


Building a Killer Home Wi-Fi Solution with Ubiquiti UniFi
Introduction
This is a post about home Wi-Fi. Specifically, my home Wi-Fi. About a year ago I moved house. Ever since then I’ve wanted to up my game when it came to wireless internet provision at home. I work from home a fair bit. I’m also a keen Smart Automation hobbyist and I firmly believe that over the next 10 years the number of Wi-Fi-connected things we’ll own is only going to go up. It’s important that there is a solid base for all these devices to operate on if they’re not to cause endless tiny and annoying problems. It’s also important (to me) that I can monitor what’s going on, what’s connecting to what, and be able to control it.
The Layout – welcome to my home
I live in the UK, in a detached 4 bedroom, brick-built 1980’s house, with a garden front and back. In the driveway is a carport for 2 cars, located at right-angles to the house and approximately 10 meters away. In the back garden are two patio decks, one near the house and the other further away. There is a garage which runs alongside part of one side of the house. I’m telling you all this because I think it helps frame the later sections, but I’m not comfortable posting images of where I live!
Existing System & Justification
In the UK there are a few different ways of getting the internet. The most popular method is Broadband and at the time we moved this was our only option. This is provided by a number of different companies, but they all actually consume the service from BT Openreach. Luckily we are in a “Superfast fibre” area. This means that Openreach runs fibre/fiber to the cabinet (FTTC), giving us total internet speeds of around 70Mbps.
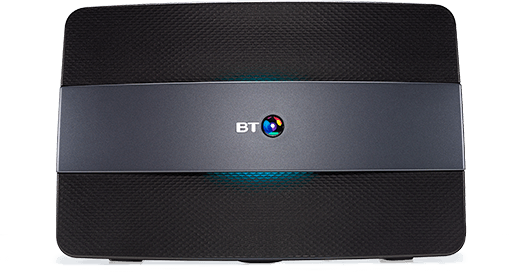
We ordered our Broadband connection direct from BT, who provide a Smart Hub. This is a classic ‘all-in-one’ wifi router:
I’m not going to comment on the Wi-Fi performance of the Smart Hub because we didn’t really use it for long enough. Almost immediately after moving in, I replaced it with one of these because I’d bought one previously:
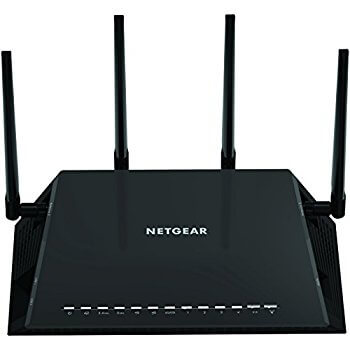
This is a Netgear Nighthawk AC2350. As a Wi-Fi router, it was absolutely fine. It was most solid router I’ve ever owned – I don’t think I ever had to reboot it. It’s Wi-Fi range and performance was commendable. I can’t really fault it for delivering on providing good Wi-Fi.
So, why change? Several reasons. Firstly, dead spots. As good as the Nighthawk is, at the end of the day it’s still a single box spraying out a Wi-Fi signal. The further away you are from it, the weaker the signal. This manifested itself most obviously at the perimeters of the property, such as when sitting in the garden, but also for things like our doorbell – the Ring Video Doorbell Pro. Because the doorbell is mounted on the outside of the property the Wi-Fi signal has to pass not only through the interior walls of the house but also through the external one. For a device that streams HD quality video, having less-than-great Wi-Fi signal was a real issue. To solve this problem you need to look at a mesh Wi-Fi solution: where you have multiple “access points” or “APs” connected via network cable, each providing a Wi-Fi signal. This isn’t Wi-Fi range extenders which are cheaper but involve creating a new, different Wi-Fi network – with a mesh Wi-Fi all the APs appear as one, big, connected network to your devices. This means you’re not constantly hopping between networks as you move around, which leads to call dropouts and other problems. I was after a more consistently fast and solid Wi-Fi experience.
Secondly, I wanted more information about what was happening on my network. How much bandwidth, relatively, was each device using. How much overall? Which devices had poor Wi-Fi signal, how could I improve that?
Finally, I wanted to fiddle and play. I’m a geek, and having lots of switches and options to play with is my idea of fun. Combined with the increased information available I wanted to tune my network for my needs, to make it the best it could be. This is the antithesis of an all-in-one solution, which is designed to be “OK” for as many people as possible and doesn’t present you with a ton of different configuration options.
Choosing Ubiquiti UniFi
I looked at several different Wi-Fi mesh solutions in my research. Unfortunately, mesh Wi-Fi in the consumer space is quite a new concept, although that is now changing and things have evolved since my decisions several months ago. For instance, BT now has its own mesh Wi-Fi solution, and so does Google.
However, I wasn’t completely convinced by these solutions. I wanted something that was proven, bulletproof and backed up by reviews and recommendations from people in the field. I started looking at more commercial solutions. What Wi-Fi solutions would a shopping mall use? What about a football stadium? What does my local pub use?
This led me to Ubiquiti, who bill themselves as “The Global Leader in Managed Wifi Solutions” with millions of shipments each year. They produce a range of different solutions, depending on your requirements. If you’re a big carrier providing last-mile connectivity or have really specific radio networking needs like point-to-point across multiple kilometers, Ubiquiti likely has a product for you. I’m not even going to attempt to try and explain what they all do as it’s way beyond what I know about Wi-Fi and networks!
Ubiquiti also has a more sensible range, called UniFi. This is a collection of products which all work together to provide commercial-grade, expandable, managed mesh Wi-Fi. It’s this range which I eventually settled on. Part of my decision making was based on their capabilities in this area – they clearly provided products which exceeded my requirements and would continue to do so as my requirements grew. They were arguably complete overkill for what I needed. That’s not really the point though, I wanted to install the best wifi I could for now and for the future.
Another big part of my decision was the Ubiquiti community. I spent a lot of time on the Ubiquiti forums to see what the general feeling was, and how useful a support resource they would be if I needed help. From all my interactions with them so far they’ve been a great asset.
Finally, a couple of blog posts by Microsoft MVP Troy Hunt tipped me into purchasing. Troy seemed to be going through a very similar provisioning process (although his house is way bigger and sunnier than mine!) and it was great to read about the steps he went through.
Planning it out
I love a good plan. 🙂
One of the first things you need to understand with UniFi is that it’s the exact opposite of an all-in-one Wi-Fi router. Each function is a separate box. Yes, you can just buy a single UniFi access point and plug it into your existing setup and you’ll get good Wi-Fi from it, but to do it properly you need to break it down into individual components.
I’m a software developer who’s spent 10 years in the industry, so I tend to think of this in a similar manner to when sys admins express a preference for maintaining a rule of “one server per function”. One server for the database, one server for the middleware, one server for the web site. It’s a model which allows for easy diagnosis of problems and supports future scale: you can choose to scale just certain parts of the puzzle individually, not all together.
When it comes to UniFi, there are several components you need to consider. In no particular order:
- Access Points (APs). These are the actual things which give out the Wi-Fi signal. One of the benefits with UniFi is that you can have as many APs as you like. For the most part they are connected to the network with Ethernet (although there are some exceptions to this rule). Being able to have as many APs as you can wire in makes you completely re-think Wi-Fi coverage. For instance, I now think about the areas of my house where people are most likely to want to use Wi-Fi and try and have an AP close by.
- Switches. This is where it gets slightly more involved. You may already have switches (or hubs). (Hubs and switches are different, but for now, just accept that switches are “better”). However, UniFi switches differ slightly from what you probably have. Firstly, they may be Power over Ethernet (PoE). What this means is that every port is also capable of powering PoE-compatible devices. By either happy coincidence or careful planning, all UniFi APs can be powered by PoE. This means that if you use a UniFi switch then you don’t have to worry about power when placing your APs. The second thing that makes UniFi switches different from normal switches is that they capture and report information back for reporting. I’ll come to reporting later, but you’ll be able to see the added layer of information this gives you. UniFi switches are definitely more expensive than “normal” switches, but if you compare the price to PoE switches there’s actually not that much difference.
- Security Gateway. UniFi’s Security Gateway serves two main purposes as far as I can see. Firstly, there are the firewall and port forwarding features. It’s hard to know how much value to put on peace of mind when it comes to security, and I’m always willing to pay a little bit more for a solid, enterprise-grade firewall. The second function the Security Gateway provides is Deep Packet Inspection. The Security Gateway will ‘look’ at each packet of data and attempt to categorise it, enabling you to see how much of your traffic is being used for Social Media, File Transfer, VoIP, Streaming Media etc. Each category is further broken down, so within the Social Media category, you can see exactly how much airtime you’re giving to Facebook, Twitter, Pinterest and the rest.
- Cloud Key. This is a computer in a small form-factor. The Cloud Key runs UniFi’s management software which you connect to in order to configure devices, administer the system and generally keep an eye on things. The Cloud Key also runs the Guest Access portal, which is a nice web page you can set up for guests to connect to your network. This is more secure than giving them your main wifi password, as it keeps them apart from all your other devices, important if (like me) all your lights, sound and security systems are on the wifi. You don’t need the Cloud Key, you can download and install the UniFi software on any machine – but unless you have a machine that’s running 24/7 and don’t want to have to remember to turn it on everytime you want to have a look at your network then it’s worth the money. The CloudKey also lets you connect remotely using Ubiquiti’s Hybrid Cloud so you don’t have to be on your network in order to administer it.
Ubiquiti make 1 Security Gateway, 1 Cloud Key, and multiple switches and APs. That at least made choosing 2 of the 4 components easy. For me, I was sure that I wanted the Security Gateway, some sort of UniFi switch, and one or more APs. I’d also decided that if I was going to go all-in with UniFi I might as well get the Cloud Key as well, in the grand scheme of things it’s not that much extra and keeps everything in the same ecosystem.
Ubiquiti do a variety of different UniFi switches, both PoE and non-PoE and with different numbers of ports. To help me decide I first had to consider how many wired devices and APs I would need, both now and in the future.
Right now there are several devices I have which are hard-wired to the network: a Phillips Hue hub, a SmartThings hub and a PC serving as a home server. I’d decided I wanted the Cloud Key, so that’s another port. And don’t forget that you need to keep one port free for the ‘incoming’ internet (or an uplink from the Security Gateway).
Why this is only Part 1
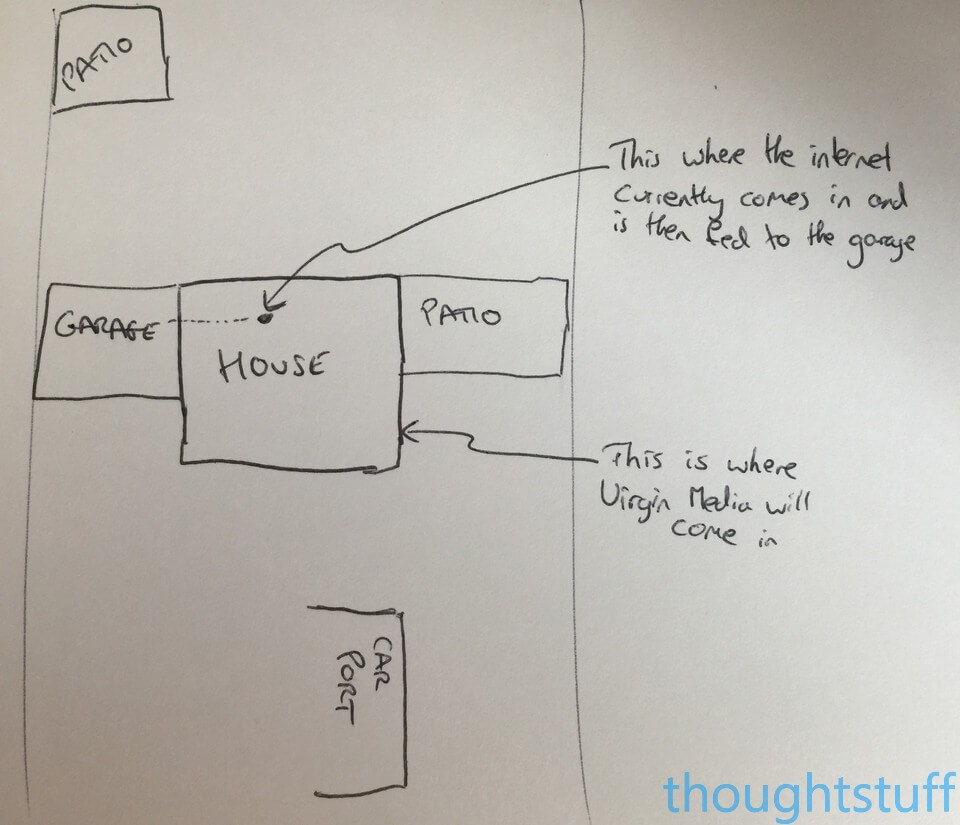
I’m actually doing my Wi-Fi installation in two parts, for annoying reasons. Basically, as of today, our internet comes into the centre of the house so it makes sense to put all the Unifi kit into the garage (where’s it out of the way and out of sight) with a single cable running from the internet provider’s router to connect it to the world. This will change in the near future because the UK’s primary cable provider, Virgin Media, has just started cabling our village. What this means is that as soon as we’re able we’ll switch our allegiances to them (70Mbps vs 300Mbps, no comparison!), but that will change where the internet comes into the house. It will come into one corner at the front, into the living room and handy for the TV but not an ideal place to put a data cabinet and a ton of equipment. I’m still working out how to solve that problem, but look out for a Part 2 once I’ve figured it out.
Choosing Access Points
UniFi make a number of different access points depending on your requirements, but most installations will probably include one or more of the general-purpose circular “dish” types of access point:
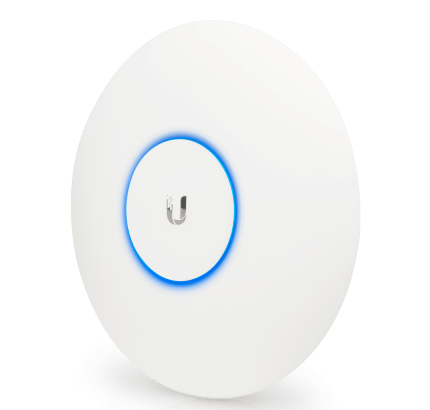
There are a few different models. After looking through them all I settled on the UAP-AC-PRO. I didn’t need the long-distance range of the UAP-AC-LR, but I did want the maximum possible WiFi speeds, including at 5GHz. Each Unifi product page has a handy model comparison chart so you can see how it stacks up against the others. The plan is to put this AP in the loft where it can provide good signal to every upstairs room, and additionally provide adequate but not great signal to the downstairs, garden, deck and garage area. This is good enough for Part 1, and is one of the nice side-effects of over-provisioning hardware. My chosen AP for upstairs is good enough to keep the downstairs covered until I can do it properly.
Downstairs, rather than install another AP in the ceiling (which I didn’t really want to do) I had a different plan, in the form of the UAP-IW-AP:

This is a flush-wall-mounted AP, designed to provide really good WiFi to a single room. In an ideal world I’d have one of these in every room! There is actually a Pro version of this, which gives throughput of 450Mbps at 2.4GHz and 1300Mbps at 5Ghz, but in the end I settled for the ‘regular’ version which gives 300Mbps at 2.4Ghz and 867 at 5Ghz. Remember, this is maximum speed per room(!). Given that the Pro version is twice the price I just didn’t think there would ever be enough people simultaneously connecting to a room AP to justify the extra speed.
Eventually, I will try and put the UAP-IW-APs in more downstairs rooms. However, for Part 1 I was considering adding just one. The issue was forced because we decided to decorate our conservatory, which meant new wallpaper, so if I wanted to wall-mount an AP then now was the time!
Choosing Switches
For Part 1, after counting up all the networked devices I settled on the US-8-150W. This is a 8-port POE switch, meaning I didn’t need to provide power to any of the APs. It’s worth remembering that you can continue to use any existing switches you have by plugging them into a Unifi switch for devices that don’t require POE. It’ll all work fine, but you won’t get quite the same level of detail in the Unifi dashboard at a switch port level – all the traffic for the second switch will be aggregated into a single set of statistics.
Putting it all Together on Paper
Here’s how it all goes together:
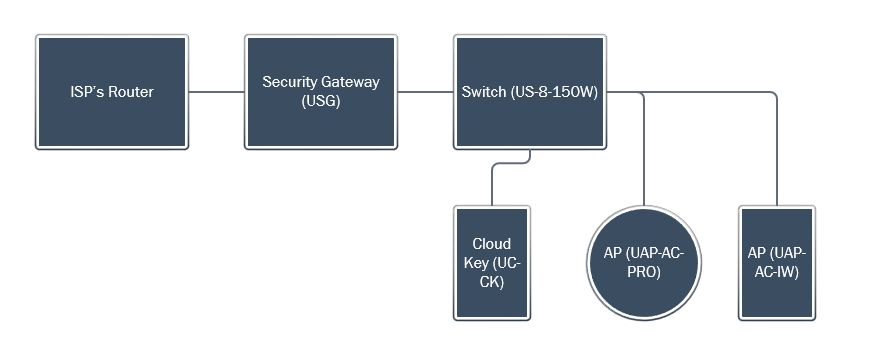
Each of the “lines” is an Ethernet cable. The switch has 8 ports so there is plenty of room for other devices that require ports, and room for expansion.
In non-technical terms, the internet comes into the ISP’s router like normal, but I’ve disabled the Wi-Fi on it. The only thing plugged into it is the Security Gateway, so all internet traffic has to go through that to keep out all the bad stuff. “Clean” internet then goes to the switch, and from there is distributed out to the different APs which provide the Wi-Fi signal. The Cloud Key is also plugged into the switch for management.
Here’s the same diagram, laid out more geographically:

This shows where everything will be placed. I bought a cabinet for everything in the garage, to keep it safe and clean. The router will stay where it currently is in the study. I could have routed a telephone cable and moved it into the garage as well, and if we were going to keep it then I would have, but Part 1 is something of a temporary solution so I’m happy to leave it for now.
Right, that’s all the planning sorted. Let’s order everything and get it set up!
Buying & Unboxing

I used two suppliers, mostly to get around stock issues and some odd differences in pricing (it’s worth looking around a bit). The majority of the kit came from MS Distribution in the UK, who were fast & reliable. They use APC as their carrier in the UK. They will also ship internationally using TNT but they’re flexible; if you want to arrange your own carrier for pickup they’re quite happy with this. The other supplier I used was EURO DK via Amazon. They’re actually based in Latvia and are the official Ubiquiti distributor there. Again, they were also fast & reliable. I’d have no concerns using either company again and expect I will in the future.
As I unboxed each item I recorded some videos. One of the reasons for this is that I struggled to find good information on the internet about exactly what was included with each item, how it should be mounted, and whether I’d need additional equipment or tools. Hopefully, these videos help answer some of those questions.
Access Points
Switch
Security Gateway
Cloud Key
Installation
Mounting APs
I don’t like technology that’s on show just for the sake of it. Focus on the user experience, let the technology get out of the way. It amuses me when I’m at other people’s houses and their WiFi router has pride of place on a shelf, or next to the TV. Why is it there? Is it aesthetically pleasing to you? Get it out of the way! I don’t much like cables either. That’s one advantage of PoE APs – only one cable to worry about.
This mentality meant that although I knew the large, dish-like APs that Ubiquiti are famous for were excellent at delivering WiFi, I was equally sure that I didn’t want them on display. For the upstairs AP I made the decision to mount it in the loft. There’s actually a perfect little square of loft where an old access hatch used to be that’s not well boarded and where the plasterboard is just covered with a little bit of insulation. I simply laid the AP on top of it:
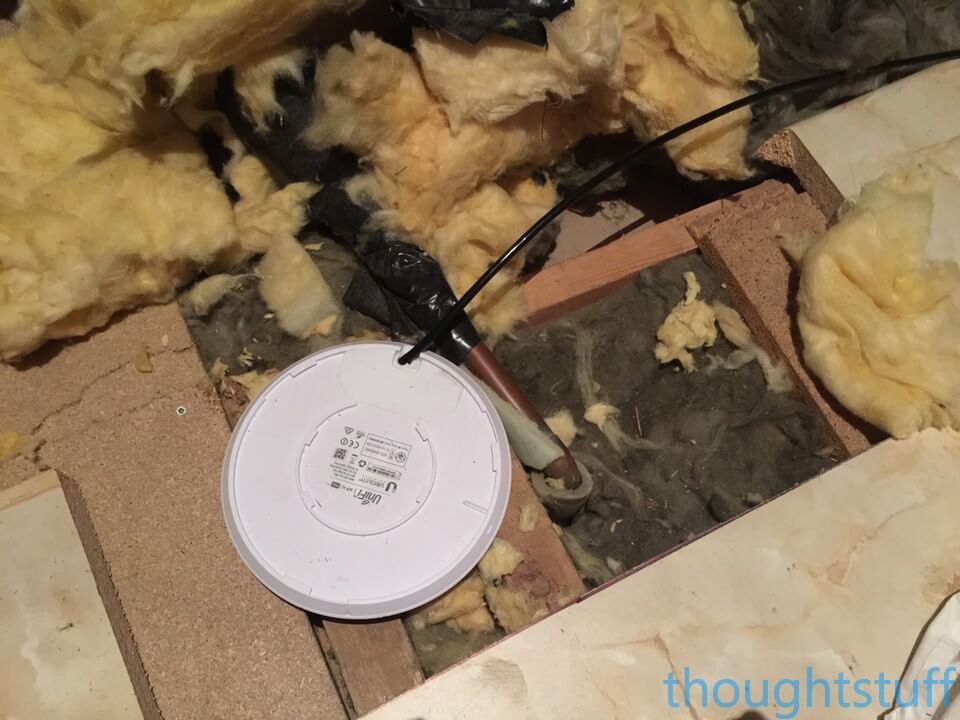
What I’m not 100% sure about is whether it’ll get too hot there or not (edit: it’s been in place for 3 months now and it’s been just fine), but having it there puts it in the centre of the house and gives great coverage to all of upstairs, most of downstairs and quite a lot of the garden too! Plus, it’s almost no visible cables! In order to get an internet cable from the garage to the loft, I drilled a small hole in the soffit and fed the cable out onto the outside of the house, as close to where the garage meets the house as I could. The cable then goes from there into the garage. You can see it from the outside of the house, but only if you’re looking for it – I would guess it’s around 5ft of exposed cable total. I used outdoor-rated burial cable to give the best chance of success exposed to the elements.
With the AP in the conservatory I knew that I couldn’t completely hide it but making it look like a regular piece of the house is the next best thing. I’m impressed with how nicely the in-wall APs look in a residential setting:
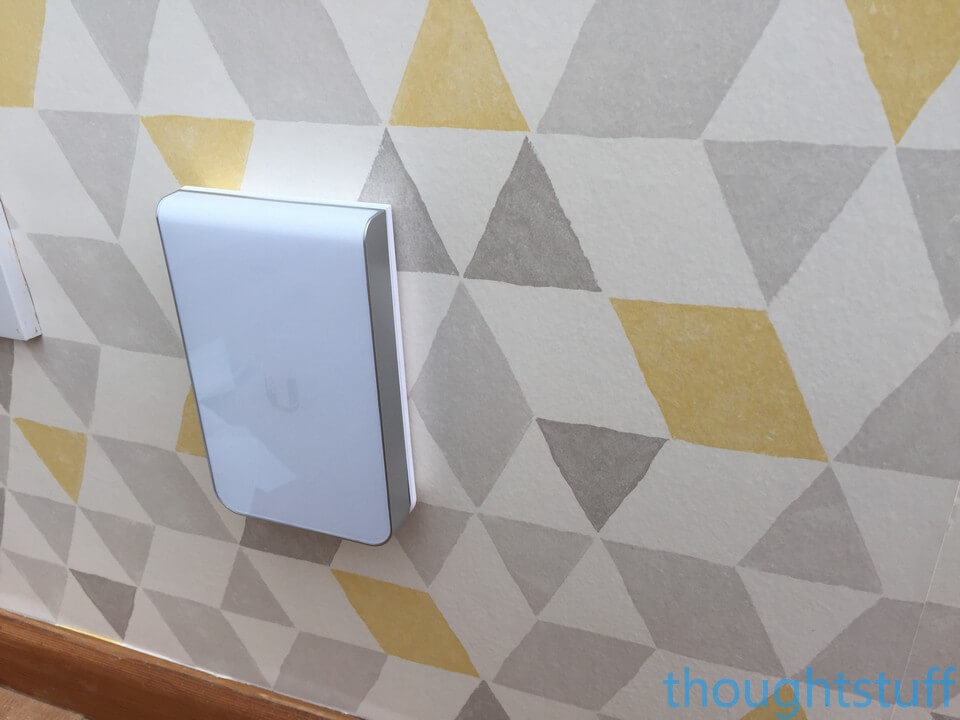
You actually can’t see it at all now that we’ve furnished the room – it’s behind a shelving unit. If you’re worried about how much it protrudes out though, don’t be. It’s no worse than a UK/US socket. Hopefully, this picture shows that: this is me looking down behind the shelving unit (excuse the dust!):
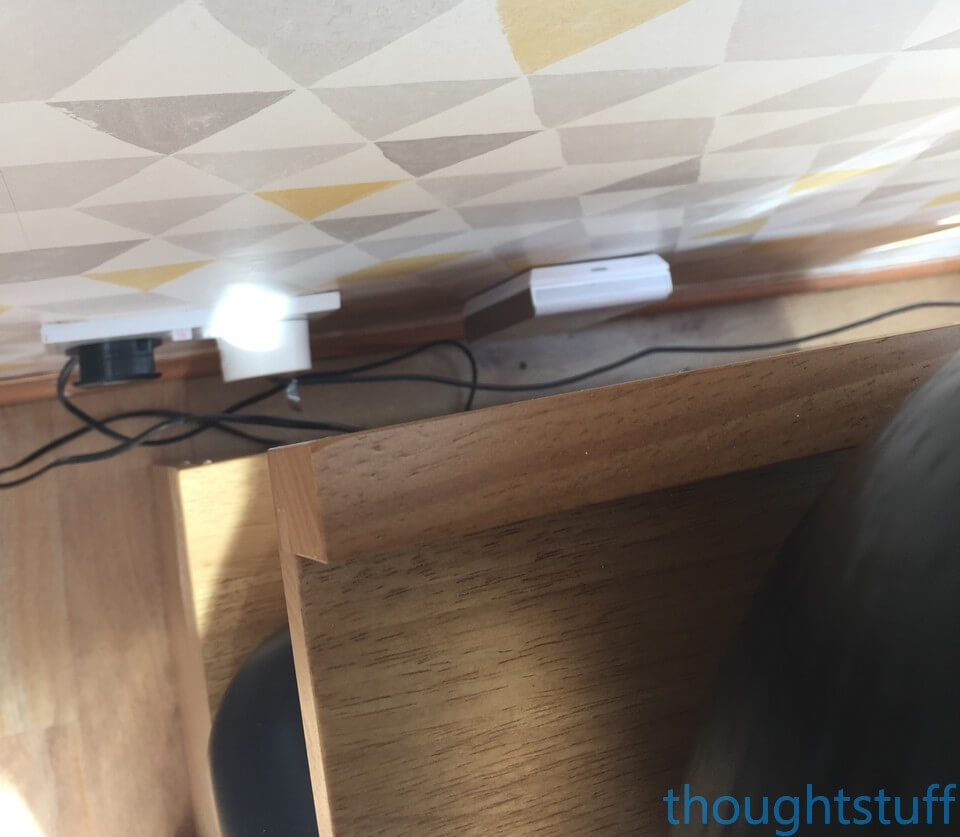
The Ethernet cable comes from the garage and straight through the wall to supply the unit. By the way, if you want more information and pictures of mounting this AP, go to my first-look blog post where I cover all the drilling, mounting etc.
Putting it all together & switching it on
I connected everything together as in the diagram above, then turned everything on. Every UniFi device has an LED on it. When everything is setup and working normally the LED is blue. The LED can also be white, which indicates it’s either initializing or in setup mode:
White Flashing: Initialising
White Steady: Ready to be setup
White/Blue Alternating: Device busy, do not unplug.
Blue Steady: Device is working normally
Blue Flashing: Locate mode. From the Dashboard you can choose to ‘locate’ a device which will cause it to flash.
So, on first setup, after initialising, everything settles into setup mode, with steady white LEDs. This is how it looked, everything in situ in the garage rafters where I’d installed the cabinet, complete with a traditional UK cup of tea:
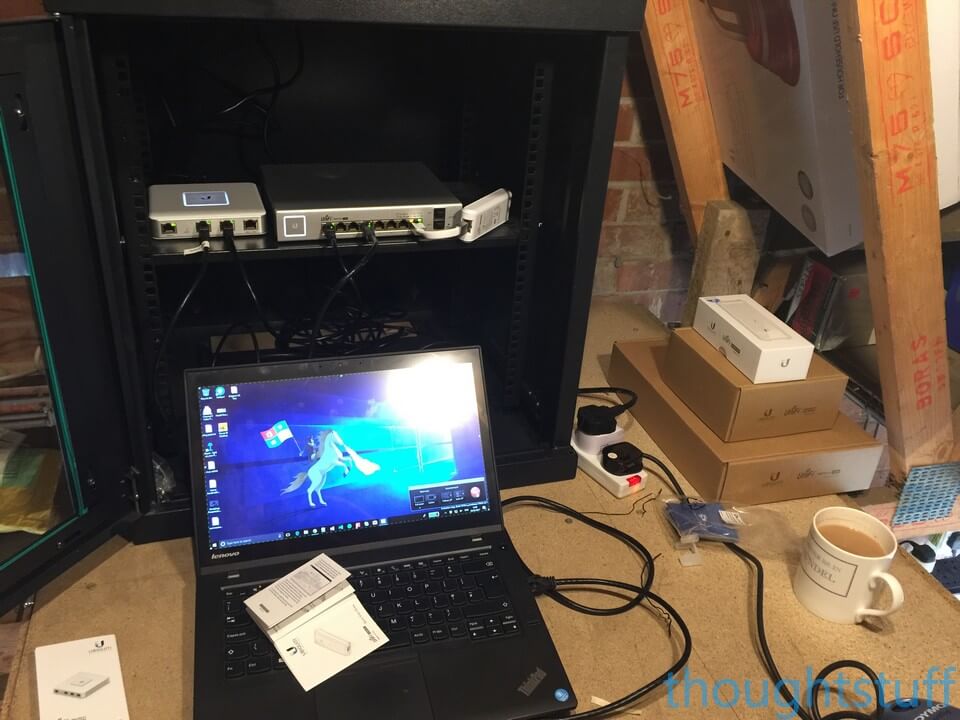
On the shelf in the cabinet is (from left to right) the Security Gateway, the switch, and the Cloud Key. I know, it’s pretty untidy. Hopefully, once everything is installed and settles down I’ll be able to make some of that better.
Setup
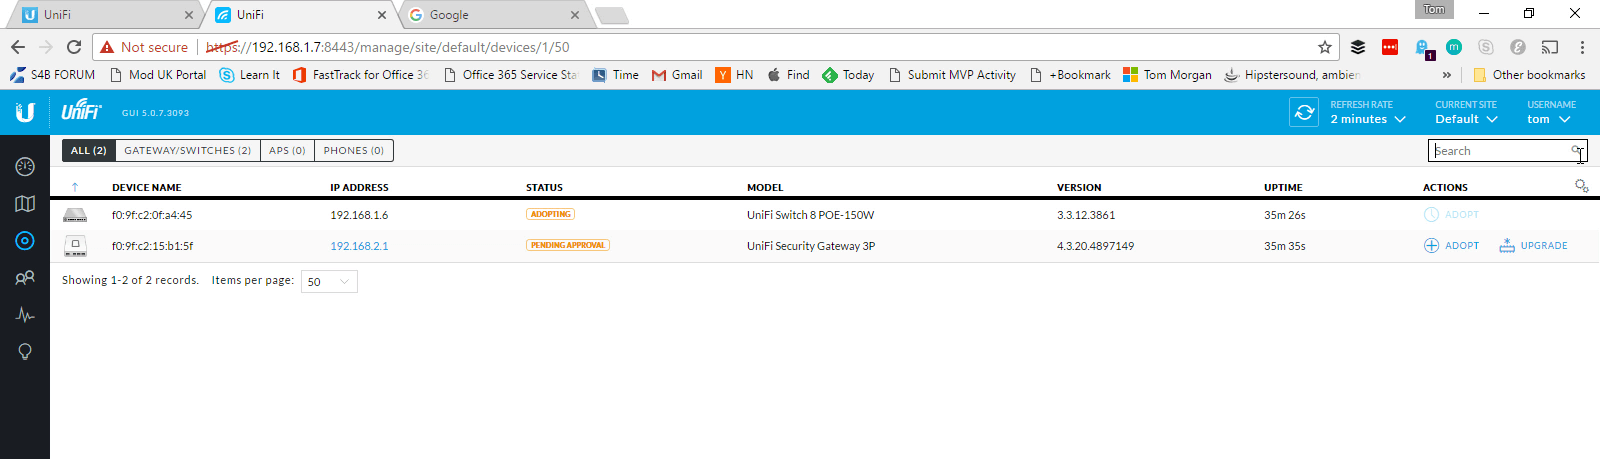
The setup process was surprisingly straightforward. The user guide gave me the address and credentials to connect to the Cloud Key. The Cloud Key already had all the UniFi software installed on it and took me straight to the Dashboard. I started off with just the Switch and Security Gateway connected. New devices show up initially as ‘Pending Adoption’ which means they’ve been found on the network but haven’t been setup yet. Clicking the ‘Adopt’ button officially adds them into the system, changing their status to ‘Pending Adoption’ during the setup process, as shown below:
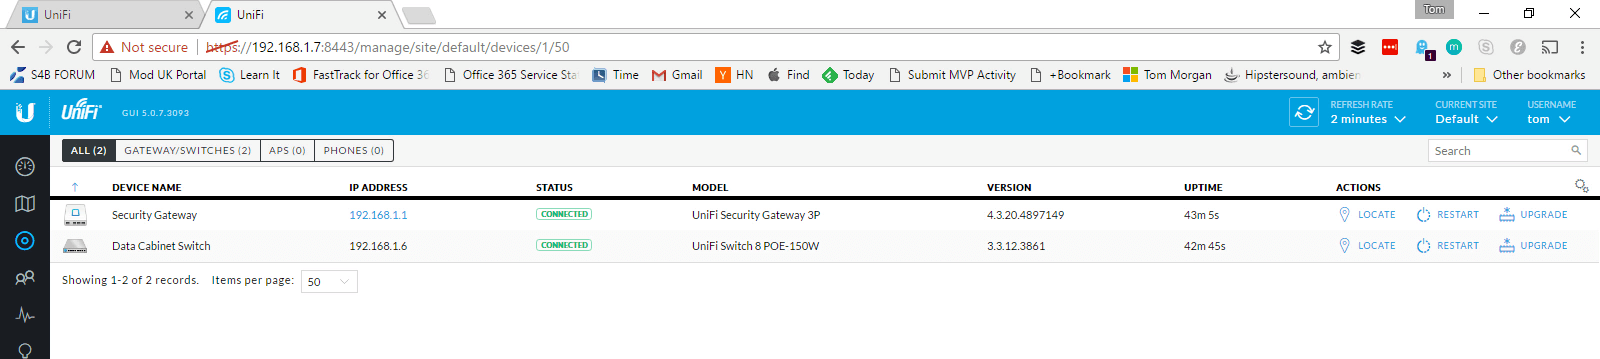
Once adoption is finished the status changes to ‘Connected’ in green, so you know everything is good:
The same process happens for the access points.
Once everything is adopted and connected then you have some options. You can either leave everything as it is and let the UniFi software manage your Wi-Fi. You don’t actually need to do anything else. Of course, if you want to then you can change the radio strength and frequency of each AP, add firewall rules, setup your Guest Access portal and a million other things that come with having a commercial-grade Wi-Fi installation.
You can also configure your Cloud Key so that you can access it from anywhere in the world, as long as you have an internet connection. This is great for remote troubleshooting when away, or just for keeping an eye on things.
The only gotcha I encountered was with IP address ranges. My ISPs router by default provides addresses in the 192.168.x.x range, which is also the default for the Security Gateway. Having both systems on the same range, even with separate subnets, was causing issues. I switched over my ISP to use 10.0.x.x instead, turned off DHCP there and everything was fine.
2 Months later…
Around 2 months after installing everything I decided to add another AP… in the garden! Remember, the only AP I had downstairs was in the conservatory at this point. It turns out that Wi-Fi signal downstairs was absolutely fine, with devices using either the AP in the loft or in the conservatory. However, outside, on the patio (deck) which is a little way away from the house, Wi-Fi signal was OK..ish. It wasn’t perfect, and devices would sometimes fall off. Using the Dashboard I could see that devices were connecting to the Loft AP, which was actually quite a long way away. I was impressed that it was connecting at all, and not that surprised that the signal wasn’t 100%. Anyway, we needed to run some other cables under the ground between the house and the patio so I decided to add some Ethernet cable as well and install an AP down in the garden. Summer was coming and I wanted to work outside!
Ubiquiti makes a UniFi AP designed to be mounted outside, the UAP-AC-M. It’s surprisingly small and discrete, and gives 300Mbps at 2.4GHz and 867 Mbps at 5Ghz:

It’s PoE so the only cable you need to run outside is the Ethernet one, and there’s a waterproof enclosed socket it connects into. Again, there is a Pro version which gives better throughput speeds, but again I didn’t think it was worth it for my requirements. I now get amazing Wi-Fi speeds when working outside. Plus it means I can tweet pictures like this:
Ooh yeah, this is how you wifi: test speeds from the bottom of my garden on the patio deck. Thanks @ubnt 👍 pic.twitter.com/GEwG5Gxcdl
— Tom Morgan (@tomorgan) July 13, 2017
Usage, Stats, Guest Portal etc
Several months of usage has also given me an appreciation for the UniFi software. I’m not going to be able to give you a comprehensive overview of all the information you can access, but it’s given me insights into how we use our network that I’ve never been able to get before. Basically, anything you want to find out you can.
The Dashboard presents data to you in two ways. By default, it’ll show basic summary data. Let’s take a quick example: a specific AP – the one in the loft. By going to the devices summary page you can quickly see that the AP is connected and doing OK:

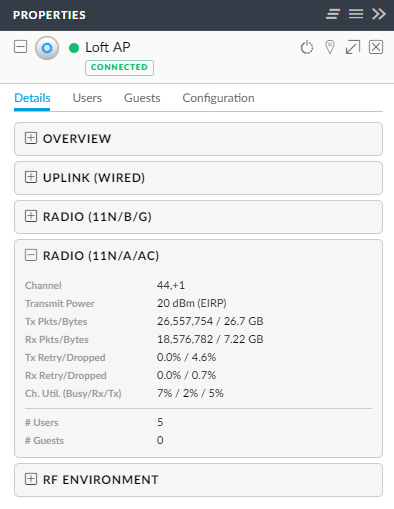
However, when you select a device a Properties pane opens on the right-hand side with loads more information. Here’s just a snapshot of one of the expandable sections, showing radio transmission details:
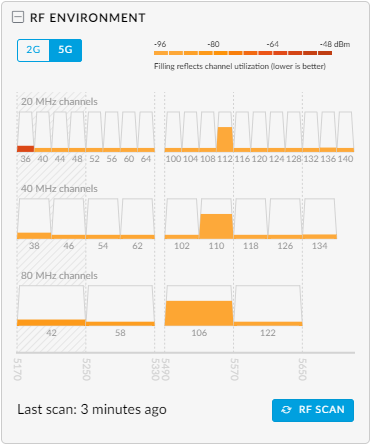
Did I mention that each individual AP is also able to scan its local environment for competing WiFi signals so that it can pick channels most likely to succeed? Each AP can use different channel configurations depending on their own scan results. Here’s what the RF Environment looks like for that AP:
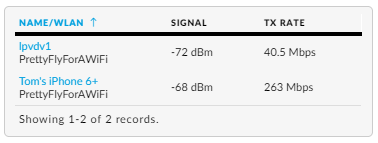
I can also get a list of everything that’s connected to just that AP, including their signal strength and transmission speeds:
I could go on, there’s loads of information. And, if you’re deeply technical, know what you’re doing and want to really roll-up your sleeves…
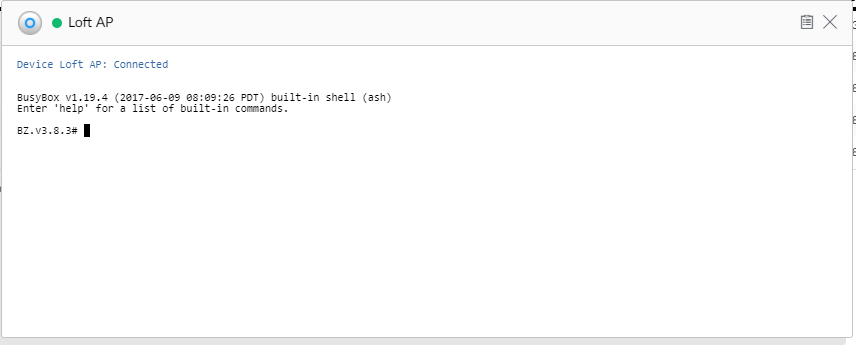
Yep, that’s a shell window for an AP, accessed via my browser!
Here are some other screenshots, showing off some other features:
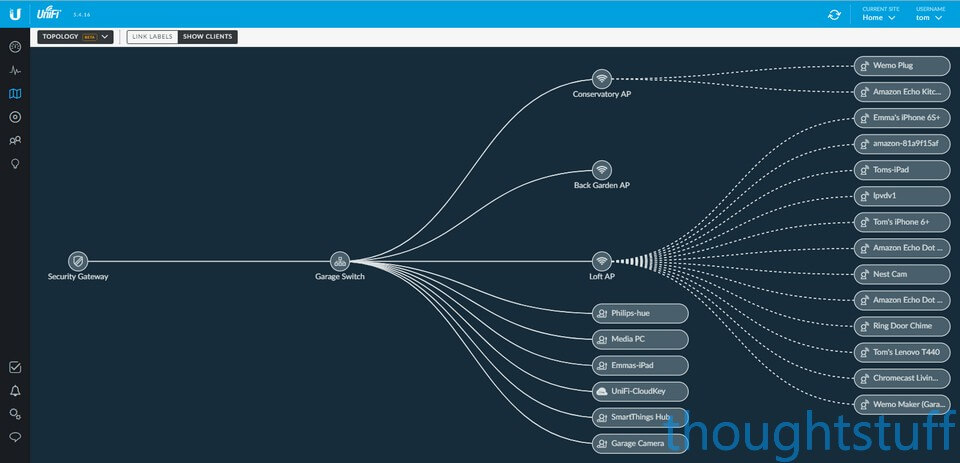
This is a nice topology map, showing how devices are connected on the network, solid lines for Ethernet, dotted line for Wi-Fi.
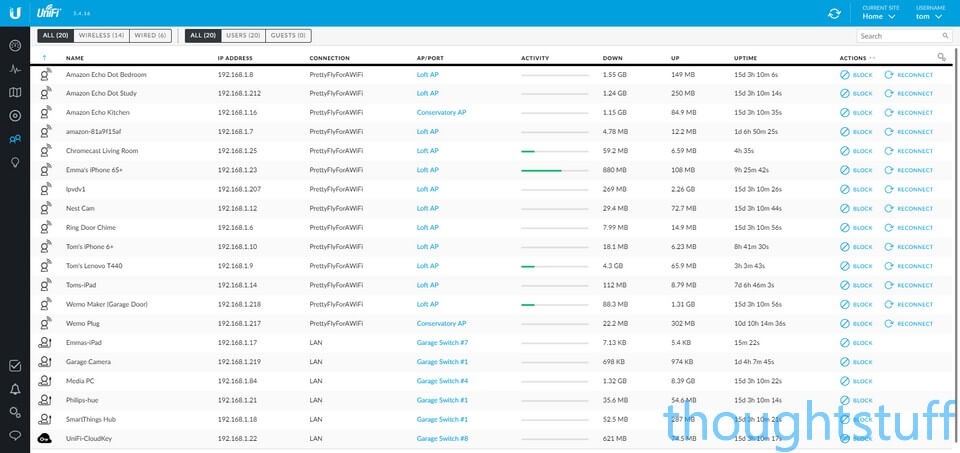
You can provide an alias to each device, and you totally should because then you’ll get better information back about usage, where it’s connected, how good a signal it’s getting etc.
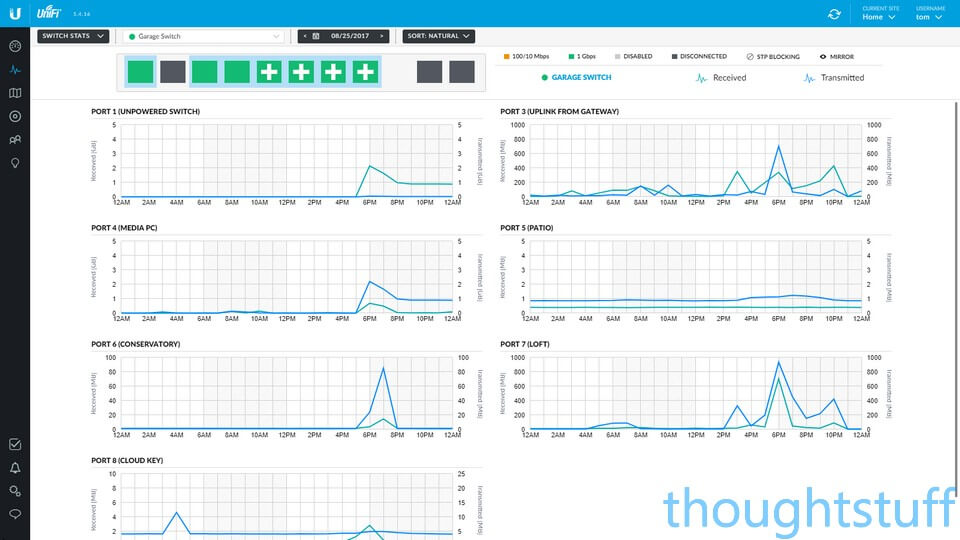
Because the switch is a UniFi switch you get really detailed information about each port, which can be useful in diagnosing/finding problems, monitoring health, or just showing off.
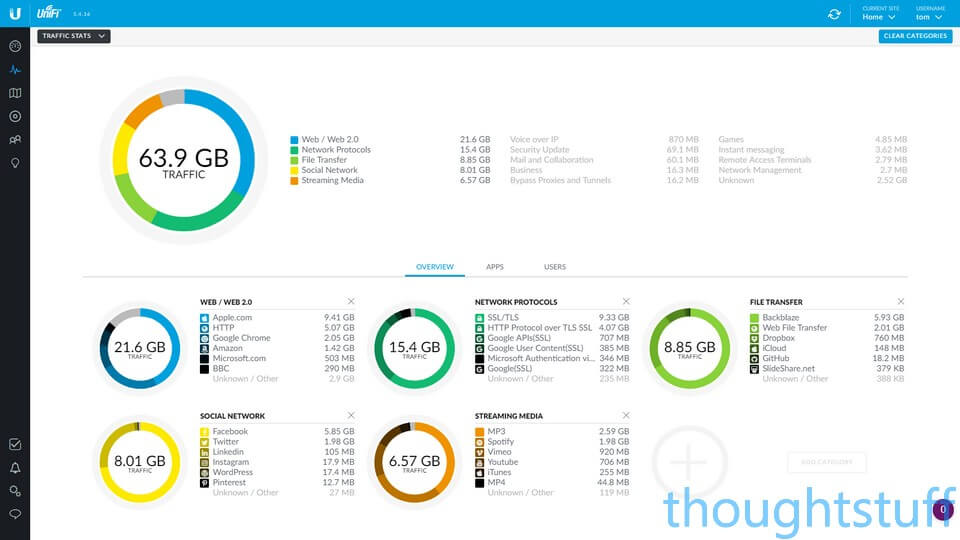
The Security Gateway conducts Deep Packet Inspection, which gives you some really detailed information about what’s happening on your network.
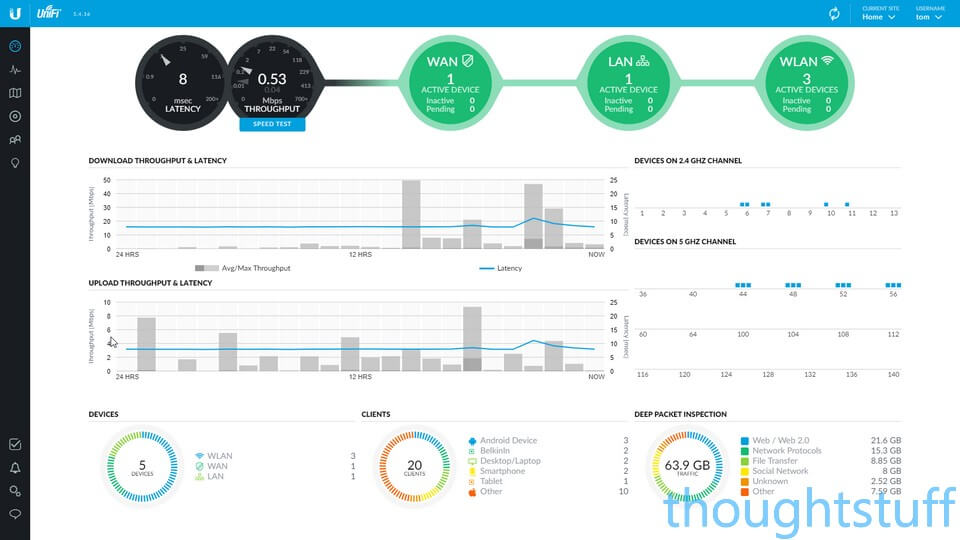
This is the all-up Dashboard view, giving you an immediate picture of throughput and latency, as well as a map of devices on each channel, so you can easily see if Wi-Fi is getting saturated.
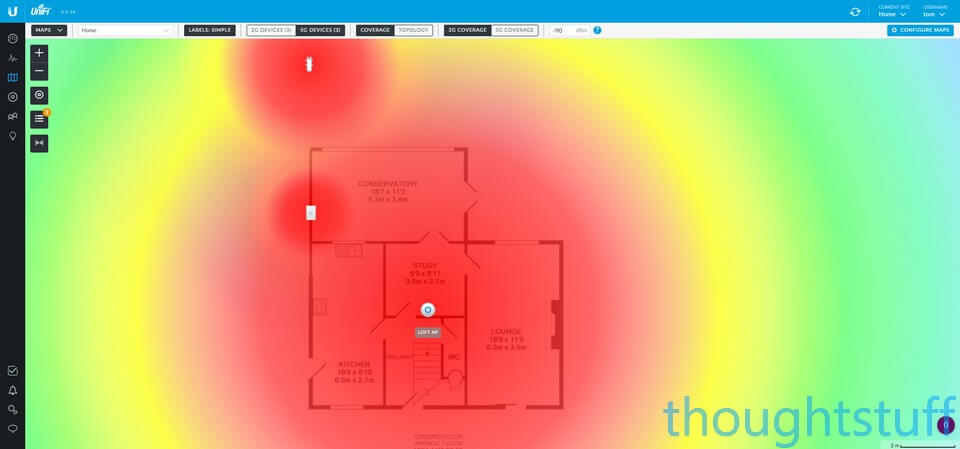
One of the cooler features: provide a map of your house, place your devices onto it and get an approximation of coverage.
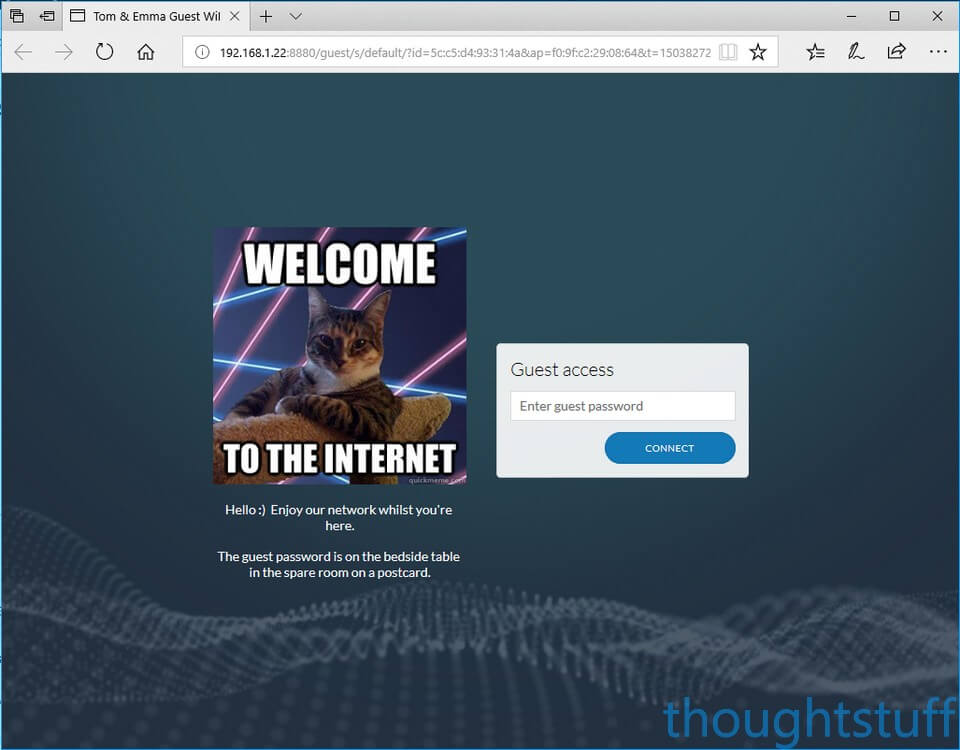
Our guest Wi-Fi is cooler than your guest Wi-Fi!
What’s Next
I still want to add more of the single-room UAP-IW-AP APs to the downstairs rooms to improve the coverage there. One of the things with a project like this is that it’s easy to get consumed with achieving absolute perfection and I’m now on a mission to get great 5GHz everywhere I can! And, maybe another outside mesh AP at the front of the house…
The biggest change that I’m planning now though is the change in ISP and the new location of the cable. Because of where the cable comes into the house I’ve got some cabling work to do to join everything together. I don’t particularly like cable being on show so that increases how complicated a project it’s going to be! I’ll make sure I keep notes, take photos and blog about Part 2 once it’s happened. I’m also looking at network video cameras to augment the home security setup I already have. I still have lots of research to do but I’ve already noticed that Ubiquiti have a range of video cameras so that’s potentially interesting.
In the meantime, I’m loving my Part 1 setup. If you have any questions I haven’t answered already feel free to reach out on Twitter and I’ll do my best.
More Information & Resources
My YouTube video series of all the Ubiquiti kit I have
Troy Hunt’s UniFi blog post
New UniFi video introduction series
UniFi Wireless Forum – a great place to lurk and pick up setup and configuration tips from professionals doing this all day long

Written by Tom Morgan
 Tom is a Microsoft Teams Platform developer and Microsoft MVP who has been blogging for over a decade. Find out more.
Hello,
Great write up. Did you disable the firewall on the Router and let the security gateway handle all the firewall requirements?
Thanks! I should do really because the gateway would happily handle all incoming traffic just fine. In reality, I actually left it on. In my head, it’s better to have two firewalls. I’m not certain if that’s actually good advice though, or whether it introduces unnecessary slowness. I didn’t want to mention it because I wasn’t confident of the answer and didn’t want to be dishing out bad advice.
-tom
Wonderful, very well written.
Hi Tom! Awesome writeup! 🙂
I’m facing a bit of problems myself with my AP-AC Pro. I can’t get the coverage I need and I was considering buying another on (or maybe a LITE og LR model??) to extend the network.
My problem is, that I live in a 2-level house. I have no ethernet cables upstairs 🙁 Downstairs I have my AP-AC Pro and upstairs I have…. nothing… Do you know if the AP-AC Pro functions as a MESH device (I think Ubiquiti calls it “hand-off”) so that users won’t feel the switch when jumping from one AP to another…?
Which device would you advice me to get in order to simply make the WIFI reception better in my upstairs level of my house?
(I don’t have the Security Gateway or PoE switch or Cloud Controller, but after seeing your setup I consider it) 🙂 I look forward to your advice.
Any particular reason you went with the USG and the PoE switch rather than just the Edgerouter PoE?
Hey Tom, Im looking to install Ubiquiti in my house. I had a bit for $500 configuration. I was reading your post and sounds like easy. Do I need to pay this $500 configuration??
Nice solution. I use Unifi at home as well (and at a few other places I manage). You should note that Ubnt makes two Unifi Security Gateways: the small one that you have, and a rackmountable Pro version. Also, the faster Wifi speeds of the AP AC Pro are only available to the relatively few devices that have 3×3 MIMO radios – some MacBooks and maybe some higher-end Windows machines, mainly.
ah, you’ll be double Nat’ing having both the ISP router and the USG, which isn’t a good idea – Look at getting an old BT openreach modem or something modern like the Vigor 130 and running it in bridge/modem mode – Then the USG acts as your router & does all the security
Great write up, just out of interest have you now had Virgin media installed, as i would be very much be interested in how you are now using your system with the Virgin router, i have just moved into a new property with Virgin and want to put together a Ubiquiti solution.
Any update would be great.
Did I miss something, did you get rid of your nighthawk? I thought you needed that as the main router & then connect that to all the access points? Or what are you using?
I did get rid of it.. once I moved everything over to Ubiquiti I figured that using the nighthawk as just a wired router was overkill, so I went back to using the default ISP-provided one. The wifi on it is turned off, and there’s a single network cable that runs from it into the Security Gateway.
still waiting for VM to get installed here. :/
This post is really a helpful post but I prefer Linksys router for the wifi connection because to establish the connection with links is really easy.
Nice set of articles! I’m just about to revamp my home network so am interested in the Ubiquiti kit for its neat management software.
You can (and should) turn your Virgin Superhub (it is rather misnamed…) into a dumb modem or what the modem’s web UI calls “bridge” mode, to avoid double NAT.
Virgin explain how to do this, and it is very easy and supported. There’s no need to throw more hardware at it!
What an awesome & thorough analysis. Thanks for the time it took to post this.
Love this project, just found it after thinking about a managed switch and an AP. My broadband comes into the house through the front wall straight into the lounge, then through a phoneline-esque cable to my BT Homehub5.
Would love to go for a big switch and a couple of AP’s but having it all visible wont be great. Have you started adding extra cable to yours yet? Wondering how easy a rack in the attic would be?
Yes I did! – https://blog.thoughtstuff.co.uk/2018/04/building-a-killer-home-wi-fi-solution-with-ubiquiti-unifi-part-2/
And a rack in the attic is exactly what I did 🙂
Hello. I’m curious to know how the loft AP has managed with the heat in the summer after you installed in 2017?
and also, how much do think the signal is impacted by sitting it above the ceiling?
It’s all fine so far… 🙂
Thanks for posting the article, it’s really helpful.
very nice post thanks for sharing this amazing post
Thanks for this amazing article !
Thanks for sharing the most important information I am so glad to visit this blog. we provide technical support. If you need any issues regarding orbilogin Routers visit our website.