


How to: Use Microsoft Flow, Azure and PowerBI to capture and display Tweet sentiment analysis & key phrases
Following my Future Decoded talk a few weeks ago on using Cognitive Services to solve real-world problems, I’ve had a few questions asking me for more detail about the Flow setup, and what the PowerBI process is. Rather than reply individually, I thought I’d take the opportunity to turn it into a how-to post.
Microsoft Cognitive Services
We’re going to be using 2 separate Cognitive Services in this blog post:
- Content Moderator API – this API can detect offensive language and personally identifiable information in text, and offensive content in images & video.
- Text Analytics API – this API can detect the language of a given piece of text, extract the key phrases from it, and determine whether the text has a positive or negative sentiment.
What we’re going to build
In case you weren’t at the talk, I demo’d using a mixture of Cognitive Services, Flow and PowerBI to take all tweets from the event with a specific hashtag, analyse the text of the tweet to understand whether the tweet was generally positive or negative, and pull out key phrases. I then displayed that using PowerBI visuals. Here’s a sample:
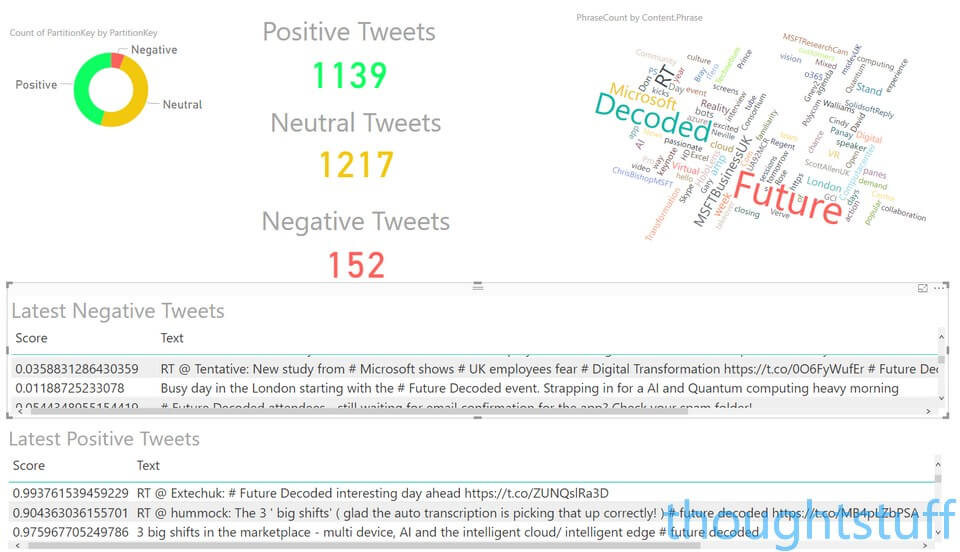
This is a snapshot of #FutureDecoded tweets, placed into 3 buckets based on the calculated sentiment of the tweet, and highlighting the most positive and negative ones. This would be useful for anyone who has to process large numbers of tweets and act on just some of them quickly, such as customer care, events etc. In our case, you can see that they’re overwhelmingly Positive or Neutrally rated (I’ll go into detail later about what that means). It’s interesting to look through the “negative” ones because it pulls out sentences where the AI has scored disproportionately (for instance, “employees fear Digitial Transformation” will result in a negative rating) – which is a good example that the AI will give you a score, and it’s up to you to interpret that score how you will.
All this is built without really writing any code, meaning you don’t have to be a developer to try this out!
Step 1 – Create Flow
If you haven’t already, go to flow.microsoft.com and have a look around. There are hundreds of templates for creating all sorts of Flows or you can create your own from scratch and then add Actions and Conditions to control behavior. It’s a really interesting way of ‘gluing’ together different components that doesn’t require coding skills.
Because our Flow is going to involve analysing different Tweets, you might be tempted to create a new Flow and then add a Condition using the Twitter Connector. However, if you do that then you’ll only be able to have access to a Condition called When a new tweet is posted. This does let you specify a hashtag, but it only fires when YOU tweet with that hashtag. That’s not so useful when we want to analyse all the tweets with a specific hashtag:

There is another type of Twitter Condition though, which will get ALL tweets with a hashtag, but it’s not so easily accessible. In fact, it’s not shown as an option anywhere. However, if we create a new Flow based on a Microsoft-provided template then the Condition will be included as part of that so we can re-use it. Hat-tip to Jonathan McKinney for telling me about this neat trick!
To do this, choose Create from template and pick one that begins with a Twitter action, such as this one that saves tweets to an Excel file. Click Continue to create a new Flow and you’ll notice that the Twitter Condition has a subtly different title:
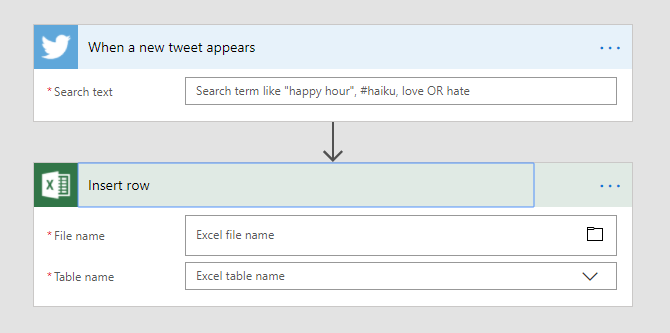
We’ll keep this Twitter Condition as it fires for every matching tweet. Fill in whatever term you’re interested in, such as a hashtag or key phrase. We can also delete the Excel Action as we’re not interested in that – do this by clicking the ellipses on the right hand side and choosing Delete.
Step 2 – They said what?!
Now we have a Flow that will run every time a tweet is posted that we care about. We know that we want to detect the sentiment and get the key phrases, so we can display them. However, there’s something we might want to consider first – and that’s filtering out tweets with rude words! There’s nothing worse than showing an auto-generated tag cloud of key phrases to your boss and suddenly realising that some trending profanity has made the cut!
Luckily, there’s a Cognitive Service to help you out – the Content Moderator service. This service can detect offensive image, video or text and also highlight possibly personally identifiable information (PII) in text. We’re going to use it to alert us to potentially offensive text.
To do this, we need to create a Content Moderator API resource in Azure and then use the access keys in Flow. Navigate to https://portal.azure.com/#create/Microsoft.CognitiveServicesContentModerator, and fill in the Name and Resource Group. For the Pricing Tier you can review the options but the Free tier should be fine unless you are processing more than 1 tweet a second. Choose West US for the location as this works best (only?) with Flow.
Once you’ve created the resource, navigate to it, select Keys and copy one of the keys.
Back in Flow, click the ‘New Step’ button and then ‘Add an action’. In the search box type Content Moderator, and then in the Actions list, choose Content Moderator – Detect profanity and match against custom and shared blacklists

You’ll be asked for a Connection Name and API Key. Enter the name of the connection you created in Azure and paste in the Key from Azure. Leave the Site URL blank (so that it defaults to the West US one)
Once you’ve done that you’ll be asked for more information the text to scan. For this example, I’m going to assume that all the Tweets are in English. This is obviously an oversimplification but for the purposes of identifying profanity, it’s OK for me. Set the Content Type to text/plain, and click into the Text Content box. When you do you’ll see the Dynamic Content window appear.

This lets you add placeholders for any piece of text, image or other content generated by any Flow items that appeared previously. Notice how the Twitter item has lots of different pieces of information you can access. Choose the Tweet Text item and it’ll be added as the Text Content. Now, for every tweet, the text of that tweet will be used.

What actually happens with the Content Moderator Flow item is that the text of the tweet is analyzed, and a list of profanity words is built up. We actually don’t care about the contents of this list, we only care if it exists or not. If it exists then we know there were some bad words in the tweet. If it doesn’t exist, then we know the tweet was probably cuss-free.
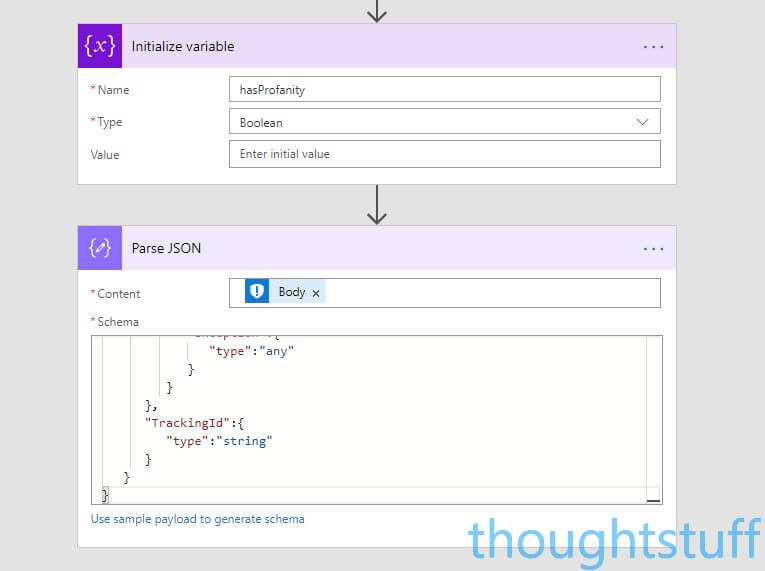
The easiest way for us to reference this information later on is to create a variable and set it to true for profanity. To do this, click New Step, Add an Action and search for Variables. Choose Variables – Initialize variable. Set the Name to hasProfanity and the Type to Boolean.
The information that comes back from the Content Moderator Flow has a number of pieces of information you can access easily…but profanity terms isn’t one of them. However, it’s possible to access the JSON response body returned from the API which contains everything – including the profanity terms. To pull that data out so that we can use it, we’re going to use another Action, which takes JSON and converts it to Dynamic Content terms we can use.
New Step, Add an Action and search for Data Operations, choose Data Operations – Parse JSON. Click Content and then add the Body tag from the ‘Detect profanity and match against custom and shared blacklists’ section of the Dynamic Content. We need to provide the JSON schema so we can resolve it into Dynamic Terms. I’ve helpfully created the JSON schema for the Content Moderator API for you below, so copy this and paste into the Schema box:
{
   "type":"object",
   "properties":{
      "OriginalText":{
         "type":"string"
      },
      "NormalizedText":{
         "type":"string"
      },
      "AutoCorrectedText":{
         "type":"string"
      },
      "Misrepresentation":{
         "type":"any"
      },
      "Language":{
         "type":"string"
      },
      "Terms":{
         "type":[
            "array",
            "null"
         ]
      },
      "Status":{
         "type":"object",
         "properties":{
            "Code":{
               "type":"number"
            },
            "Description":{
               "type":"string"
            },
            "Exception":{
               "type":"any"
            }
         }
      },
      "TrackingId":{
         "type":"string"
      }
   }
}
Now that we’ve done that, we can look at Terms to see if there are any items in it. This is the first time we’re doing something different depending on a piece of data, and it’s one of the things that makes Flow powerful.
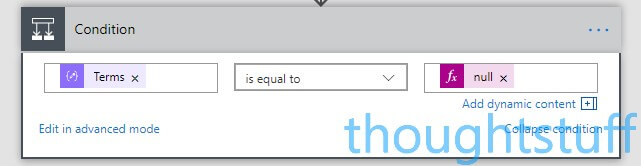
Click New step, Add a condition then scroll down until you find Terms in the ‘Parse JSON’ section. Annoyingly, because Terms isn’t of a type that’s instantly recognised by Flow the UI doesn’t assist us much here, so here’s what I’ve found works. Firstly, choose AutoCorrectText as the Condition. (We don’t care about this value, and we’ll change it later). Change the middle part to ‘is equal to’ and on the right-hand section, choose the Expression tab and type “null”. It should look like this:
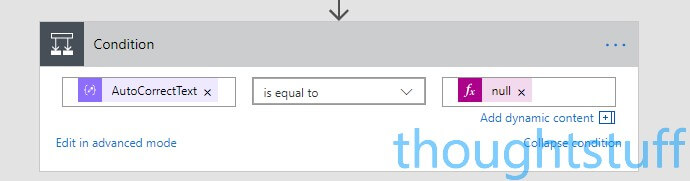
Now, click ‘Edit in advanced mode’ and replace ‘AutoCorrectText’ with ‘Terms’. Click ‘Edit in basic mode’ and you should see this:
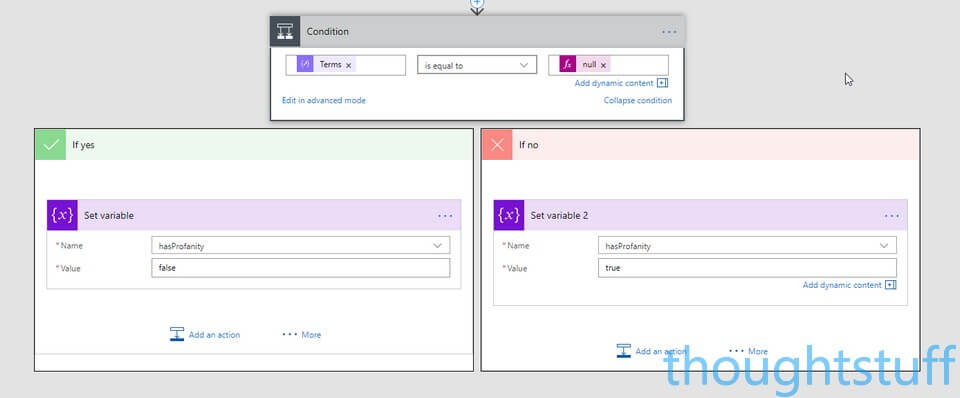
Now that we’ve done that, we need to specify what happens in each case (the If yes, If no parts). For each of the boxes, add an action, search Variables and choose the Variable – Set variable option. Choose the hasProfanity variable from the drop-down list, and set the Value to false in the If yes section, and true in the If no section:
Step 3 – Storing Sentiment
At a high-level, we’re going to store the tweets along with their sentiment score (how happy they are) in Azure Table Storage. If you’re not familiar with Azure Table Storage then don’t worry: think of it a bit like an Excel spreadsheet that’s stored in Azure and that we can read and write data to. There are a couple of rules though, which seem odd unless you know how Table Storage works. Each entry we want to add must contain 2 pieces of data in addition to what we want to store: a Partition Key and a Row Key. The Row Key must be unique, which makes sense. The Partition Key, however, doesn’t and is used to group similar data together. It makes it easier to read back later.
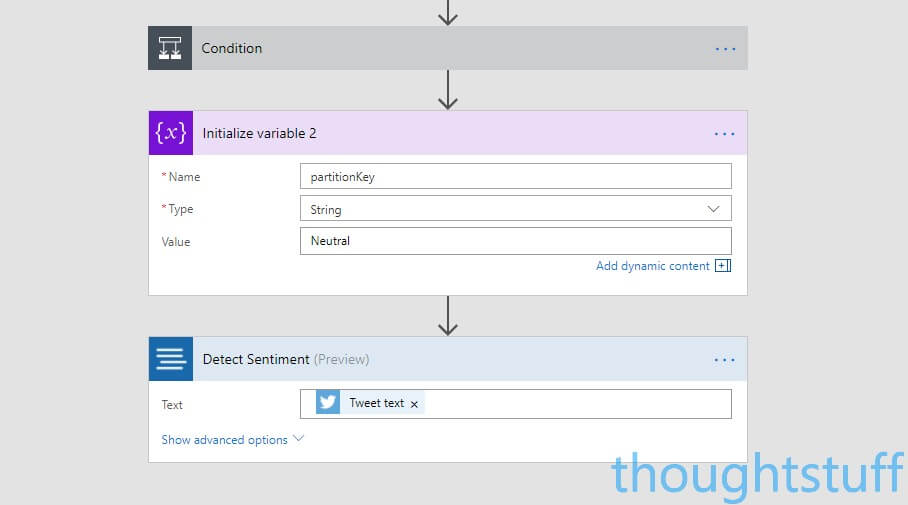
For our example, we’re going to work out the sentiment of our tweets first so we can group our data into three partitions: Postive, Negative and Neutral. Let’s create a new variable to use as the Partition Key. Click New step, Add an action, search Variables and choose Variables – Initialize variable. Set the Name to partitionKey and the Type to String. Set the Value to Neutral. We’ll use this as our default if our rules about positive and negative tweets aren’t met.
Now to actually work out the sentiment. Similar to the Content Moderator API we used previously, we need to create a new Azure resource for this API and grab the keys. Navigate to https://portal.azure.com/#create/Microsoft.CognitiveServicesTextAnalytics and create a new instance. Choose West US as the location as it seems to work better with Flow than the other locations.
Once you’ve copied the key using the same method as for Content Moderator, add a New Step. Add an Action, and search Text Analytics. Choose the Text Analytics – Detect Sentiment action. For the Text value, add the Tweet Text from the Twitter Connector:
The Detect Sentiment Connector will make a call to the Text Analytics API with the text of the tweet, calculate the sentiment of the text and return a score from 0 to 1. 0 is very positive, 1 is very negative. Here are some examples:
“Everything is amazing” – 1
“He’s just so rude” – 0.1
“Their performance was average” – 0.5
We can choose where to set the thresholds when we group our tweets into Positive, Negative and Neutral, so feel free to play around with the values I’ve used below.
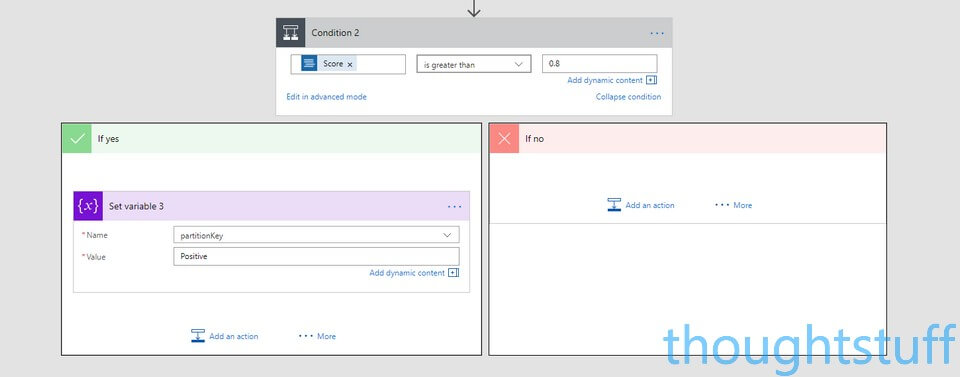
Click New Step, Add a Condition and choose the Score from the Detect Sentiment section. We’ll check for happy tweets first, so set the middle value to “is greater than” and add 0.8 to the value. In the ‘If yes’ section, add an action, search Variables and choose Variable – Set variable. Choose the partitionKey variable and set its value to “Positive”.
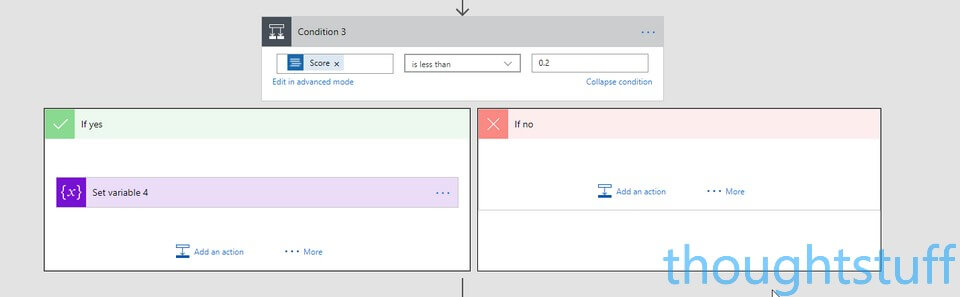
Now repeat the process to add a second Condition, where the Score is less than 0.2. This will be for our Negative tweets, so set the partitionKey value to Negative:
Now that we’ve turned the score into an actual sentiment and given ourselves a partition key we are ready to store our tweet data! We’re going to be using Azure Table Storage for this – it’s scalable and cheap. You could also use SQL Server, Redis, or any number of other storage mechanisms.
Back in Azure, navigate to https://portal.azure.com/#create/Microsoft.StorageAccount-ARM to create a new storage account. Specify a name and resource group – all other options can be kept to the default, and click Create.
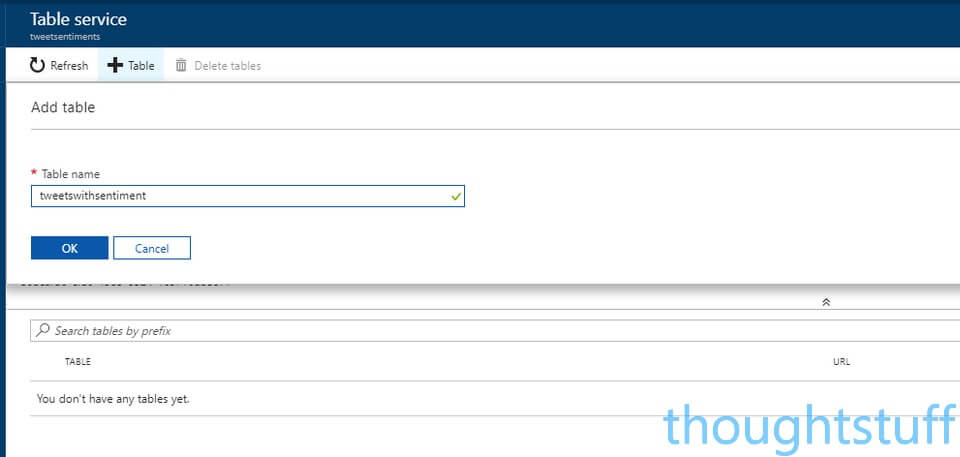
Once it’s created, navigate to it in Azure, and from Overview sheet, choose Tables from the Services section. Click the large Plus sign to add a new Table, and specify a name, such as tweetswithsentiment:
Whilst you’re here, go back to the Storage Account, choose Access Keys and copy one of the two keys shown. You’ll need this make a connection from Flow.
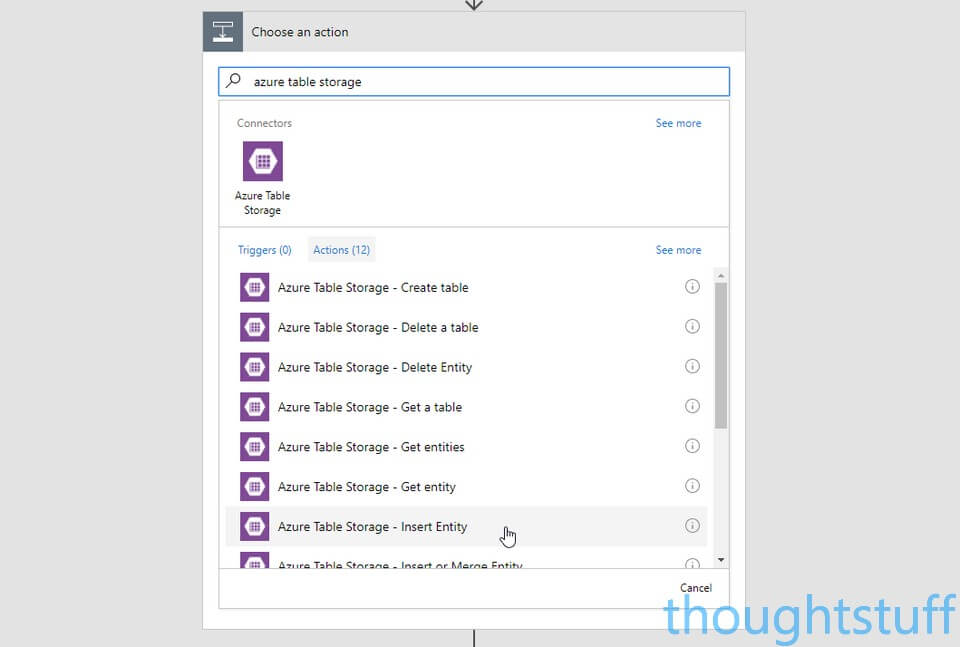
Now that the table has been created you can write to it in Flow. Add a new Step, Add an action, and search for Azure Table Storage. Choose Azure Table Storage – Insert Entity:
You’ll be asked for your Connection Name (which is just a friendly name for the connection so can be anything), the Storage Account name (not the Table name), and the Shared Access Key (the key you just copied). Assuming everything goes well, you’ll then be able to choose your Table from the drop-down menu.
For the Entity value, you need to provide valid JSON, but also bring in lots of Dynamic content. Exactly which fields you include are up to you, but as a minimum, you MUST include PartitionKey and RowKey. Here’s what mine looks like:
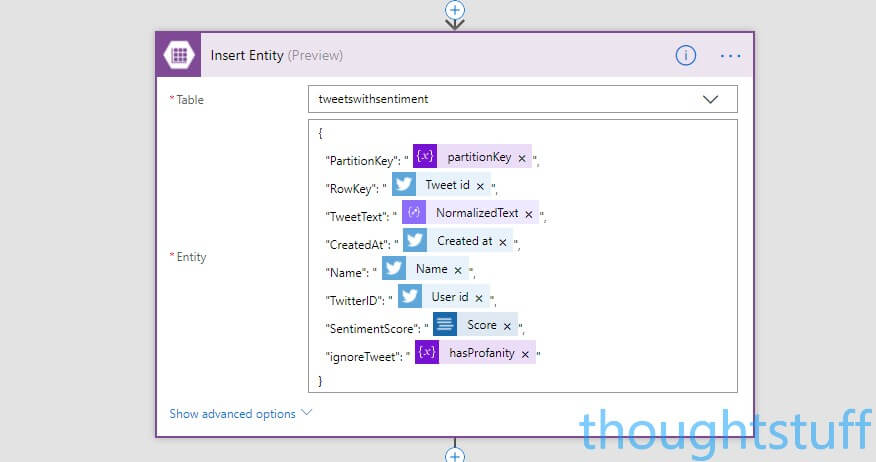
You should be able to get the same by copying this and pasting it into the Entity box:
{
  "PartitionKey": "@{variables('partitionKey')}",
  "RowKey": "@{triggerBody()?['TweetId']}",
  "TweetText": "@{body('Parse_JSON')?['NormalizedText']}",
  "CreatedAt": "@{triggerBody()?['CreatedAtIso']}",
  "Name": "@{triggerBody()?['UserDetails']?['FullName']}",
  "TwitterID": "@{triggerBody()?['UserDetails']?['Id']}",
  "SentimentScore": "@{body('Detect_Sentiment')?['score']}",
  "ignoreTweet": "@{variables('hasProfanity')}"
}
Step 4 – Storing Key Phrases
The other thing we want to do is store the key phrases from each tweet. This is so that we can build up a word cloud of phrases. We’re going to store this in a new table, so head back to Azure and create another table, called keyphrases, similar to the one we created for sentiment.
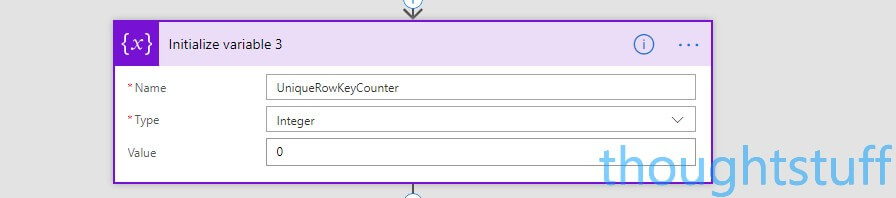
Remember that when we insert values to an Azure Storage Table, we need a unique Row ID. When we run our tweet through the Text Analytics API to extract the key phrases we’ll get an ID for the transaction, but not for each phrase. Therefore we’re going to have to create our own ID, made up of the ID from the transaction and a counter.
To store this new ID, create a new variable, by choosing New Action, Variables, Initialise Variable, with a name of UniqueRowKeyCounter and type of Integer. Set the value to zero:
We want to avoid any tweets which our previous code marked as having profanity. Because we already stored this as a variable, it’s easy to add a new Condition, checking to see if the hasProfanity variable is equal to false (which we can get by choosing the Expression tab from the Dynamic Content pop-up and searching false:

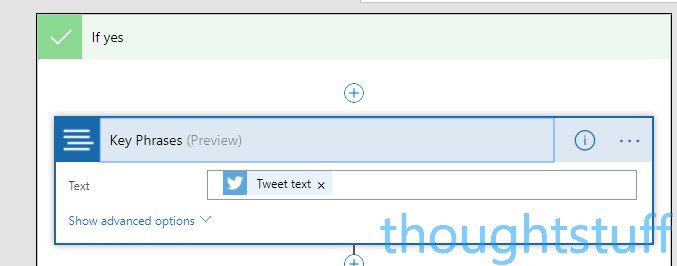
Within the ‘If yes’ part of the condition, this is where we actually extract the key phrases. Choose New Action, then search for Text Analytics. Add the Text Analytics – Key Phrases action. For the Text field, choose the Tweet Text item:
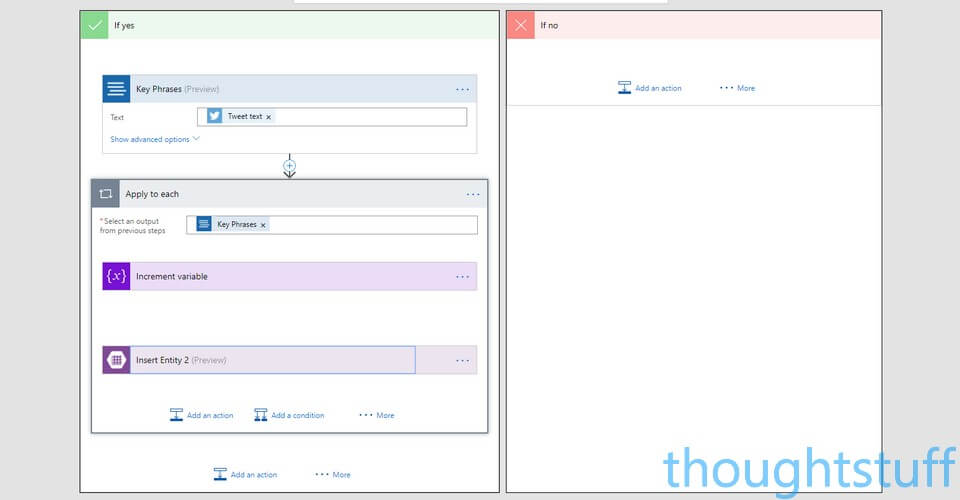
The output from this step is a collection of Key Phrases. There might be 1, there might be 10. It’s going to be different for each tweet. Therefore, to make sure we add each one, we can add a “Apply to each” action to loop through each of the phases. To do this (staying within the ‘If yes’ section), click the “More” ellipses to the right of the ‘Add an action’ link and choose “Add an apply to each”. In the ‘Select an output from previous steps’ field, choose the Key Phrases item from the Dynamic Content.
Notice how the ‘Apply to each’ section has it’s own ‘Add an action’ link for things that should happen for each key phrase. This is where we’re going to increment our UniqueRowKeyCounter variable (to keep it unique) and also insert the phrase into the Azure Storage Table.
First, add a new action, search Variables, and choose Variables – Increment Variable. Choose the UniqueRowKeyCounter value, and set the IncrementBy field to 1.
Secondly, add another action, search Azure Table Storage. Choose Azure Table Storage – Insert Entity. In the Table drop-down, choose the keyphrases table, and paste the following JSON into the Entity field, which sets the PartitionKey to “Phrases”, sets the RowKey to a combination of the ID from the Key Phrase transaction and our incrementing variable, and set the Phrase to be the current phrase which is being iterated through:
{
  "PartitionKey": "Phrases",
  "RowKey": "@{body('Key_Phrases')?['id']}-@{variables('UniqueRowKeyCounter')}",
  "Phrase": "@{items('Apply_to_each')}"
}
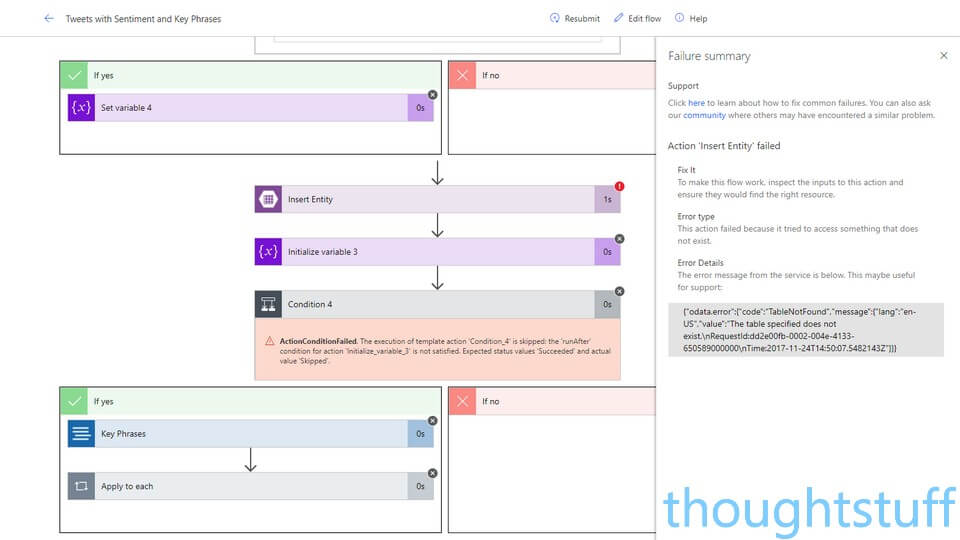
OK, that’s it! Save your Flow, and then make sure it’s turned on. From the My Flows page you can see your newly created Flow, and clicking it will take you to a status page where you can see the Run History. Make sure that it’s all running correctly – if it isn’t then you can click into the failed run to see detailed information exactly where the flow failed, as in this example:
Step 5 – Viewing in PowerBI
This isn’t going to be a full tutorial on how to use PowerBI, but hopefully I can take you through just enough steps that you can visualise this data.
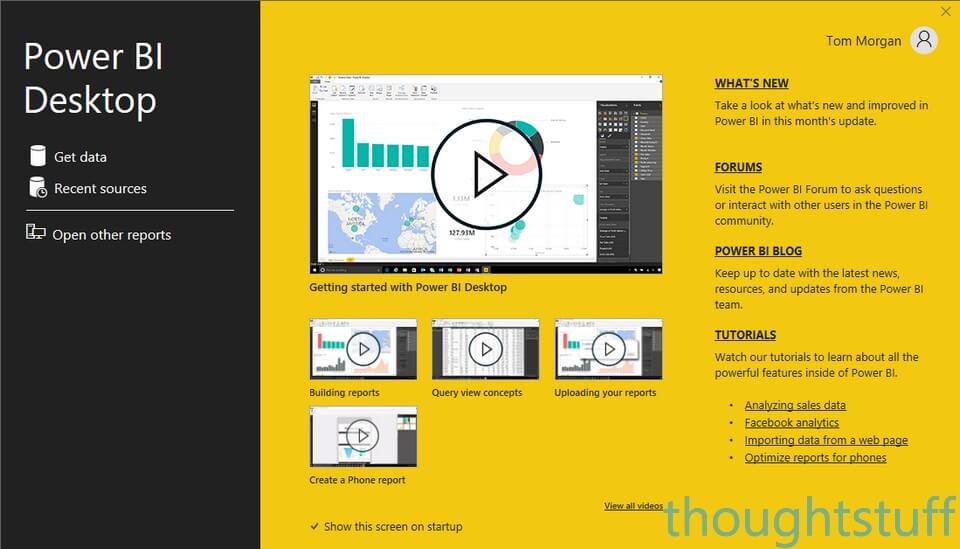
If you don’t already have it, you can download the desktop version for free from powerbi.com. From the welcome splash-screen (shown below), select Get Data:
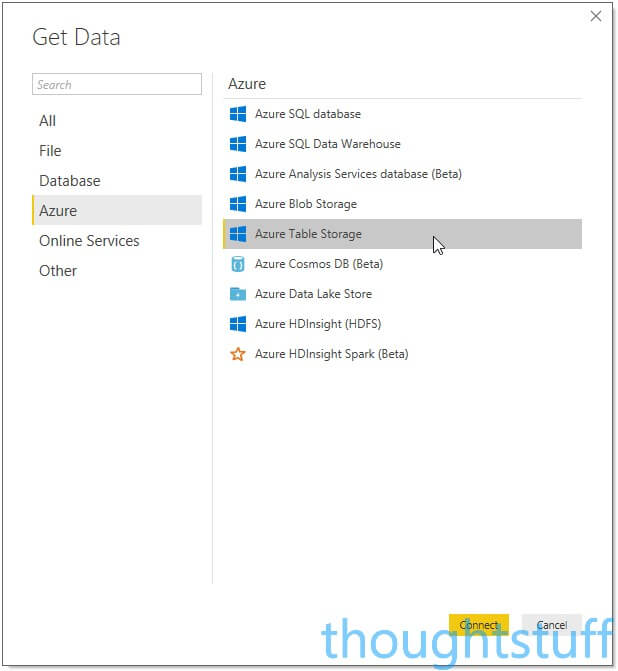
Choose Azure from the list, then Azure Table Storage:
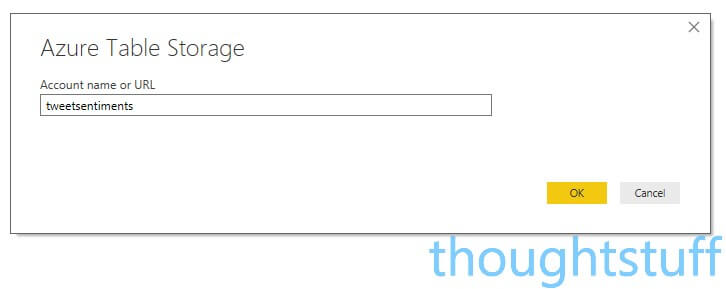
Specify the name of your Table Storage account (not the individual name of the tables) and click OK
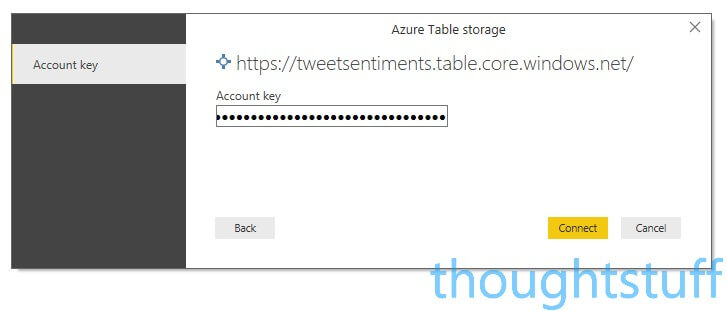
Copy one of the access keys from Azure and paste it into the next box, then click Connect:
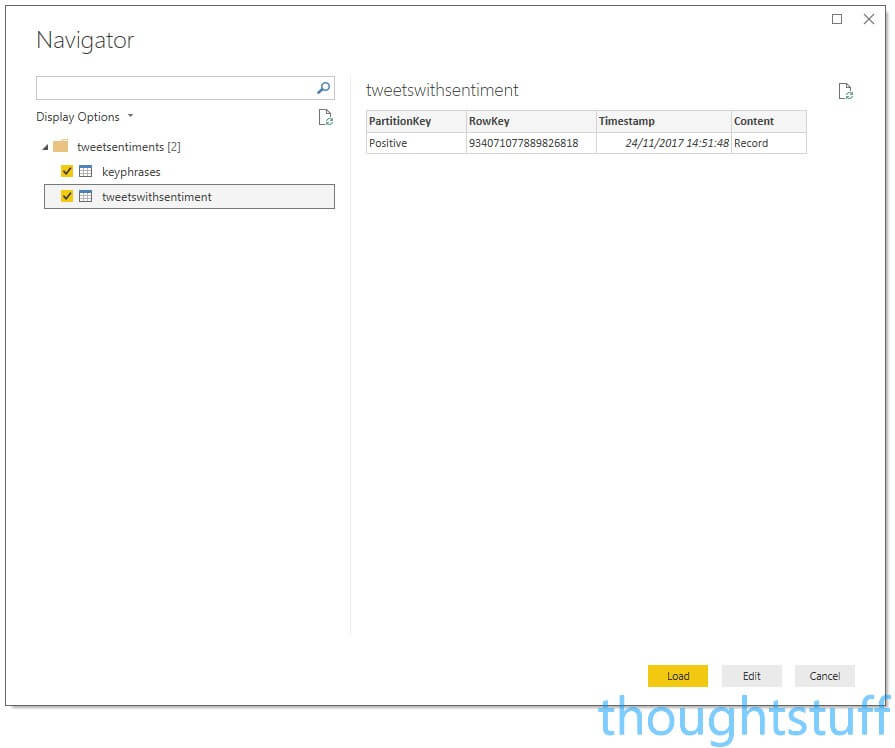
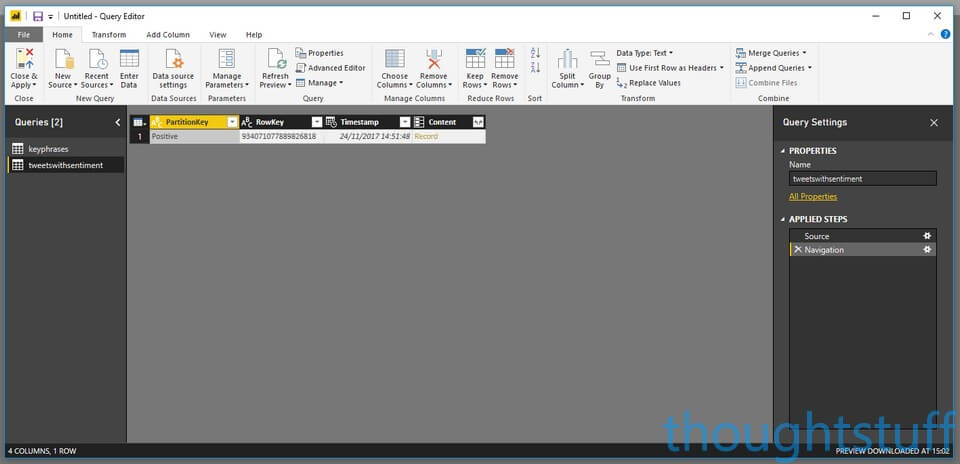
You should see the two tables you created. Click them both. If you already have data in the tables from your Flows having run you’ll see some of it here. Don’t click Load, but instead click Edit to open the Query Editor. This is because we need to expand some of the record data so we can use it in reporting. The Query Editor should open with both tables shown:
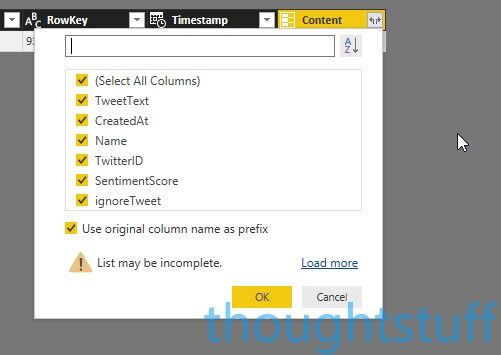
For each table, click the icon with two arrows that’s next to the Content column and select all the fields to include them for reporting:
Make sure to do this for both tables, then click Close & Apply. The data will then load, which may take some time if there is already a lot of it.
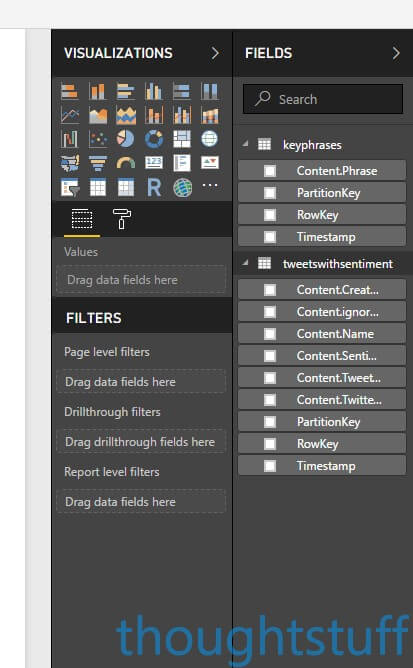
On the right-hand side of the screen, you’ll see two panels: one for Visualisations, and one for Fields. Expand the tables to show the individual fields. (if you don’t see this, make sure you’re in Report view by clicking the little bar chart on the top left-hand side of the window):
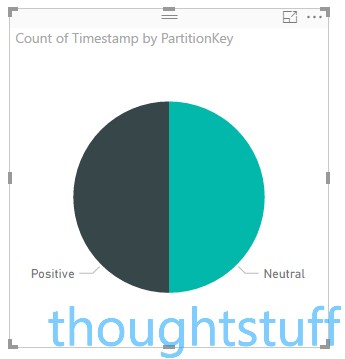
At this point, you can experiment with the different visualisations available, and populate them using values from the different Fields. For instance, you could click the Pie Chart visualisation, then drag PartitionKey from the tweetswithsentiment table into the Details field, and Timestamp into the Values field. PowerBI will assume you probably want a count of each timestamp, and will render a chart showing the split of positive, neutral and negative tweets:
Using this data and some basic PowerBI techniques, I generated the report you see at the start of this blog post. To update your report with the latest information from the Storage Tables, click the Refresh button in PowerBI.
Conclusion
As I originally said in my talk, we’re seeing the democratization of AI, with Cognitive Services that are straightforward to consume and can be built into flows using Microsoft Flow easily. Analysing tweets to pull out the most positive and negative ones is a fairly trivial example, but an important one for all sort of industries where it’s important to quickly respond to customer feedback. Hopefully, this walkthrough has been useful, and I’m excited to see what Flows you will build using Microsoft Cognitive Services.
Written by Tom Morgan
 Tom is a Microsoft Teams Platform developer and Microsoft MVP who has been blogging for over a decade. Find out more.
Related posts:
 Reporting Services: Achieving Text Flow with Columns
 Streaming MP4 video files in Azure Storage containers (Blob Storage)
 Building an Out of Office reminder with the new Microsoft Teams Connector for Microsoft Flow
 Controlling the order of CWEs display in menu in Lync 2013
 Video: I’m talking about Modality Systems Network Performance Analysis Tooling