


Learn Azure Communication Services Day 2 – How does ACS Work? (high-level)
This blog post is part of a series called “Learn ACS“, all about Microsoft Azure Communication Services. The series covers a high-level overview of capabilities and considerations, then dives into the development detail of using ACS in your application. Find the rest of the posts in the series at learnACS.dev.
Yesterday, we talked about what ACS is, and its high-level capabilities. Today, we’re going to cover how ACS works: what the architecture model is for developers that want to use it. ACS is a platform for communication. Exactly how you decide to use it is very much up to you, but regardless of which capabilities you make use of there is a common authentication model you’ll need to understand first.
Authentication
ACS provides a model for your code to authenticate clients who want to connect and use your ACS instance. As long as these clients are running your front-end code and you’re expecting them, everything is fine. However, there has to be an authentication step in case someone tries to use your ACS instance for their own calls: because you’ll be picking up the cost!
This authentication code should run server-side, not client-side so that the sensitive access keys that are used to manage ACS aren’t exposed. Besides, it’s good practice to secure these authentication steps behind an API. It also gives your API a chance to process any business-logic to decide whether this request for access should be granted or not. You likely already have authentication between your front-end client and your API so there might now be any additional calculation to be done other than to check that the request is valid. In other scenarios, though it might depend on a subscription level, whether or not the user is eligible, if the service is open and operating: any number of different reasons.
Here’s how the flow works at a really high level:
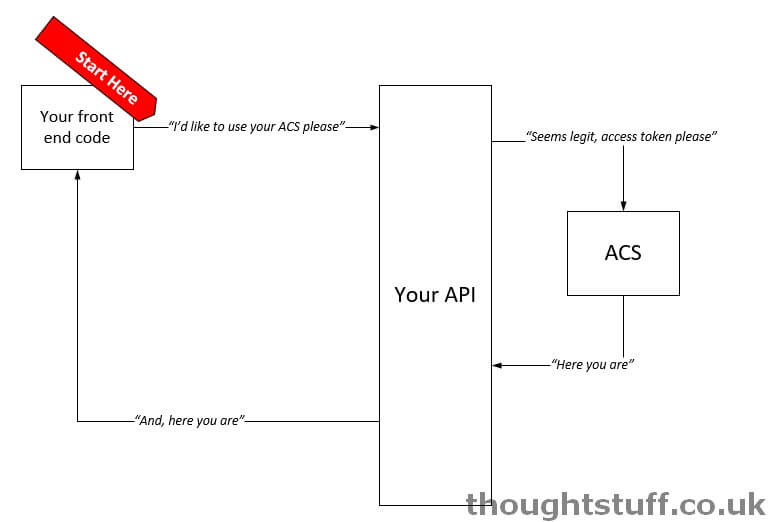
We’re going to focus on exactly what happens in between the API and ACS part.
Identity
Once you’ve decided that you want to allow access, the first thing that your back-end code needs to do is to create an ACS Identity. Don’t think of this as anything as complicated as a user, or an Azure AD account or anything like that. It’s simply a way of identifying this connection. You can create as many of these identities as you want, there’s no charge. They don’t contain any identifying information (you can’t set name, date of birth, anything like that): they are just a unique ID that ACS generates and is used to identify this connection on the system.
However, if your solution does have the concept of users and accounts then you can (and should) store this ID once you have generated it and then re-use it the next time this user wants to use ACS. This means that you will always be using the same ID for a user and will be able to tie together calls in the ACS environment with the users that are making them.
The identity is also used when making and receiving calls – if you want to make a call to this user then you need to know their identity to do so. Similarly, when looking at an incoming call being made, the identity will be provided. This allows your application to look up the identity and overlay any other useful information about the incoming call, such as display name, photo, etc etc.
An ACS identity looks like a combination of some GUIDs and other characters. It’s a string object. Here’s an example of one: 8:acs:4ccc92c8-9815-4422-bddc-ceea181dc774_00000006-19e0-2727-80f5-8b3a0d003502
You can create them either by calling the ACS API or by using the .NET libraries. Tomorrow, we’re going to make use of the .NET libraries and create a simple Azure Function that will create identities for us.
Scope and Access
Once you’ve created an identity (or retrieved an identity you previously created), it’s time to actually grant access. This is done by generating a short-lived access token, similar to how many authentication systems such as OAuth work.
When you generate an access token you have to provide the scope of that token. The scope defines the things that can be done by someone with that access token. For instance, if you are issuing an access token to someone you know is about to use the VoIP capabilities of ACS then you will want to make sure you set the scope to CommunicationTokenScope.VoIP. Valid scopes are:
- CommunicationTokenScope.Chat
- CommunicationTokenScope.PSTN
- CommunicationTokenScope.VoIP
You can generate access tokens by using the ACS API or using the .NET libraries. Tomorrow, we’re going to use the .NET libraries to enable our simple Azure Function to issue access tokens for use. You’ll then be able to use this Azure Function in the following blog posts to test some of the other things we will be talking about.
That’s it. ACS will generate an access token which you can then pass back to the caller of your API (such as your front-end code), which can use the access token to access ACS. It’s a simple, secure model that keeps your API in control. At any time your API can choose to revoke an access token and the front-end code has no ability to access ACS directly.
It’s worth remembering that tokens expire! When a token is generated it has an expiry date/time and your application is responsible for renewing these tokens over time if it needs to maintain access past this point (this is also something you can do via API or .NET)
By default (at the time of publishing) an access token is valid for 24 hours from issue.
Front-end, let’s go!
From here, it’s all down to the front-end code: there’s nothing more that’s needed from the back-end.
The front-end client code is the code that sets up the call and lays out the display of video, issues commands to mute/unmute, call, hangup, answer and whatever else it is you want to do. Your API might tell your front-end which identity it needs to call but all the actual work of making and receiving calls is done on the front-end.
Don’t panic though – there are libraries to help you make this easy and abstract a lot of the heavy lifting. There are also UI controls you can use to simplify things even more. We’ll cover all this in a future blog post.
That’s the high-level of how ACS operates and how to fit it into your existing code. Next time we’re going to build our a simple Azure Function to generate access tokens, which we’ll then use in subsequent demos. Links for all blog posts can be found at learnACS.dev. You can also subscribe to my YouTube channel for videos about ACS (and much more!).
Written by Tom Morgan
 Tom is a Microsoft Teams Platform developer and Microsoft MVP who has been blogging for over a decade. Find out more.
Related posts:
 Learn Azure Communication Services Day 1 – What is Azure Communication Services (ACS), an Introduction
 With Teams Interop for Azure Communication Services, developers can finally create native Web and Mobile experiences
 How to: Create your own Family Video Room using Azure Communication Services without writing any code (if you don’t want to)
 Azure Communication Services: what it is, how you use it, and why it’s AMAZING!
 Weekly Update 11 December 2020 – Create your own Family Video Room with ACS, New Graph calls to get ALL user chat