


Learn Azure Communication Services Day 3 – Let’s Code! Creating a back-end Token Issuing Function in Azure Functions
This blog post is part of a series called “Learn ACS“, all about Microsoft Azure Communication Services. The series covers a high-level overview of capabilities and considerations, then dives into the development detail of using ACS in your application. Find the rest of the posts in the series at learnACS.dev.
Last time we talked about how a back-end service is needed to create an ACS Identity and issued an access token with specific scopes.
This time, we’re going to create a demo back-end service that will issue tokens for us. We’ll use this service in the remainder of the series whenever we need to get an access token and use ACS.
Create an Instance
The very first thing we need to do is create an ACS instance to use. This is a resource in Azure, just like a database or a Web App. Navigate to the New Azure Communication Services blade (or search for “Communication Services” in the ‘Create a resource’ section):
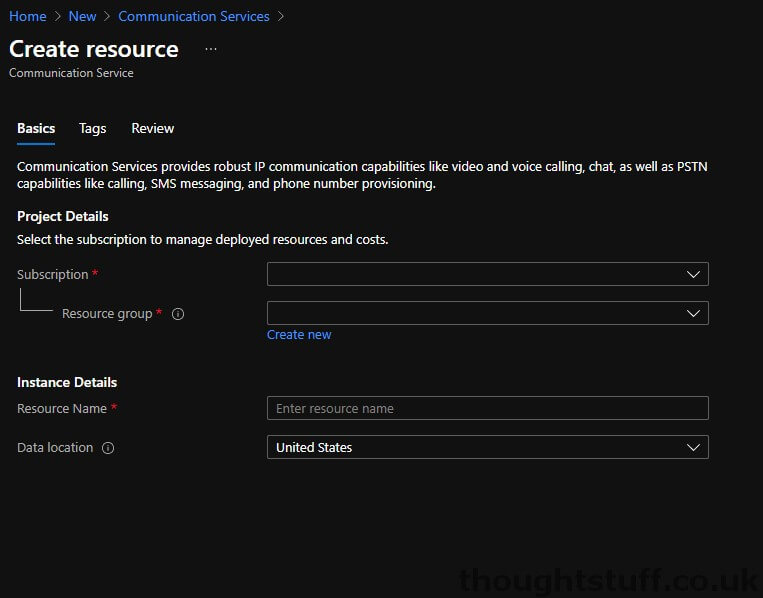
Fill in the blanks and click Create. Once your ACS instance has been created, navigate to it, and click on “Keys” in the “Tools” section of the left-hand menu bar.
Make a note of the “Connection String” (either the primary or secondary) as we’ll need it shortly.
Create an Azure Function
We’re going to create a simple Azure Function which we’ll call whenever we need an access token.
Create a new Function App by navigating to the Create Function App blade (or search for “Function App” in the ‘Create a resource’ section):
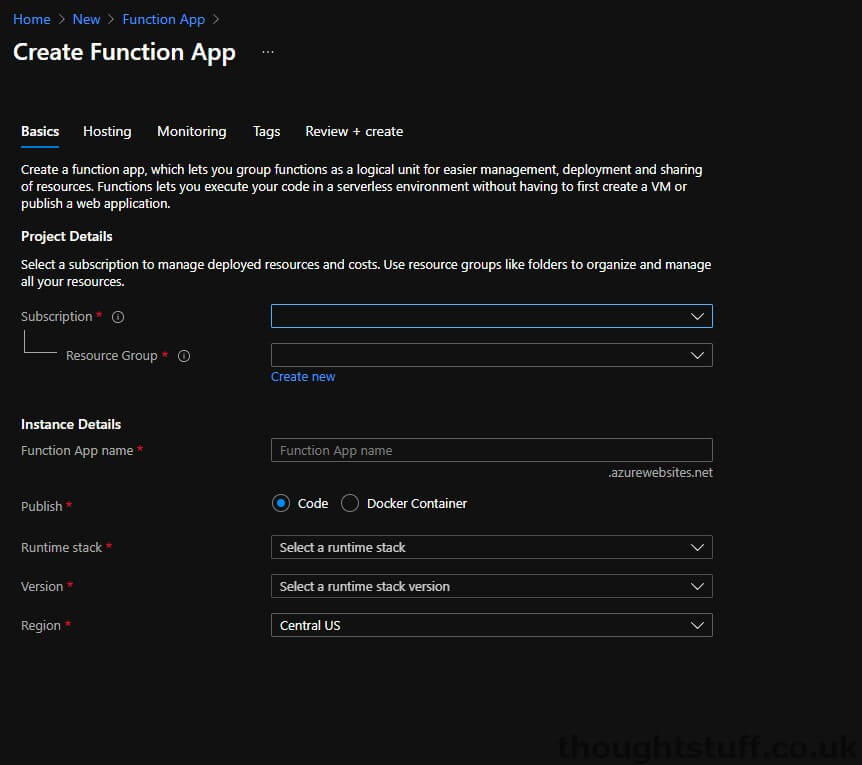
Set Publish to “Code”, Runtime stack to “.NET” and Version to “3.1”. Choose a resource group, name and region and click Create.
Once the Function App has been created, navigate to it, and then click “Configuration” in the “Settings” section of the left-hand menu bar:
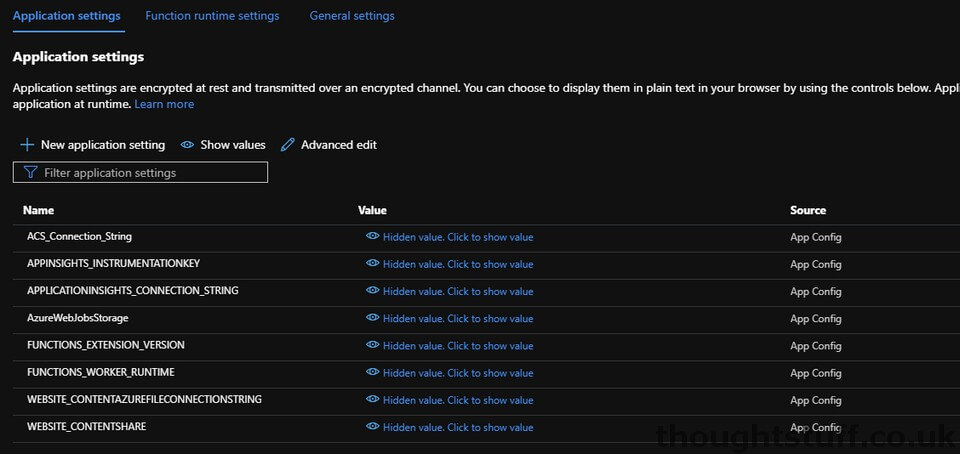
Click “New Application Setting”. We’re going to create a new setting, which will contain the connection string of our ACS endpoint, making it easy for us to reference it later on.
Set the Name of the application setting to “ACS_Connection_String” and set the Value to be the connection string you previously made a note of. Click OK, and your list of Application Settings should look something like this:
Now, click “Functions” from the “Functions” menu of the left-hand menu bar and then click +Add to create a new function.
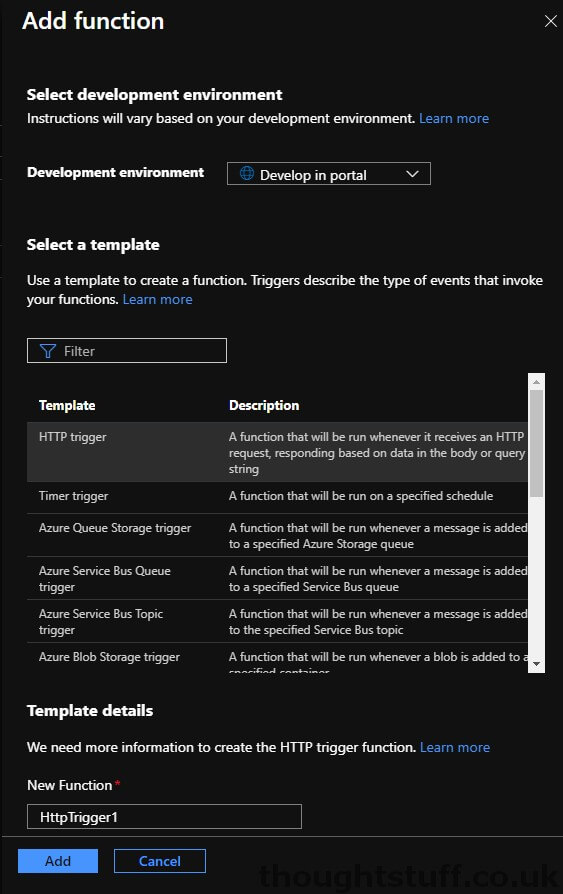
Make sure that the “Development Environment” is set to “Develop in portal”, and click “HTTP Trigger”. There are lots of different ways of executing Azure Functions but we want ours to trigger when we call it via an HTTP endpoint (from our front-end). Keep the authorisation level as Function and click Add:
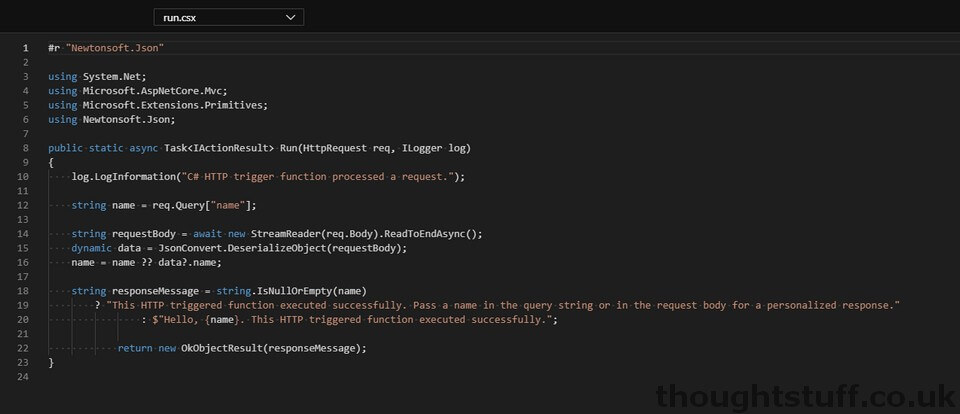
Once the dashboard loads, click “Code + Test” from the “Developer” section of the left-hand menu bar. You’ll notice there is already some code here – Azure provides a template to get started:
Click the Test/Run button, and then click the “Run” button from the testing window that slides open from the right. This simulates something calling your Azure Function, and you should see a sample message returned:

Let’s add code
Now that our Azure Function is created and ready to go, we need to replace the sample code that is there with something that will interact with our ACS instance in order to generate an access token.
Remember from yesterday’s blog post that we actually need to do two things: firstly create an ACS identity, and then issue an access token with a specific scope for that identity.
I’m going to give you all the code to get everything working first, and then we can step through what it’s actually doing.
Replace the contents of the run.csx file with this:
Then, create a new file locally on your machine and call it “function.proj”. Add the following code to it:
Save it, and then click “Upload” in your Azure Function and choose the file to add it. Once it’s upload, navigate to it using the drop-down box and make sure it’s not empty. If it is, copy the code in to it again.
At each stage of the process be sure to click “Save”. Also, keep an eye on the Logs pane which will open up from the bottom. As you save the “function.proj” you’ll notice that it has to restart your Function so give it a few minutes to complete that.
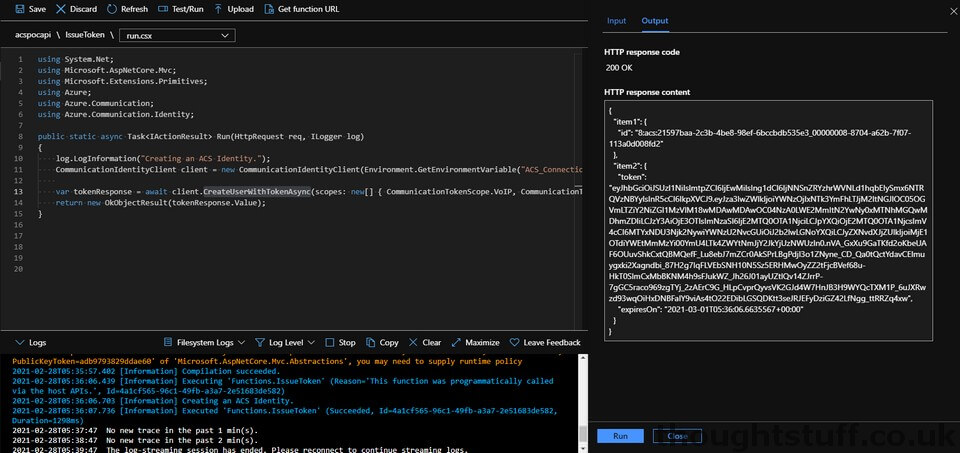
Once that’s all done, click Test/Run again and this time you should see an ACS access token returned, which looks like this:
At this point, we are actually done. Congratulations, you have an Azure Function that can issue access tokens. If you don’t really care what the code is doing you can stop for the day. The only other thing you need to know is how to call your function from your code.
Click “Get Function URL” from the menu bar at the top and make a note of the URL. You’ll notice there is a large code parameter appended to the URL. This is to help secure your function against misuse. If you ever need to change this code you can do so from the “Function Keys” menu on the left-hand side.
What’s actually happening
Let’s go through the code to see what’s happening. All the actual code is in the run.csx file, the other file is simply loading the ACS Communication NuGet package which we reference.
It’s possible using ACS to create then identity in one step, and then issue the access token in a second step. If wanted to do that, our code might have looked like this:
However, we’re using a single method (CreateUserWithTokenAsync) which creates the identity and issues the access token in a single step. This also has the additional benefit of returning the ACS identity as well as the access token – the IssueToken method doesn’t return the identity ID.
- Line 11 creates a new instance of the ACS Communication client, using the connection string we stored in our app setting.
- Line 13 creates the ACS user and issues the access token. Notice that the scopes for which the token are valid are passed as arguments. In this example, I’m setting up an access token that has both VoIP and Chat scopes.
- Line 14 returns the detail of the access token (which is actually an object containing the token and its expiry date) and the ACS identity. Right now, the return object is an array of two different objects and so it looks a bit messy, with placeholder titles like “item 1” and “item 2”. That’s because we’re blindly returning what is actually a ValueTuple and letting IActionResult turn it into JSON for us. A better implementation might be to make our own class to contain these objects and return that.
In this blog post, we’ve created a simple Azure Function which issues access tokens for our ACS instance. We’ll use this function in future blog posts whenever we need an ACS access token. Links for all blog posts can be found at learnACS.dev. You can also subscribe to my YouTube channel for videos about ACS (and much more!).
Written by Tom Morgan
 Tom is a Microsoft Teams Platform developer and Microsoft MVP who has been blogging for over a decade. Find out more.
Related posts:
 Learn Azure Communication Services Day 2 – How does ACS Work? (high-level)
Learn Azure Communication Services Day 1 – What is Azure Communication Services (ACS), an Introduction
Learn Azure Communication Services Day 2 – How does ACS Work? (high-level)
Learn Azure Communication Services Day 1 – What is Azure Communication Services (ACS), an Introduction
 How to: Create your own Family Video Room using Azure Communication Services without writing any code (if you don’t want to)
 With Teams Interop for Azure Communication Services, developers can finally create native Web and Mobile experiences
 Azure Communication Services: what it is, how you use it, and why it’s AMAZING!
Hi Tom!
Great stuff I like your tutorials a lot. I am actually building an application with our team at school right now that is funded by Microsoft.
I was wondering, once I issue the user identity, how would I be able to refresh a particular token for the already existing user identity. I want to link up such that I can type “Tom” in application, and it would find the already existing ACS userID that would then have it’s access token refreshed.
I would appreciate the help!
Hi, I should do a blog post about this at some point, but take a look at https://docs.microsoft.com/en-us/azure/communication-services/quickstarts/access-tokens?pivots=programming-language-csharp#refresh-access-tokens for refreshing tokens.
Basically, you can call client.GetTokenAsync to just issue a token on an existing identity. This is for when you already have an identity, such as in your case. You pass in the identity, and any scopes.
Hi Tom,
when trying the test/run after uploading functions.json I get a 500 Internal Server Error.
Any idea what the issue can be?
regards, Marty
Hi Tom,
i get a 500 internal server error when I do the test/run after uploading the functions.json file.
Any idea howto fix this?
regards, Marty
The project file should be renamed to function.proj instead of function.json
Hi Tom,
i get a 500 internal server error when I do the test/run after uploading the functions.json file.
Any idea howto fix this?
Regards,
Divya
@Alan – Thank you for pointing this out. I’ve updated the post. A few people have said it hasn’t been working but I haven’t had time to go and check why – this is probably the reason. 👍
See Alan’s comment, but there was a typo in the blog post – function.json should be function.proj. Post is now updated.
Thank you for this wonderful tutorial series.