


Learn Azure Communication Services Day 6 – Receiving a peer-to-peer VoIP WebRTC call
This blog post is part of a series called “Learn ACS“, all about Microsoft Azure Communication Services. The series covers a high-level overview of capabilities and considerations, then dives into the development detail of using ACS in your application. Find the rest of the posts in the series at learnACS.dev.
Yesterday, we created a very simple application to make a call. In this blog post, we’re going to build on that to allow our application to accept incoming calls.
A quick note on the sample code: Azure Communication Services uses React components to abstract functionality. However, you’ll see in these samples that although my samples are React apps, I’m not laying them out as true React apps or including any of the other artefacts you would normally associate with a React application.
That’s intentional so that anyone who is not yet familiar with React applications but who does understand JavaScript can understand and copy what’s happening. Remember: this is sample code and when building out your own application you should follow all the usual guidance and best practice: these samples are deliberately minimal in order to showcase the ACS content.
Adding our code
Similar to yesterday, I’ll provide the complete code sample first so that you can get it running, and then talk through how it works.
Add this to your index.html file:
Add this to your client.js file. Remember to set the Azure Function URL to issue your token.
Remember to click Save to ensure this change takes effect.
Let’s test it out!
Make sure both index.html and client.js files are saved, then use this command-line command to build and run your application.
npx webpack-dev-server --entry ./client.js --output bundle.js --debug --devtool inline-source-map
If there are any compile errors then you’ll see them in the command line, otherwise, open a web browser to localhost:8080 and you should see your calling page with the test call ID pre-populated, and your ACS identity shown.
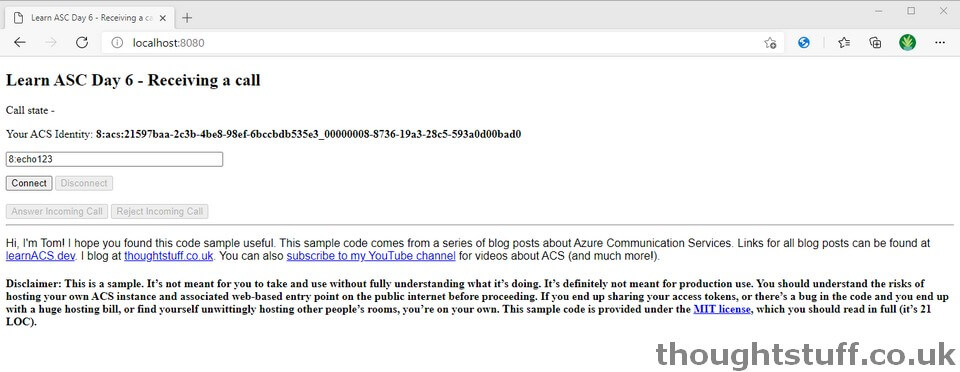
If the “Connect” button is enabled (or becomes enabled after a few seconds) then it means that the page has successfully received an ACS access token from your Azure Function. You can see this happening if you look in the Network tab of Developer Tools. You should also see your identity shown – which we’re going to need in order to place a call to this client.
Once this is running, we need another client running, in order to make a call, so that we can test accepting it. Open a new command prompt and follow the Day 5 instructions to get that running alongside. Because the Day 6 code is already using localhost:8080, webpack will use another port, usually 8081, which you’ll see listed in the output in the command prompt. Don’t forget to go and add this to the CORS list of your Azure Function as well, and then load that page up side by side.
Copy the ACS identity from the Day 6 sample to the input box of the Day 5 sample and click Connect. You’ll see that the Day 6 sample changes to show the incoming call:
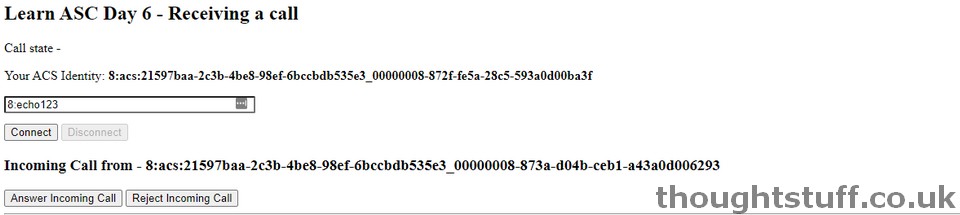
If you click “Answer Incoming Call” then you should see the call state of both changes switch to “Connected”. You can also experiment with the various different call states that the call cycles through during this make/receiving process.
What’s the code doing?
I’ve taken the Day 5 code sample and added some extra parts to it, in order to listen for and react to incoming calls.
- Line 28 – I’m surfacing the ACS identity ID, which is provided as part of the identity object that’s returned alongside the access token object from our Azure Function.
- In the initialisation, I’m also subscribing to an incoming call notification, which is provided by the CallAgent object. When this happens I update the UI with the caller information and set the value of an incomingCall variable: this just makes it easier code for the button click (a proper React implementation would do this better).
- The two button-click events for accepting and rejecting a call are at the bottom of the client.js file. You can see that both accepting and rejecting are single line calls. The accept() method returns a Call object, very similar to making a call, meaning I have moved some of the call setup logic into a function where it can be called by both the making call button and the receiving call button.
Today we added to our existing code by adding the ability to answer incoming WebRTC calls. Links for all blog posts can be found at learnACS.dev. You can also subscribe to my YouTube channel for videos about ACS (and much more!).
Written by Tom Morgan
 Tom is a Microsoft Teams Platform developer and Microsoft MVP who has been blogging for over a decade. Find out more.
Related posts:
 Learn Azure Communication Services Day 5 – Making a peer-to-peer VoIP WebRTC call
Learn Azure Communication Services Day 1 – What is Azure Communication Services (ACS), an Introduction
Learn Azure Communication Services Day 3 – Let’s Code! Creating a back-end Token Issuing Function in Azure Functions
Learn Azure Communication Services Day 2 – How does ACS Work? (high-level)
Learn Azure Communication Services Day 4 – ACS vs Microsoft Teams: the discussion
Learn Azure Communication Services Day 5 – Making a peer-to-peer VoIP WebRTC call
Learn Azure Communication Services Day 1 – What is Azure Communication Services (ACS), an Introduction
Learn Azure Communication Services Day 3 – Let’s Code! Creating a back-end Token Issuing Function in Azure Functions
Learn Azure Communication Services Day 2 – How does ACS Work? (high-level)
Learn Azure Communication Services Day 4 – ACS vs Microsoft Teams: the discussion