UCMA Workflow 1 – Introduction
This is post number 1 in a series of 4 on using UCMA Workflow. If you need more information on this or are looking for a reference guide, I highly recommend Professional Unified Communications by George Durzi & Michael Greenlee, which has an entire chapter (50 pages) devoted to Workflow.
The UCMA SDK comes with some added functionality, which isn’t immediately obvious. It’s called UCMA Workflow SDK and is a Windows Workflow Foundation (WWF)Â layer on top of UCMA.
By providing an additional layer on top of UCMA, UCMA Workflow (from now on just called Workflow) allows you to perform UCMA operations by using and joining together shapes in a WWF workflow. This “workflow focused” approach to working with UCMA makes it ideal for scenarios such as IVR applications, where you want a bot to answer an incoming call and traverse a pre-determined set of paths, based on user feedback and other information.
For me, seeing the workflow shapes laid out really made me realise the power of UCMA, and how you can use it to easily create IVR applications which will run on your Lync infrastructure:
- You can read text aloud, or play a pre-recorded audio message.
- You can read a set of options and track which option was chosen (“Press 1 for sales, 2 for marketing etc”)
- You can collect and act on spoken feedback
If you want to ask callers to select from a set of choices you read out to them, then transfer them – you can do this. If you want to collect feedback from callers and maybe lookup their details in a database before deciding where to transfer them – you can do this. The potential to create a really nice, useful and polished experience for users is huge!
It’s important to keep in mind when creating Workflow applications that the end result is still a standard UCMA application. Therefore, even though you will create a WWF Workflow file which will handle the “real work” of your application, this will only work if you surround the Workflow with all the usual UCMA application mechanisms, such as starting an application, connecting to endpoints, registering incoming call handlers, etc. I’ll break all this down in a moment, but it won’t be the topic of this post, or this series. (I will cover it elsewhere though, in time).
In this post, I want to talk through creating a Workflow application, and the steps you have to take to get a minimally working example. In future posts I will cover the most common WWF shapes you can use, some common usage scenarios and even show you how to implement a simple number guessing game using UCMA!
Creating a Workflow Application
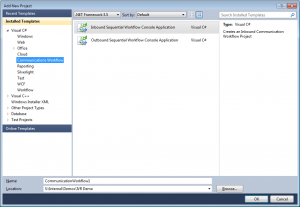
With the UCMA APIÂ come two extra Visual Studio templates. Located under “Communications Workflow” are templates to create both incoming and outgoing sequential workflows. I’m going to be concentrating mostly on incoming workflows in these posts, as I think these are probably the most popular.
Creating a project with these templates actually just creates a Console Application but adds a workflow file and some code to provision your application. However, the code in the template is old. It’s based on the UCMA 2.0Â method of provisioning, which was a lot more complicated than it is now with UCMA 3.0 and its ability to auto-provision. Therefore, I would suggest you replace nearly all of this code with your own, for provisioning and starting UCMA applications.
As I said before, it’s out of the scope of this post to talk about how to provision, set up and start an application. It comes down to remembering that this is still a “normal” UCMA application. Therefore, you will need a TrustedApplication and TrustedApplicationEndpoint. You will need to provision your app, register for incoming AudioVideo calls and start up in the normal way. You will want to register for incoming calls on the AudioVideo call type with an Event Handler to a method which you will use to kick off your worfklow.
this._endpoint.RegisterForIncomingCall<AudioVideoCall>(this.IncomingCallRecd);
The Incoming Call
At this point, you should have a working UCMA app that does, well, nothing useful! It should accept incoming calls, and calls a method when a call arrives, but nothing else.
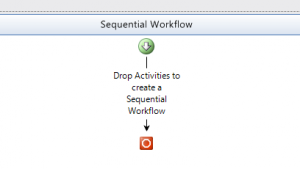
The template created a file called Workflow1.xoml. If you still have it, open it. If you deleted it, then you can add it as a new item (it’s under the Workflow section and is a Sequential Workflow (with code separation) file).
This is your workflow. We’re going to leave this here for now, and come back to it in a future post when we discuss some of the most common shapes, but if you’re the impatient type, feel free to examine all the different shapes available to you in the toolbox.
We have a workflow file, but we haven’t wired it up to the call yet. Let’s go back to our method handling the incoming call:
void IncomingCallRecd(object sender, CallReceivedEventArgs<AudioVideoCall> e)
{
}
We don’t accept the call like we might with other UCMA solutions. Instead, here we create an instance of the workflow and pass the call to it. Once we’ve done that we can start the workflow, and it will then take over and run through its steps, using the call we have passed it.
Creating the Workflow
The code that follows next isn’t mine: it comes from the project template – I’m just pulling out the interesting bits.
To get from your workflow file into something which is running and capable of handling calls, you need to create a WorkflowRuntime object. You’ll feed this object details of the workflow to use and, eventually, details of the call object. For now though, you just need to create it:
_workflowRuntime = new WorkflowRuntime();
_workflowRuntime.AddService(new CommunicationsWorkflowRuntimeService));
_workflowRuntime.AddService(new TrackingDataWorkflowRuntimeService());
_workflowRuntime.StartRuntime();
Technically, you don’t have to perform this step once you know a call is ringing, you can do it beforehand and have it waiting for you, as you don’t have to specify the call here (or even the workflow – so you could have scenarios where different calls from different people get routed to different workflows based on time of day, caller, etc.)
Once you have the runtime, you can start the workflow. Again, see the template for a fuller example, but the important lines that make things happen are:
WorkflowInstance workflowInstance = _workflowRuntime.CreateWorkflow(typeof(Workflow1));
This creates an instance of a specific workflow, and is where you pass through your Workflow object.
Aside: you can pass properties through to your Workflow object. To do this, follow the excellent instructions given on the gotUC site here: Lessons Learned: passing parameters to your workflow.
CommunicationsWorkflowRuntimeService communicationsWorkflowRuntimeService = (CommunicationsWorkflowRuntimeService)_workflowRuntime.GetService(typeof(CommunicationsWorkflowRuntimeService));
TrackingDataWorkflowRuntimeService trackingService = (TrackingDataWorkflowRuntimeService)_workflowRuntime.GetService(typeof(TrackingDataWorkflowRuntimeService));
Don’t worry too much about these two services. I’ll be doing a blog post soon about what they are, and why they’re useful, but we won’t be using them in this series.
try
{
communicationsWorkflowRuntimeService.EnqueueCall(workflowInstance.InstanceId, call);
communicationsWorkflowRuntimeService.SetEndpoint(workflowInstance.InstanceId, application.Endpoint);
communicationsWorkflowRuntimeService.SetWorkflowCulture(workflowInstance.InstanceId, new CultureInfo("en-US"));
}
catch (InvalidOperationException ex)
{
call.EndTerminate(call.BeginTerminate(null, null));
}
Here you are passing through details of the call, the endpoint, and the workflow culture. Notice that you do this in a try..catch loop: if this goes wrong then you don’t want to leave your caller hanging on in an empty conversation.
At this point, control is transferred to the Workflow object and the sequence of events in the call is handled by the Workflow.
Stopping a Workflow
You should also make sure that you shutdown the WorkflowRuntime object once you no longer need it:
_workflowRuntime.StopRuntime();
The template has a nice example of attempting to shut down, then forcing a dispose after 45 seconds if the object still hasn’t shut down cleanly.
Apart from the fact that your workflow doesn’t actually do anything, hopefully you now have enough code for a fully running UCMA application which hands off incoming AV Calls to a workflow.
The next stage is to populate the workflow with something interesting. In the next post I describe some of the most common, potentially most useful shapes and how you can use them.


hi Tom,
‘Communications Workflow’ not seen on VS2012, I installed UCMA SDK 4.0
yeah, it got removed in UCMA 4 unfortunately. If you want to use the Windows Workflow Foundation shapes (the drag and drop stuff) you’ll need to install UCMA 3. Otherwise, you can actually do everything you could before using UCMA 4 – but you have to do it all in code.