UCMA Workflow 3 – IVR Example
This is post number 3 in a series of 4 on using UCMA Workflow. If you need more information on this or are looking for a reference guide, I highly recommend Professional Unified Communications by George Durzi & Michael Greenlee, which has an entire chapter (50 pages) devoted to Workflow.
In the last two posts I described how to create a UCMA application which uses the Workflow SDK and described some of the more common (and, I think, more useful) shapes you can utilise.
In the next two posts I’d like to walk through some examples. In this post I’ll be creating a simple IVR solution for a small company. After that I’ll describe how to make a Lync version of the numbers game.
The Idea
Interactive voice response (IVR) is a technology that allows a computer to interact with humans through the use of voice and DTMF tones input via keypad.
Lots of companies have a single ‘customer’ phone number which routes to their phone system. Often this number just goes through to a single hunt group, such as the Customer Services team who will then route it appropriately if necessary. Using Lync and the Workflow API we’re going to add a simple IVR which will ask the caller which department they’d like to be routed to. We will then transfer the call depending on the result. [this is a simple solution based on the assumption that each department will map to single number or SIP URI. However, for lots of small companies, this is true, and even for those that aren’t, the mapping could be made to a hunt group number or similar.]
Getting Set Up
I’m going to assume you’ve read at least the first post in this series and already have a UCMA application set up, and a new, blank Workflow XOML file. The application should compile as it is, and accept incoming AV Calls, handing them off to the Workflow file.
In this walkthrough, I’m not going to suggest that you name any of the shapes. Don’t take this to mean that I don’t think you should, I just don’t want to have to spell it out on every shape, and for consistency of the screenshots I’ll leave everything with its default naming. You’ll find it makes a lot more sense (especially when you get to the If-Else branches) if you name the shapes sensibly as you go along.
Step 1 – Accept the call, create a sequence
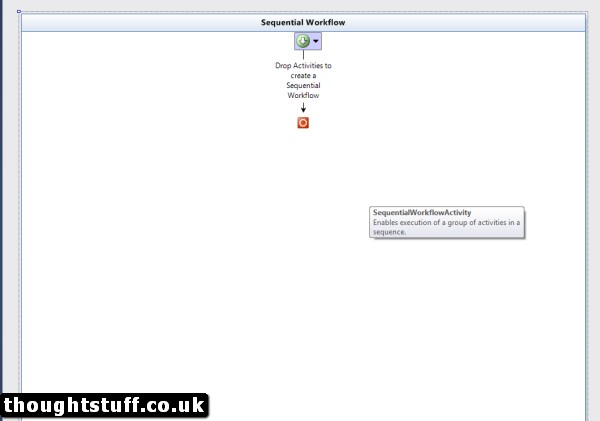
Hopefully, your workflow file looks like this:
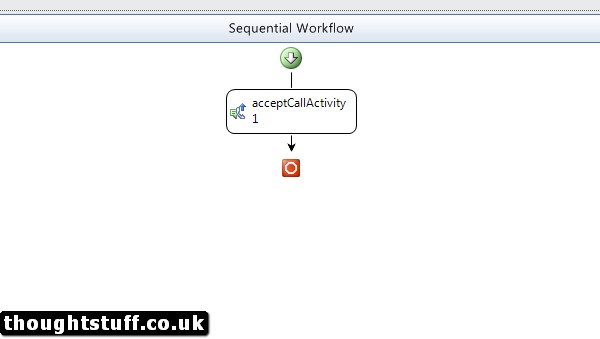
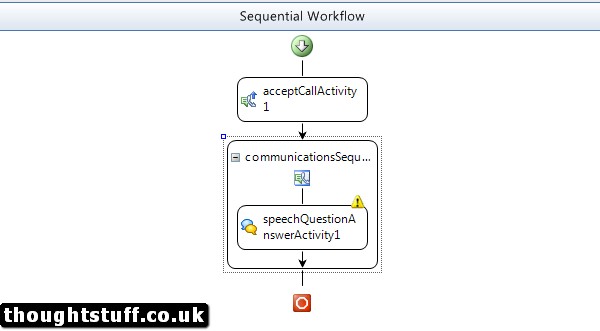
Drag on the AcceptCall shape – it’s in the Unified Communication Workflow section of the Toolbox, probably at the top. Drag it onto where it says “Drag Activites to create…”:
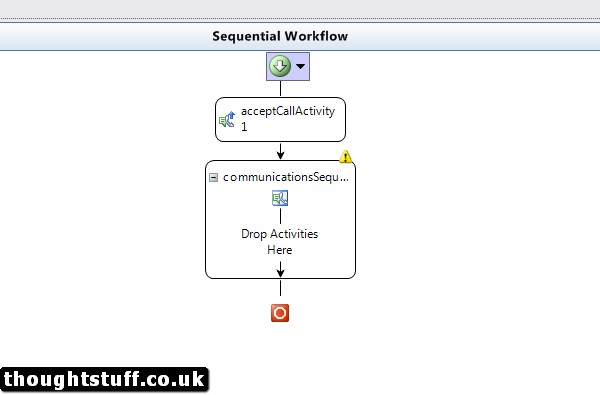
Now find the CommunicationSequence shape and drag it to underneath the AcceptCall shape but above the end red square. You’ll notice that there is a yellow warning icon. That means we’ve not provided a mandatory property:
Click on the shape to populate the Properties in the Properties window. (if you don’t have a Properties window, click the shape anyway and type Alt+Enter). Click the yellow warning icon on the shape to find out which property is required. Clicking the text will take you directly to that property (it should be the CallProvider property).
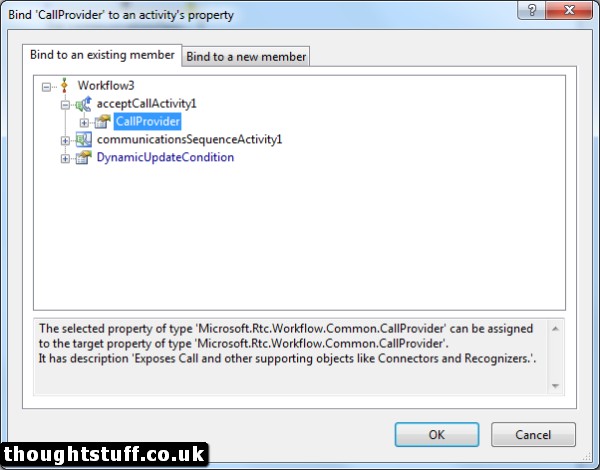
Click the ellipses to the right of the property’s value box to open the Bind ‘CallProvider’ to an activity’s property dialog. Our call provider will be the AcceptCall shape. Expand the AcceptCall shape and click the CallProvider object. You’ll notice the text at the bottom tells you this is “OK”. That is, the type of the object you’ve chosen matches the type required. In more complicated set-ups you can imagine how you might have different call providers for incoming and outgoing calls:
Step 2 – Ask a Question, Get a Response
Next, find the SpeechQuestionAnswer shape. Drag it onto the workflow, within the communication sequence shape:
Again, you’ll notice that this shape has some required properties. By clicking on the warning icon you can see that you will need to provider value for MainPrompt and for one or both expected speech inputs.
MainPrompt is the text that is spoken and is designed to set up the question. You can put whatever you want in there, I’m going to suggest something like: Welcome to Gringotts. Press 1 for Sales, 2 for Finance, 3 for Reception. If you’ve never tried this before, take a moment to compile the application now (or just add a speechStatement shape). There’s something childishly cool about UCMA doing Text-to-Speech over the phone based on your typing!
For this example I’m only going to use DTMF tones for my feedback (pressing buttons on the keypad) but it’s pretty easy to modify this for speech feedback (see post 2). Click the ellipses to the right of the ExpectedDTMFInputs property and enter the values: 1,2,3:
Step 3 – Make Decision, Transfer
Once we’ve come out the other side of a SpeechQuestionAnswer shape, we can hope that we have some feedback from the user to go on. This will be residing in the shape’s RecognitionResult property – which we can query.
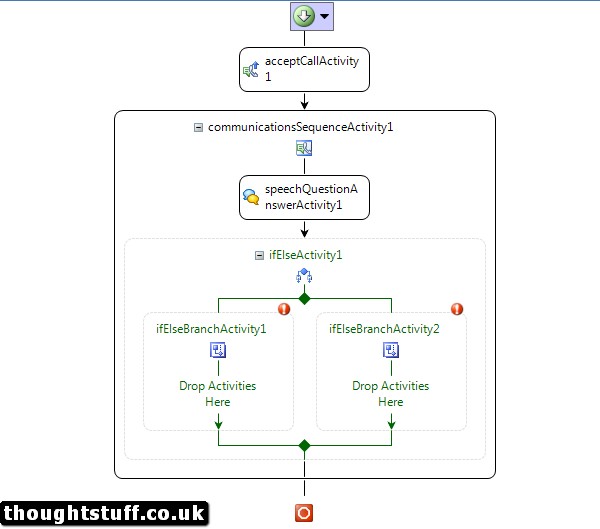
Find the IfElse shape. It won’t be in with the other shapes, as it’s part of the Windows Workflow v3.0 collection. Drag it immediately underneath the SpeechQuestionAnswer shape making sure that it’s still within the communicationsSequence shape: (I get this wrong quite a lot and then spend ages wondering why nothing works!)
You’ll notice a worrying red exclamation icon on one of the branches. If you hover over it you’ll be told that the branch doesn’t have a Condition set. The reason that it’s only a problem on one of the branches and not both of them is that you can have up to one branch without a condition – it serves as the Else part of the statement. However, in this example we’re not going to have one.
Add another branch to the shape by right-clicking anywhere in the shape (not in the branches though) and choosing AddBranch:
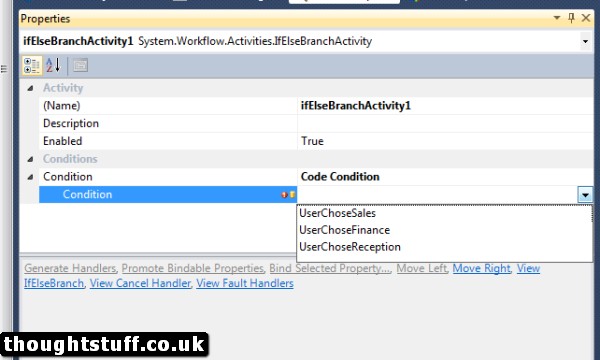
Select the branch on the far left: this will be our Sales branch. For the Condition property, choose Code Condition. Then, click the small arrow to the left of the property title to expose the other required part of the property, the actual condition. You’ll notice there are no available Conditions in the drop down for you to choose from – we haven’t created any yet.
We’re going to create the conditions in code, by evaluating the result from the speechQuestionAnswer shape with what we know are the available inputs. Right-click on the white-space of the workflow and choose View Code. Add this method to evaluate whether the user chose 1 for Sales:
private void UserChoseSales(object sender, ConditionalEventArgs e)
  {
    if (speechQuestionAnswerActivity1.RecognitionResult.Text.Replace(" ", string.Empty) == "1")
     {
        e.Result = true;
      }
    else
      {
        e.Result = false;
      }
  }
Repeat this code for the other 2 types of input.
Now, if you go back to the workflow and repeat the process of choosing a Code Condition, the three methods will be show. Repeat the process for all three branches (including the one at the end without the red icon) to correctly associated each branch with an expected DTMF input:
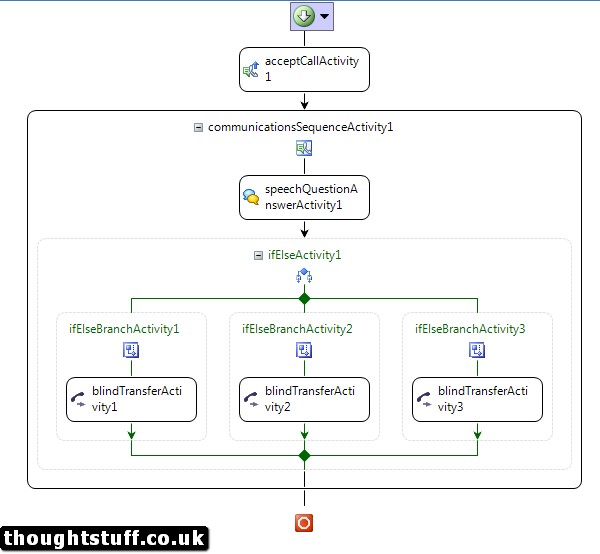
Finally, now that we know where the caller wants to go, let’s transfer them! Find and add the BlindTransfer shape 3 times – one into each branch of the IfElse shape, where it says “Drop Activities Here”:
Each of these transfer shapes has a required property (as shown by the yellow icon) which is the CalledParty, or ‘where you want to transfer to’. You can specify anything here, including numbers in tel:12345 format and Lync contacts in sip:[email protected] format. For testing, I’m going to use my home phone number for Sales, my mobile for Finance, and my Lync address for Reception, using the tel and sip formats respectively.
Step 4 – Finish
At this point, your project should compile. Deploy it to a Lync Application Server, provision it with a SIP address (which you can tie to an incoming phone number) and give it a call!
Points for Improvement
One of the largest problems with this solution is the blind transfer. If the other party doesn’t pick up, the call is lost. I’ll be discussing a better alternative, the Assisted Transfer in a separate post soon.
Also, this example doesn’t contain any code to cope for a flow which isn’t exactly as we expect. UCMA inserts some sensible defaults, so you’ll notice that if you accidentally type, say, 9, it will just repeat the question. Eventually though, you’ll confuse it and the call will “hang” – still connected but not really being controlled by the Workflow. These are all things you can fix up easily though, really just by poking around in the properties of the speechQuestionAnswer shape and also by exploring some of the possible events you can subscribe to in the communication sequence shape.
As you can see, the workflow enables some interesting scenarios. It doesn’t provide any extra functionality which you couldn’t already do in UCMA, but it seems to present it in a way that promotes solution thinking with regard to workflow-orientated problems such as IVR. In the next post I’ll show another example, this time for something more interesting.






IVR solutions enable users to retrieve information including bank balances, flight schedules, product details, order status, movie show times, and more from any telephone
Hi Tom,
Would it be possible to “catch” the caller’s customer number (in the form of DTMF code) and then pass that on to the Lync Client, so that the representative can easily look up the customer’s info?
Kind regards,
Koenraad Willems