


How to write a simple webpage chat, voice & video experience with Skype for Business and Skype Web SDK in 160 LOC!
Introduction
In early 2015 Microsoft released Skype Web SDK â a RESTful JQuery API which interacts with Skype for Business. Prior to this it was possible to write websites which signed in as Skype for Business users and send/received Instant Messages, using the Unified Communications Web API (UCWA) â but it was complicated. UCWA is a very powerful way of communicating with Skype for Business using just HTTP Request and Response calls â but this adds complexity when trying to use it for simple scenarios. Besides, UCWA doesnât support audio or video. Skype Web SDK adds this support today through the use of a plugin, and soon it will support the ORTC API and the need for the plugin will be removed.
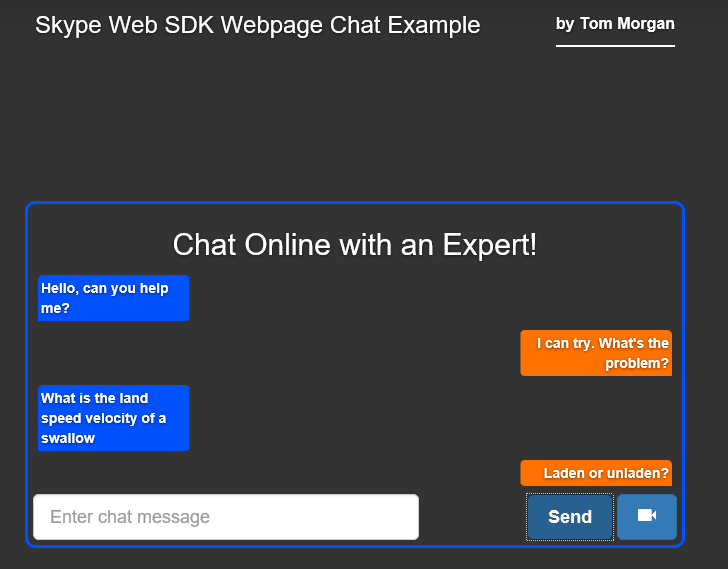
To show whatâs possible Iâm going to create a simple webpage chat experience. Visitors to a webpage will be told that the chat feature is either Online or Offline, based on checking the presence of a specific user. Assuming the user is Online webpage visitors will be able to start an instant message conversation. They will also be able to start a video call directly from their browser, without needing to have Skype for Business installed!
Disclaimer: in order to keep the scope of the example confined the scenario involves signing in as a specific user (with a hardcoded username and password stored in JavaScript) and checking the presence of a specific user. This is not appropriate for real-world usage and would not scale â it is done purely to show some of the capabilities of Skype for Business. In order to use Skype Web SDK you should ensure all server pre-requisites are met. Skype Web SDK is in Public Preview and you should review and agree to the Pre Release Software License Terms before use.
What this is (and what is isnât)
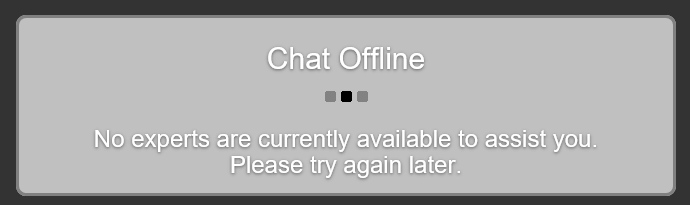
What Iâm describing in this post is a web site which, when the page loads, will sign in as a specific user. The page will monitor the presence of another Lync user, and use this userâs presence to mark the online-chat function as being âonlineâ or âofflineâ. The page will also start a new conversation with that user.
Whilst this is a good demo of what the Skype Web SDKÂ can do, there are some problems here which prevent this being a workable solution for all but the smallest of projects. The credentials are in the JavaScript, so they can be seen by anyone. Everyone signs in as the same user, so it wonât scale. You can only contact a single person.
There are definitely ways around these problems ⦠but this isnât the post for them. I just wanted you to be aware of them so you donât read this post and think this is the best, or only, way of using UCWA.
Finally, to use the video features described in this blog post you need to use Internet Explorer, not Firefox of Chrome and install the Skype for Business Plugin (Windows | Mac)
High-Level Design
In this scenario website users (visitors) are able to communicate with someone who is able to answer their questions (an expert). When a visitor visits our webpage, the Skype Web SDK code will sign into a Skype for Business environment and monitor the status of a specific user (the expert), displaying this status to the visitor. If the expert is available then the visitor will be able to send Instant Messages to the expert and receive responses. The visitor will also be able to upscale the conversation by adding video capabilities.
160 LOC vs. 270 LOC, with added video
I have previously written this example using UCWA, however as a chat-only experience (no audio or video). This involved roughly 270 lines of code of JavaScript, plus using the Microsoft-provided JS library helper files (roughly 3000 LOC). This is a very unscientific comparison â but less lines of code to babysit is definitely a Good Thing!
If youâd like to download the code so that you can follow along this walk-through, itâs hosted on GitHub at:Â https://github.com/tomorgan/SkypeWebSDKSamples/tree/gh-pages/SkypeWebSDKSimpleWebpageChatExample
Before you start
Before you can start using the Skype Web SDK, you need to reference it within your JavaScript file. Rather than providing a static URL for the SDK, Microsoft have instead used bootstrapper code to ensure that you always receive the most recent and up to date version of the SDK. To use this, you first add a reference to the SkypeBootstrap.js file:
<script type="text/javascript" src="//swx.cdn.skype.com/shared/v/1.1.23.0/SkypeBootstrap.js"></script>
And then initialise the Skpe Web SDK from the bootstrapper. Assuming the initialisation is succesfull I am then calling the function SignIn():
var client;
Skype.initialize({
apiKey: 'SWX-BUILD-SDK',
}, function(api) {
client = new api.application();
console.log("SDK Instantiated");
SignIn();
}, function(err) {
alert('Error loading Skype Web SDK: ' + err);
});
});
At this point, the client object is ready to use. This object is of type Application and is the top level class for the Skype Web SDK. All other parts of the SDK can be reached from this object, as can be seen in the Skype Web SDK Object Model:
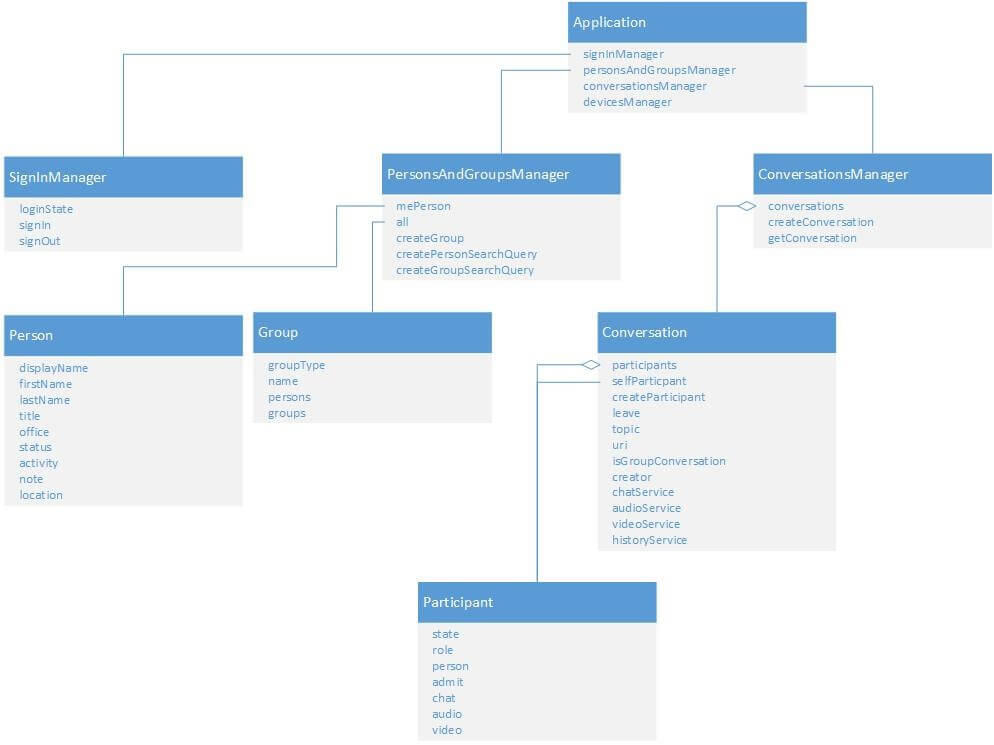
Once you have instantiated the Application object you can then access all other parts of the object graph.
Signing In
In the code above youâll notice that once the instantiation is complete, the SignIn function is called. Letâs look at that now:
function SignIn() {
console.log("Signing In");
// start signing in

client.signInManager.signIn({
username: loginSIPAddress,
password: loginPassword
}).then(function() {
//log in worked!
SubscribeToExpertPresence();
}, function(error) {
//Something went wrong.
alert(error);
});
}
If youâve ever used UCWA to perform sign in then youâll know this is a much easier and cleaner experience! This single function call to the SignIn function of the SignInManager object abstracts away all the Autodiscover and handshaking required to log in to Skype for Business.
Subscribing to Presence
Now that weâre signed in we need to subscribe to the presence of a specific user, the expert. This is so that we know whether or not to display the chat window and allow users to start a chat session on the webpage â we donât want them to do this if the expert isnât available.
Using our reference to the Application object, we can use the personAndGroupsManager to search for a particular person. Because in our example we know the SIP address of the expert we can expect only a single record back. In other use cases you could search by name and present a list of results to the user:
function GetContactFromName(contactSIP)
{
var query = client.personsAndGroupsManager.createPersonSearchQuery();
query.text(contactSIP);
query.limit(1);
return query.getMore();
}
This function will perform the search and return a promise, rather than the actual results. The results are always enclosed in an array, even if there is just one match, as in this case. Because we know weâre only expecting one result (and because this is example code so I can get away with it!) weâre looping over the results even though weâre only expecting one record to be returned:
function SubscribeToExpertPresence() {
console.log("Subscribing to expert presence");
GetContactFromName(expertSIPAddress).then(function(results) {
results.forEach(function(result) {
expertPerson = result.result;
expertPerson.status.changed(function(newStatus) {
ExpertPresenceChanged(newStatus);
});
expertPerson.subscribe();
});
});
}
The results of the search are Person objects, which include a status property. This includes a changed function â making it easy for us to set up a call to a function when the status changes. Finally, we call subscribe on the person object to register our interests in the calls. Skype Web SDK wonât just subscribe to everything just in case we attach an event handler: we need to explicitly tell it about people we want to subscribe to.
Every time the expertâs presence change our function ExpertPresenceChanged is called with the new status. This makes it easy for us to update the UI by hiding or showing the chat console:
function ExpertPresenceChanged(newStatus) {
console.log(newStatus);
$('#ajaxLoading').hide();
if (inVideoCall) return; //ignore status changes when having a video call with expert.

if (newStatus == 'Online') {
$('#chat-offline').hide();
$('#chat-online').show();
} else {
$('#chat-offline').show();
$('#chat-online').hide();
}
}
Iâve also added a check to test whether the expert is currently in a video call with the user. In this case, the expertâs Skype for Business presence will change to Busy â but that shouldnât cause the UI to reset to show them as not available!
Starting a new Conversation & Sending an IM
The process of starting a new conversation begins when the user types a message into the input box and clicks the Send button. This is also how they send subsequent messages in the same conversation, so itâs necessary to check whether or not a conversation already exists, and if it doesnât, create it:
$("#chat-send").click(function () {
if (typeof conversation == 'undefined') {
StartNewConversation();
} else {
SendMessage();
}
});
To start a conversation we first create a Conversation object. This is done via the ConversationManager, using the method createConversation(). There are no parameters but the method returns a handle to a new conversation object. The next thing to do is to add participants to the conversation. The signed-in user is automatically added to the conversation because they are creating it, but we need to add the expert user. This is done with the createParticipant method, which creates the participant object, which we then add to the participants collection. Finally, we add the newly created conversation to the ConversationManagerâs conversations collection.
At this point the conversation is set up and ready to be started. Before we do though we will subscribe to two events so that we can react when they occur. They are the state of the conversation (so we know when itâs been fully created and can then continue to actually send the message the user typed) and any items being added to the History Service for the conversation. The History Service keeps a collection of messages sent and received, so being notified of these events allows us to keep the UI up to date throughout the conversation. Finally, to start the instant message conversation, we call the start() method on the chatService:
function StartNewConversation()
{
conversation = client.conversationsManager.createConversation();
convParticipant = conversation.createParticipant(expertPerson);
conversation.participants.add(convParticipant);
client.conversationsManager.conversations.add(conversation);

conversation.chatService.state.changed(function (newState)
{
if (newState == 'Connected')
{
SendMessage();
}
});

conversation.historyService.activityItems.added(function (newMsg) {
if (newMsg.type() == 'TextMessage')
{
var direction;
if (newMsg.direction() == 'Incoming')
DisplayIncomingMsg(newMsg.text());
}
});

conversation.chatService.start();
}
Once the conversation has been established the state will update and the SendMessage method will be called. Actually sending an IM once the conversation has been established is easy: just call the sendMessage method of the chatService:
function SendMessage()
{
var textToSend = $('#chat-input').val();
if (textToSend !== "") {
conversation.chatService.sendMessage(textToSend);
DisplayOutgoingMsg(textToSend)
}
}
Adding Video
From the screenshot of the example youâll notice there is also a button with a video icon. This allows the user to upgrade their instant message conversation to a full video call, within the browser. There are some cavetas to that today â you need to have the Skype Plugin installed for this to work. However this restriction is being worked on and you can expect it to be removed in a future version of the SDK.
You would think that adding video capabilities to this example would be a complicated process. Well, I have good news for you:
$("#video-call").click(function () {
inVideoCall = true;
conversation.videoService.start().then(function () {
conversation.selfParticipant.video.channels(0).stream.source.sink.container(document.getElementById("videoWindowOutgoing"));
convParticipant.video.state.changed(function(state) {
if (state == 'Connected')
{
convParticipant.video.channels(0).stream.source.sink.container(document.getElementById("videoWindowIncoming"));
convParticipant.video.channels(0).isStarted.set(true);
}
});
});
});
Thereâs really only three things going on here. Firstly, we call start() on the videoService to start it up, in very much the same way as for the chatService. Then, we reference the video source of the conversationâs selfParticipant object (this is the web user) and provide a div object to place the video into. This is for the âvanity feedâ so the web user can see themselves on screen. We do the same for the expert participant, although we have to wait for the state of the video object to become connected before we can do this. Finally, we mark the video channel as started to force the SDK to display the incoming video.
Conclusion, Code
The full source code for this example is on GitHub, so I encourage you to walk through the code yourself. As I said at the start this is quite a contrived example, but hopefully it gives you a feel for whatâs possible with the Skype Web SDK.
Written by Tom Morgan
 Tom is a Microsoft Teams Platform developer and Microsoft MVP who has been blogging for over a decade. Find out more.

Hi Tom,
Thanks for your post. Very enlightening indeed. I am trying to develop a chat client for the web. I am however having an issue…
I get this error:
https://lyncdiscoverinternal.vcsu.edu/ 403 (Forbidden)
https://lyncdiscover.vcsu.edu/ 403 (Forbidden)
I can access the urls above in my browser without any errors.
What could I possibly be missing on the server side?
Thanks.