


How to: Create your own Family Video Room using Azure Communication Services without writing any code (if you don’t want to)
Introduction
If we’ve learned one thing in 2020 (and I sincerely hope we come out of this year learning more than one thing about ourselves), it’s how to use video conferencing to replace in-person meetings. Nowhere has this been more obvious (to me) than family meetups. Sure, I’m doing more conference calls for work, but I’ve always done conference calls for work. I’ve never done them for catching up with my extended family, though.
Skype, Teams, Zoom, HouseParty – I don’t know about you, but we’ve tried them all. They all have their advantages and disadvantages. As a developer, I was left thinking “I wonder if I could do something different: something that’s just right for our family, with just the stuff we need, and easy enough for everyone to use”.
Earlier this year (at Ignite), Microsoft launched Azure Communication Services as a way for developers to embed audio and video functionalities into their solutions. Alongside the announcement, several sample projects were provided, including one for group call scenarios. As soon as I saw it I thought this would be perfect for our family video call, and maybe other peoples too. However, the sample took a few steps to set up, deploy and use. I needed to make it a little simpler.
Also earlier this year, Microsoft also announced that Azure Static Web Apps now supported Azure Functions, meaning it was possible to create a full-stack app including API from a GitHub repo, via GitHub Actions.
For me, everything clicked into place. An Azure Static Web App hosting the Azure Communication Services group calling sample, with Azure Functions securing the token management.
It took a little bit of messing around (but that was mostly me not understanding React/Typescript/JSX well/at all) but that’s what this code is.
What is this?
This project builds heavily on this sample project:
Azure Communication Services Group Calling Hero Sample
It takes the above sample and makes it work with Azure Static Web Apps. It does this by implementing the back-end part (to get access keys etc) as API calls using Azure Functions, which are now built right into Static Web Apps.
You have some options for how you want to use it. You could either take it exactly as it is, and use it for your own Family Video calls. Or, you can extend it and make it better by adding features etc etc.
Disclaimer
This is a sample. It’s not meant for you to take and use without fully understanding what it’s doing. It’s definitely not meant for production use. You should understand the risks of hosting your own ACS instance and associated web-based entry point on the public internet before proceeding. If you end up sharing your access codes, or there’s a bug in the code and you end up with a huge hosting bill, or find yourself unwittingly hosting other people’s rooms, you’re on your own. This sample code is provided under the MIT license, which you should read in full (it’s 21 LOC).
Pricing
If you follow these steps, you will be deploying your own instance of Azure Communication Services and Azure Static Web Apps to create your very own Family Call group session website. This will be running in your Azure tenant – meaning you’ll be directly responsible for the cost. There’s no licenses to pay, but there are some usage charges:
Azure Communication Services – latest details on pricing are here, but at the time of writing expect to pay $0.004/User minute whilst joined to a call. (hint: it’s not going to break the bank)
Azure Static Web App – latest details on pricing are here, but at the time of writing Static Web Apps are in preview, and are free.
So, this whole solution will cost $0.004, per user, per minute. A typical family call of 4 people connecting for an hour will cost approximately 96 cents.
How to deploy
Step 1 – Create a Azure Communication Services instance
Create a new Azure Communication Services instance. Once it’s created, go to Keys and make a note of one of the Connection Strings.
Step 2 – Deploy the code
Make sure you are logged into GitHub, otherwise you’ll get 404 and other strange errors.
Click https://github.com/tomorgan/FamilyCall-ACSSampleAsAzStaticApp/generate
(If this link shows a 404, then go to the repository at https://github.com/tomorgan/FamilyCall-ACSSampleAsAzStaticApp, and click the “Use this template” button.)
In the Repository name box, enter the name you want for the project
Click Create repository from template.
Step 3 – Create a Static Web App and link to this code
This step not only creates the Azure Static Web App in your Azure tenant, but it also links it to the GitHub repository you just created. That means that the code will automatically be compiled and published for use by the Static Web App (without you needing to do any work!). Any changes you make will automatically cause a rebuild and re-publish to the Web App! DevOps!!
- Navigate to https://portal.azure.com/#create/Microsoft.StaticApp to create a new Static Web App
- Select your Azure subscription
- Select or create a new Resource Group
- Name the app
- Select a Region closest to you
- Select the Free SKU
- Select the Sign-in with GitHub button and authenticate with GitHub
After you sign in with GitHub, enter the repository information.
- Select your preferred Organization
- Select the repository you just created from the Repository drop-down
- Select master from the Branch drop-down
If you don’t see any repositories, you may need to authorize Azure Static Web Apps in GitHub. Browse to your GitHub repository and go to Settings > Applications > Authorized OAuth Apps, select Azure Static Web Apps, and then select Grant. For organization repositories, you must be an owner of the organization to grant the permissions.
- In the Build Details section, set the following configuration details:
- Select Custom from the Build Presets dropdown
- Keep the default value in the App location box
- Make sure that the Api location value is set to “api”
- Leave the App artefact location box empty
- Select Review + create.
- Select Create.
- Select Go to resource.
Step 4 – Wait for it to fail and then make some changes
The effect of joining your Static Web App to that GitHub repository is that it will kick-off a new build process to compile and deploy the code.
You can see this happening by going back to GitHub, and choose the Actions section of your repository.
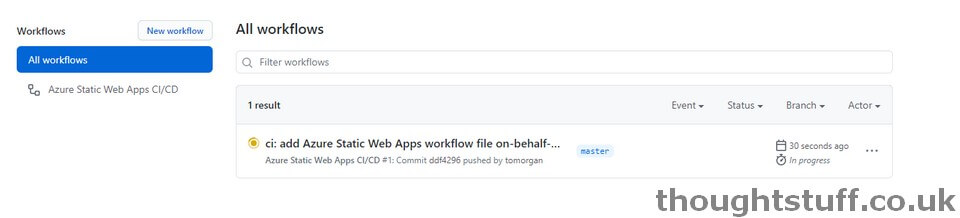 Eventually (after a few moments), this action will fail. You can examine the reason why, but it’s most probably because of these errors:

These are warnings that I’ve not been able to workaround in the code, and the only fix I’ve found is to disable checking for these warnings in the build process.
This is a bit clunky, but I sort of ran out of time and ability. If you know how to fix these so that the GitHub build works, without having to turn off treating warnings as errors, I’d appreciate it if you could let me know!
To fix this, go back to the code in GitHub. At the top, you’ll notice that a new folder has been added:Â .github/workflows. In that folder is a new .yaml file. Edit that file, and insert the following lines immediately after the “name” entry on/around line 16:
env:
  CI: false
The file should now look like this:
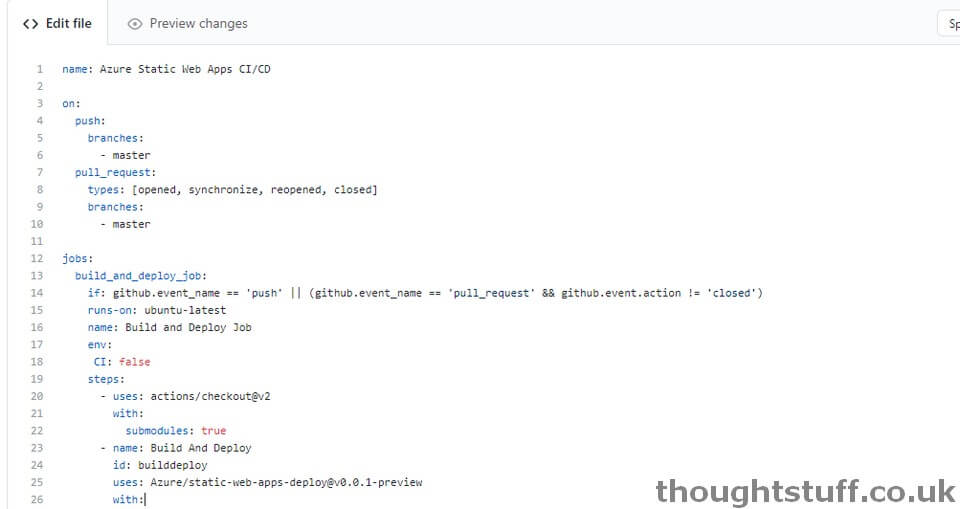
Commit the file (to the master branch). This will kick-off the build process again, and this time it should succeed.
Step 5 – Set Config Values
Once the step above has completed (and you can’t do this until then), it’s time to set some configuration values in the Static Web App.
As part of the work to take the ACS sample and turn it into something that could be used for family calls, I’ve created some API calls to protect the process of granting an access token, and to serve up the group ID. Both of these are stored as config values. Thirdly, the connection string to the Azure Communication Services instance created in Step 1 is also set as a config value.
In the Static Web App, click Configuration. If your code is still deploying (or has an error deploying) you won’t be able to proceed, seeing this instead: Application settings are only applicable to Static Web Apps with at least one function. Add a function to your app to enable Configuration.

Once deployed though, you should be able to add the following Application Settings:
- Name: ACS_Connection_String  Value:  [connection string from step 1 – the whole thing, including the “endpoint=” part]
- Name: EntryCode  Value: [whatever you like, this is the entry code to enter your room. Change it often!]
- Name: GroupIDÂ Â Value: [this is the ID of the group room everyone will join. It should be a GUID so generate a new one and use that. If you want to, you could host multiple rooms with different Group IDs using the same ACS instance.]
Testing it out
On the Overview page of your Static Web App is a URL – this is the URL of your new Family Room (you could also set up a custom domain, see the Custom domains section):

Everyone is prompted for the entry code. This needs to be the same as the EntryCode you set in the Application Settings. Assuming this is entered correctly, clicking Next will show the device screen and let you set your name, before joining you to the call:
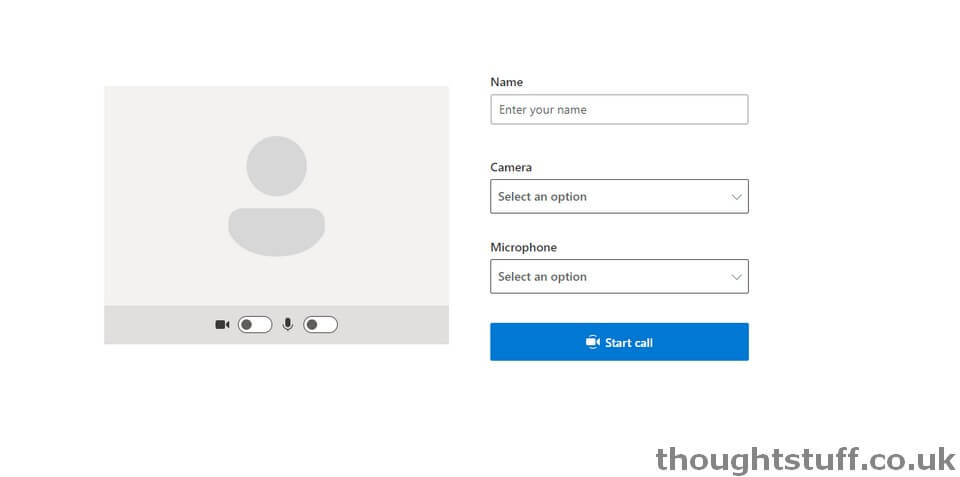
Once you’ve chosen your options, and click Start call, you’ll be joined into the call. Anyone else you’ve shared that webpage with, doing the same thing, will also join the same call, meaning you’ve just created your very own group room functionality, running in a web browser, powered by Azure Communication Services and Azure Static Web Apps!

Written by Tom Morgan
 Tom is a Microsoft Teams Platform developer and Microsoft MVP who has been blogging for over a decade. Find out more.
Related posts:
 Building an FAQ Bot using Azure and QnAMaker without writing any code: Part 1
Building an FAQ Bot using Azure and QnAMaker without writing any code: Part 2
Building an FAQ Bot using Azure and QnAMaker without writing any code: Part 1
Building an FAQ Bot using Azure and QnAMaker without writing any code: Part 2
 Azure Communication Services: what it is, how you use it, and why it’s AMAZING!
Building an FAQ Bot using Azure and QnAMaker without writing any code: Part 3
Azure Communication Services: what it is, how you use it, and why it’s AMAZING!
Building an FAQ Bot using Azure and QnAMaker without writing any code: Part 3
 Creating a Microsoft Teams IVR Bot Part 2 – The Sample Code
Hey Tom, I’m going to have to try this out now… one question… is there an option to record the call in this service?
no, there’s no built-in recording at the moment in ACS.
Is Azure Communication Services Available in India? Can I use Chat, Call functionality? Any Idea when it is going to be generally available?
Right now, just in US. At Ignite earlier this month, Microsoft said that ACS would be GA “later this month”….
Hi, i am looking for an option to generate a predefined meeting URL which is only used by the given participants and for a valid time period. Is it possible to achieve this?
thanks