


Learn Azure Communication Services Day 11 – Changing Audio & Video Devices
This blog post is part of a series called “Learn ACS“, all about Microsoft Azure Communication Services. The series covers a high-level overview of capabilities and considerations, then dives into the development detail of using ACS in your application. Find the rest of the posts in the series at learnACS.dev.
Today, we’re going to take the Day 8 sample (which joins an ACS client to a Teams meeting), plus the video features we added in Day 10, and add the ability to change audio and video devices. You could add these to any of the samples we’ve previously made – but the Teams meeting one means it’s easy for you to create a Teams meeting and join it using the Teams client, and then join with an ACS client and toggle the video and audio devices then see and hear the effect using the other client.
When we talk about audio and video devices, there are actually three different devices we are changing: the video feed, the microphone and the speaker. Each of these can have different values, and these values can be changed mid-call.
Audio devices in Azure Communication Services are changed by making a call to the DeviceManager, which then handles the actual switching of audio. No other change is needed. For anyone who has previously had to deal with WebRTC, you’ll recognise this is a significantly easier process.
For video devices, there is a method on the LocalVideoStream object called switchSource which we can use. This has the benefit of not only changing the video feed sent to the call (if the call is connected) but also updating the local vanity feed automatically.
You can see all this happening in the code below. As before, I’ll provide all the code to get it working, and then we’ll talk through it. I’m going to assume that you have already followed all of the steps in Day 5 to get the sample code up and running. Replace the contents of index.html and client.js with these versions. Don’t forget: on Line 18, replace the placeholder text with the full URL of your Azure Function created in Day 3, including the code parameter. Also, note there are additional import statements in this code, so if you’re adding to an earlier sample, be sure to include them:
index.html
client.js
Testing it out
Make sure both index.html and client.js files are saved, then use this command-line command to build and run your application.
npx webpack-dev-server --entry ./client.js --output bundle.js --debug --devtool inline-source-map
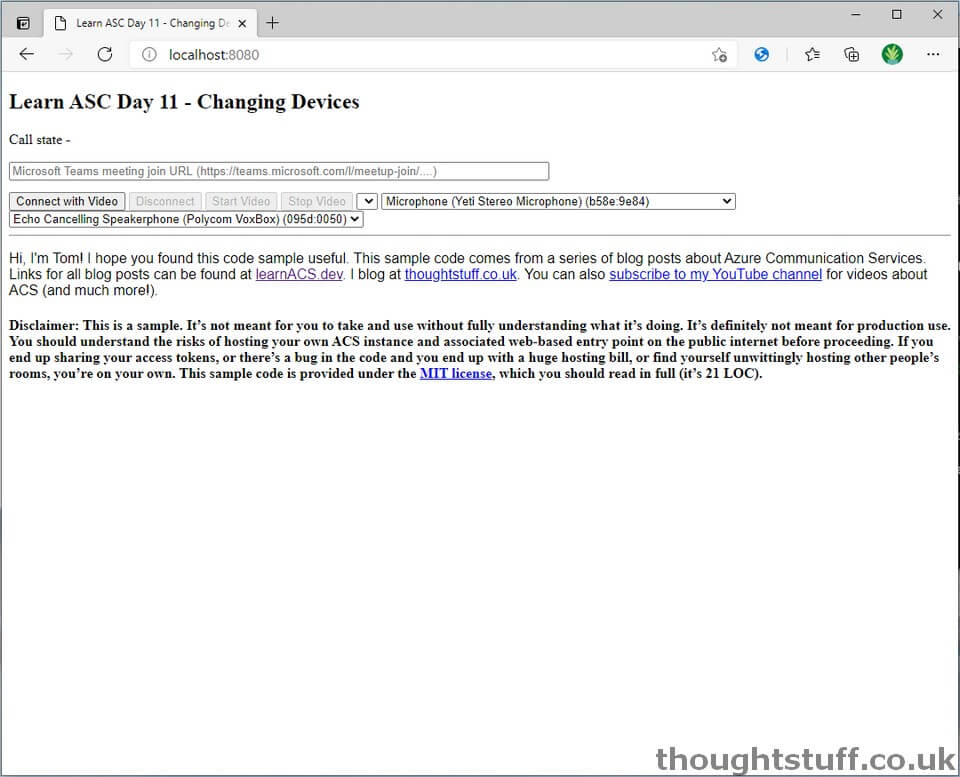
If there are any compile errors then youâll see them in the command line, otherwise, open a web browser to localhost:8080 and you should see your calling page with new dropdowns for video and audio devices, and with the “Connect with video” button enabled after a short time:
Changing the video/audio devices can be done before or during the call. The LocalVideoStream is actually updated even when you’re not on a call, it’s just that this code only shows the local feed once the call is connected. However, there’s no reason you couldn’t show it before, to allow users to see the video they will be sending once the call is connected.
The sample code joins you to a Teams meeting, and once you’ve done that then you can try changing each of the device types to see the effect. You’ll notice that (compared to some other WebRTC solutions) device changing is quick and smooth with Azure Communication Services.
What’s the code doing?
- The init function (starting Line 27 of client.js) is what populates the drop-downs on the first load. It does this by using methods from DeviceManager.
- Setting devices is slightly different for audio and video. For audio, the change is made directly on the DeviceManager, using the selectMicrophone and selectSpeaker methods. For video, it’s about setting up a LocalVideoStream and then changing that if the video device changes. In the init, the first device in each list is selected using both of these approaches.
- Lines 52-76 populate the dropdowns with the device names and IDs from DeviceManager. There are definitely nicer ways to do this in React but I’m trying to keep the code as simplistic as possible and not introduce anything which can’t be understood by someone who isn’t familiar with React.
- When the user changes a value in the drop down, for audio it’s just a case of calling those same methods again (lines 127,132). For video there is a specific method switchSource which is called on the LocalVideoStream. This means that you don’t need to stop and start the video feed in order to change devices, and the result switch is very quick and not jerky.
Today, we took our existing ACS code and added the ability for user to choose their own devices. Tomorrow we’re going to look at sharing screen content. Links for all blog posts can be found at learnACS.dev. You can also subscribe to my YouTube channel for videos about ACS (and much more!).
Related posts:
 Learn Azure Communication Services Day 8 – Microsoft Teams Meeting Interop
Learn Azure Communication Services Day 5 – Making a peer-to-peer VoIP WebRTC call
Learn Azure Communication Services Day 10 – Showing and Hiding Video
Learn Azure Communication Services Day 1 – What is Azure Communication Services (ACS), an Introduction
Learn Azure Communication Services Day 3 – Letâs Code! Creating a back-end Token Issuing Function in Azure Functions
Learn Azure Communication Services Day 8 – Microsoft Teams Meeting Interop
Learn Azure Communication Services Day 5 – Making a peer-to-peer VoIP WebRTC call
Learn Azure Communication Services Day 10 – Showing and Hiding Video
Learn Azure Communication Services Day 1 – What is Azure Communication Services (ACS), an Introduction
Learn Azure Communication Services Day 3 – Letâs Code! Creating a back-end Token Issuing Function in Azure Functions
Hello Tom,
Thanks for the posting this series.
I have been trying different features of the ACS Javascript SDK. I liked the abstraction which makes common use cases simpler.
However, I’m unable to add participants to a group call in ‘listen-only’ mode. Ideally, the browser shouldn’t ask such participants for microphone permission. But I can’t prevent that from happening.
The audioOptions member of the JoinCallOptions interface only supports a ‘muted’ flag. Also, I can’t just set audioOptions to null, unlike videoOptions.
Is this not possible in ACS at all? Or is there another way that I’m missing?