

As part of the Office365 Summit series, weâre finding out lots of really useful information about the upcoming Skype for Business release, the replacement to Microsoft Lync.
Courtesy of a webinar on In-Place Upgrade Deep Dive, we now know what the upgrade process from Lync Server 2013 to Skype for Business Server 2015 looks like.
For the first time ever, in-place upgrade is supported, meaning that instead of having to create a new Skype for Business pool and migrating over existing users, you can simply upgrade the existing 2013 pool (with a short amount of downtime). You can debate the practicalities of this in production versus swing upgrades, but for Lync developers and testers, managing different environments, where uptime isn’t an issue, this will represent huge savings, both in time and in hardware costs – as new servers for the new pools won’t be needed.
Upgrading Lync 2013 to Skype for Business 2015 is going to be a 5 step process:
Step 1 – Install Prerequisites
Before you start, you need to:
- Install CU5 + latest hotfixes to your Lync 2013 topology. This is required!
- Make sure you are using PowerShell version 6.2.9200.0 or later
- Make sure you have SQL Server 2012 SP1 or later installed.
- You also need to install the following security hotfix (pick for your OS):
The installer will let you know if any of these prerequisites aren’t present.
Step 2 – Upgrade & Publish Topology and Databases using Topology Builder
You should run the installer on a new/clean server, one that doesn’t have any specific Lync roles. Install the Skype for Business admin tools, and run Topology Builder. Right-click the 2013 pool and select “Upgrade to Skype for Business Server 2015“:
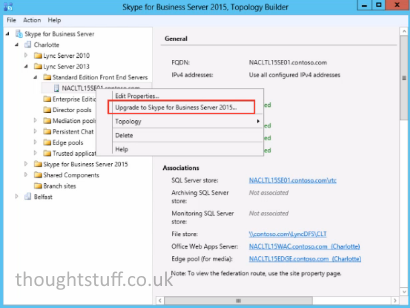
When the topology is published, the databases will also be automatically updated.
Step 3 – Stop Services
You should now stop Lync services on all servers in the pool, using Stop-CsWindowsService.
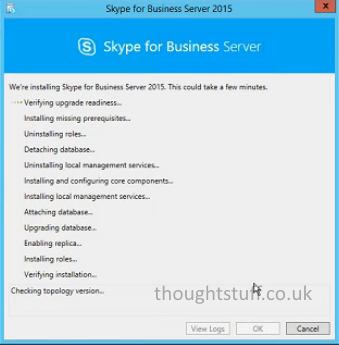
Step 4 – Run setup.exe on each server
For each server in the pool, you should now run setup.exe from your install media, or via command line using setup.exe /inplaceupgrade
 Skype for Business 2015 now has the option to grab the very latest updates and hotfixes and slip-stream them into the upgrade process.
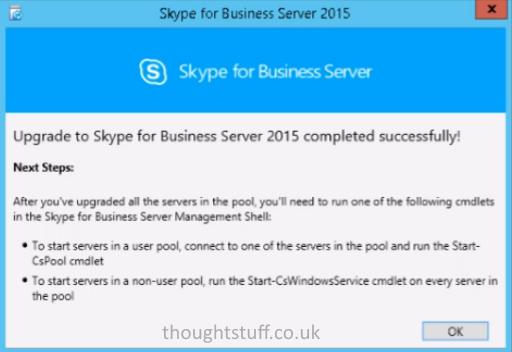
Step 5 – Start Everything in the pool with one, awesome new command
You now have two options. You can either go to every server in the pool and run Start-CsWindowsService to start the services on that server.
Or, you can be awesome and run Start-CsPool. This will automatically start all the services, on all the servers, in your pool.

Well, I think it’s pretty cool anyway.
Summary
As I said earlier, a possibly unintended benefit of simplifying the Skype for Business upgrade process is that it’s going to much easier for those of us that don’t install Lync everyday to set up new environments, and upgrade the ones we have. Anything that means developers and QA engineers get to spend less time on environments is a win in my book!


WoW!
How Can i get Lync for Business Package?
It’s due to be released in the first half of this year.
-tom
Hey,
this blog article was a huge help !
Cheers,
Andre
Hello,
Nice article. Little confused about the upgrade order for a pure Lync 2013 ennvironment with 2 pools in two different sites. Both of these pools are paired for DR. Upgrade order says to do all the front end pools first, but then it also says to do CMS pool last. So, does that mean upgrade the front end pools hosting the CMS last ? Can you please clarify ? Thank you.