


Building a QnAMaker Bot in UCMA for Skype for Business On-Premise Environments
I recently wrote a series of blog posts about building an FAQ bot by combining the AI of QnAMaker with the bot capabilities of the Azure Web App Bot.
Whilst this is definitely the option which gives you the most channels you can offer your bot through, including Skype for Business Online, you can’t do this if you’re environment is completely on-premise. In the on-premise only model, the only thing you can really use to build a bot is UCMA.
Here’s how you can take the AI capabilities of QnAMaker and consume it in UCMA to build an on-premise bot that can answer questions!
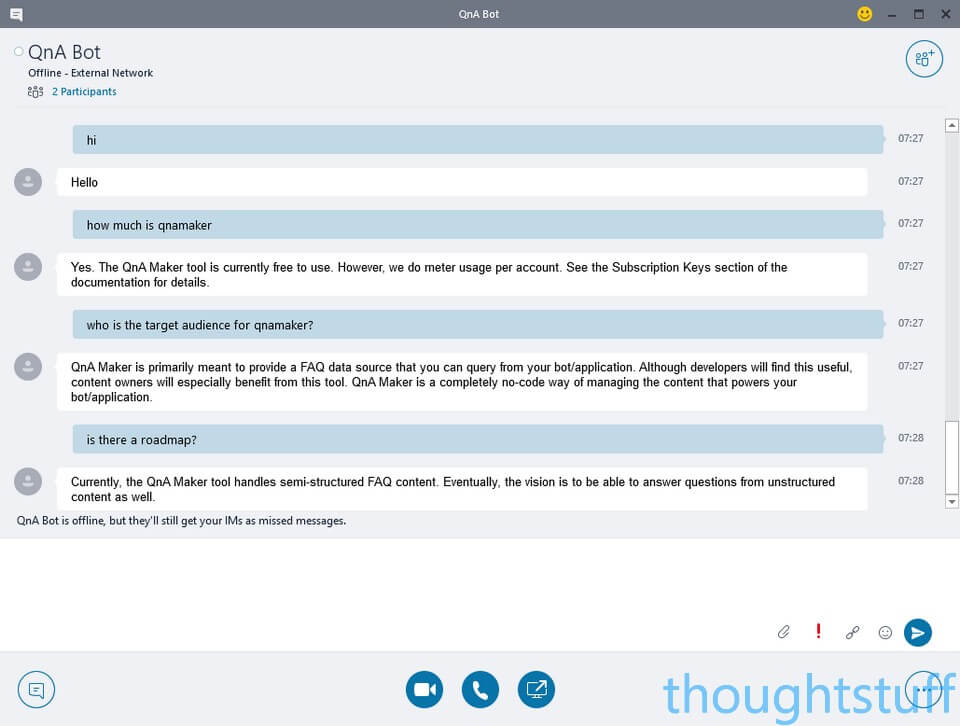
Look: QnAMaker answers presented in Skype for Business on-premise!
Code on GitHub! All the code in this blog post is taken from the working sample code which is on GitHub. All my code samples are listed at thoughtstuff.co.uk/code
At a high-level, this works because QnAMaker exposes an HTTP endpoint which we can call with user questions, and which will return JSON containing the answer. If you want more information about this and how to set it up, read Building an FAQ Bot using Azure and QnAMaker without writing any code: Part 1. We need to accept incoming IMs, take the text of the IM and submit it to QnAMaker, take the answer and read the JSON to extract the text of the answer, and then return the answer to the user in an IM response.
Project Structure
The project is a Command Line application. It’s sample code so I wanted to keep it as simple as possible. You could easily make this into a Windows Service if you wanted to.
Aside from the program.cs file which is really just initiation and error handling, there are two other code files: LyncServer.cs and QnAConversation.cs. I’ve deliberately split the code into two parts, one covering the Skype for Business parts and one covering the QnAMaker parts.
LyncServer.cs
In the Start method, this is where we create a new CollaborationPlatform. Before we start it, we register for new endpoints being discovered. When our program runs and registers with Skype for Business, this event will notify us of any endpoints which are associated with this application. This code sample assumes that the application only has a single endpoint.
When that code does get called, before establishing the endpoint, we call RegisterForIncomingCall and pass the InstantMessagingCall modality. This means that we’ll get notified of any new IM conversations sent to our bot, but not other modalities, such as Audio or Desktop Sharing.
Finally, this class raises an event for any new incoming Instant Messaging call. Code in Program.cs listens for this and passes the call to a new QnAConversation instance.
To make the code cleaner, I’m making use of the excellent UCMA Task Extensions by Michael Greenlee.
QnAConversation.cs
This class is going to accept the incoming call, process it and then return a response. It gets passed the incoming call from the LyncServer class. At this point, the incoming call is just that, incoming. It’s essentially still ‘ringing’ and hasn’t been answered yet. (in another scenario we might choose to selectively decline calls).
As soon as we accept the call, UCMA will set up the Instant Message Flow for us. However, if we want to interact with it (for instance to read and write IMs) – which we do – then we need to subscribe to an event so that we know when that happens. That event is InstantMessagingFlowConfigurationRequested.
When that event fires it contains as one of its arguments the Flow object. However, the Flow then goes through a setup process, so we need to subscribe to another event to make sure we work with it only when it’s active. At this point, we also subscribe to the MessageReceived event of the Flow. The first message in an IM conversation is actually accessible within the incoming Call object, but subsequent messages will arrive via this event so subscribing to it means that our bot will able to respond to all messages it receives, not just the first in the conversation.
In both cases (once the new Flow is setup, or on subsequent messages) the same method is called, ProcessMessage:
private void ProcessMessage(string message)
{
if (AreKeysMissing())
{
_flow.SendInstantMessageAsync(“Please set QnAKnowledgebaseId and QnASubscriptionKey in App Settings. Get them at https://qnamaker.ai” );
return;
}
var response = GetAnswerFromQnAMaker(message);
_flow.SendInstantMessageAsync(response);
}
There’s an initial check to make sure that the QnAKnowledgebaseId and QnASubscriptionKey keys are set in App Settings. [if you don’t know what these are, point 3 of How to: Create QnA Maker Bots in Azure tells you where to get them from.]
Then, there’s a call to GetAnswerFromQnAMaker, which takes the user’s question text as a parameter and returns the answer. Finally, the answer is sent back to the user by calling SendInstantMessage on the Flow object.
That’s all the UCMA-specific code and covers the Skype for Business setup and communication code.
GetAnswerFromQnAMaker
This is the method that does the QnAMaker-specific work, although really it’s just making a HTTP request and formatting the response. I’ve split that process into two: calling the API, and then parsing the result. Both the methods are nothing special, and certainly not specific to Skype for Business or QnAMaker:
private string CallAPI(string input)
{
string url = string.Format(“https://westus.api.cognitive.microsoft.com/qnamaker/v2.0/knowledgebases/{0}/generateAnswer”, ConfigurationManager.AppSettings[“QnAKnowledgebaseId”]);
WebRequest request = WebRequest.Create(url);
request.Method = “POST”;
request.Headers.Add(“Ocp-Apim-Subscription-Key”, ConfigurationManager.AppSettings[“QnASubscriptionKey”]);
using (var streamWriter = new StreamWriter(request.GetRequestStream()))
{
string json = “{\”question\”:\”” + input + “\”}”;
streamWriter.Write(json);
streamWriter.Flush();
streamWriter.Close();
}
var response = (HttpWebResponse)request.GetResponse();
using (var streamReader = new StreamReader(response.GetResponseStream()))
{
var result = streamReader.ReadToEnd();
return result;
}
}
public string ExtractAnswer(string response)
{
JToken token = JObject.Parse(response);
var answers = token.SelectTokens(“answers”);
return answers.First().First.SelectToken(“answer”).ToString();
}
The actual structure of the JSON that gets returned looks like this:
{
    "answers": [
        {
            "answer": "Yes. The QnA Maker tool is currently free to use. However, we do meter usage per account. See the Subscription Keys section of the documentation for details.",
            "questions": [
                "Is the QnA Maker Service free?"
            ],
            "score": 98.002270337206127
        }
    ]
}
Putting it all together
Once everything is written and compiled then all that’s needed is to register the application and endpoint with Skype for Business, and running the application. If you don’t know what’s involved in that process, read Walkthrough: Creating a UCMA Application & Application Endpoint.
All being well, your endpoint will be searchable in the contact list, and you should then be able to interact with it using the Skype for Business client:
Conclusion
You can, relatively easily, start to embed cutting-edge AI technology into your Skype for Business UCMA applications, even if those are run in an on-premise environment.
All this code is available to you in GitHub. It’s sample code, so it’s not production-ready but hopefully should be a useful resource for training and education.
Related posts:
 An important UCMA Application restriction to be aware of – Hybrid Lync Environments
 Building an FAQ Bot using Azure and QnAMaker without writing any code: Part 1
Building a Speech Transcription and Translation Bot in Skype for Business using UCMA and Microsoft Translator API
Building an FAQ Bot using Azure and QnAMaker without writing any code: Part 1
Building a Speech Transcription and Translation Bot in Skype for Business using UCMA and Microsoft Translator API
 SkypeDevQ: Using Skype Web SDK with on-premise Skype for Business
 Microsoft just showed off a new management, reporting, analytics tool for cloud & hybrid Skype for Business environments