Pages Menu
TwitterRssFacebook

Posted by on Mar 13, 2021 in Azure Communication Services, Development

Learn Azure Communication Services Day 12 – Showing Screen Share Content

Learn Azure Communication Services Day 12 – Showing Screen Share Content

This blog post is part of a series called “Learn ACS“, all about Microsoft Azure Communication Services. The series covers a high-level overview of capabilities and considerations, then dives into the development detail of using ACS in your application. Find the rest of the posts in the series at learnACS.dev.

I don’t make any apologies for the fact that today’s sample is really straightforward! It’s straightforward thanks to the abstraction that Azure Communication Services gives you when performing complex tasks like screen sharing in WebRTC. Previously this would have required plenty of work and maybe also a plugin to work properly. Now it’s all built into the browser and you can add it to your solution with just a single line of code!

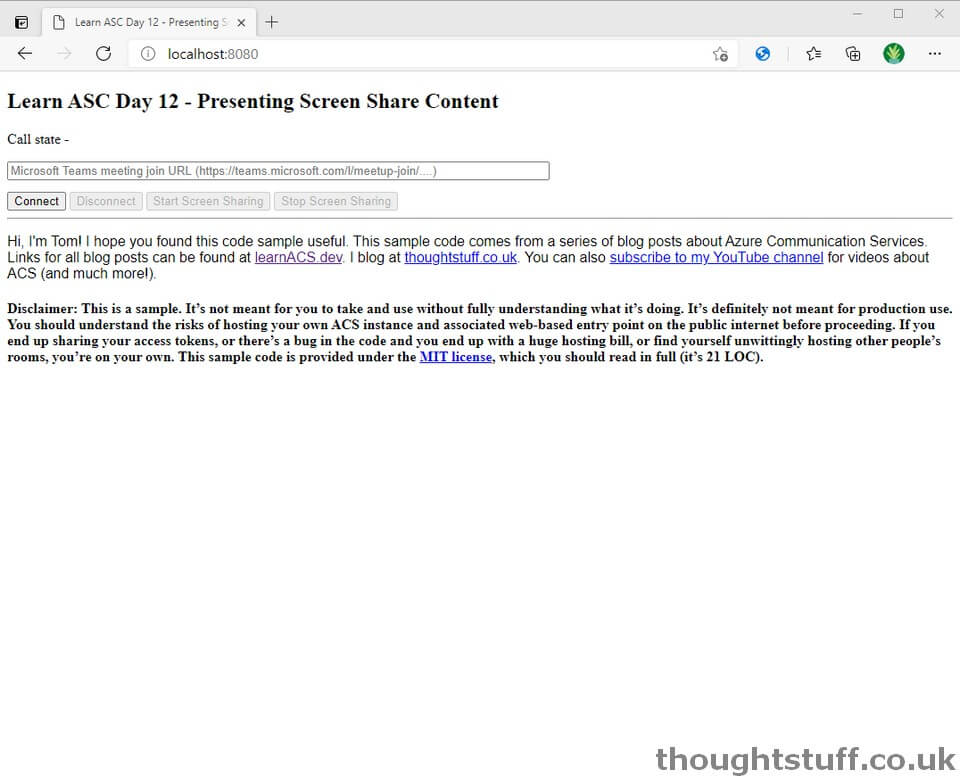
I’ve taken the Day 8 sample for joining a Teams meeting and added two buttons to it. Each of those buttons has a single line of code associated with the click handler. And, just like that, screen sharing is enabled!

Here’s the code: don’t forget, on Line 18, replace the placeholder text with the full URL of your Azure Function created in Day 3, including the code parameter:

index.html

<!DOCTYPE html>
<html>
<head>
<title>Learn ASC Day 12 - Presenting Screen Share Content</title>
</head>
<body>
<h2>Learn ASC Day 12 - Presenting Screen Share Content</h2>
<p>Call state <span style="font-weight: bold" id="call-state">-</span></p>
<input id="destination-group-input" type="text" placeholder="Microsoft Teams meeting join URL (https://teams.microsoft.com/l/meetup-join/....)"
style="margin-bottom:1em; width: 600px;" />
<div>
<button id="connect-button" type="button" disabled="false">
Connect
</button>
<button id="disconnect-button" type="button" disabled="true">
Disconnect
</button>
<button id="shareScreenStart-button" type="button" disabled="true">Start Screen Sharing</button>
<button id="shareScreenStop-button" type="button" disabled="true">Stop Screen Sharing</button>
</div>
<hr/>
<p style="font-family: sans-serif">Hi, I'm Tom! I hope you found this code sample useful. This sample code comes from a series of blog posts about Azure Communication Services. Links for all blog posts can be found at <a href="https://learnacs.dev" target="_blank" rel="noopener">learnACS.dev</a>. I blog at <a href="https://blog.thoughtstuff.co.uk">thoughtstuff.co.uk</a>. You can also <a href="https://www.youtube.com/c/TomMorganTS?sub_confirmation=1" target="_blank" rel="noopener">subscribe to my YouTube channel</a> for videos about ACS (and much more!). </p>
<h4>Disclaimer: This is a sample. It’s not meant for you to take and use without fully understanding what it’s doing. It’s definitely not meant for production use. You should understand the risks of hosting your own ACS instance and associated web-based entry point on the public internet before proceeding. If you end up sharing your access tokens, or there’s a bug in the code and you end up with a huge hosting bill, or find yourself unwittingly hosting other people’s rooms, you’re on your own. This sample code is provided under the <a href="https://opensource.org/licenses/MIT">MIT license</a>, which you should read in full (it’s 21 LOC).</h4>
<script src="./bundle.js"></script>
</body>
</html>

client.js

import { CallClient, CallAgent } from "@azure/communication-calling";
import { AzureCommunicationTokenCredential } from '@azure/communication-common';
const connectButton = document.getElementById('connect-button');
const disconnectButton = document.getElementById('disconnect-button');
const callStateElement = document.getElementById('call-state');
const destinationGroupElement = document.getElementById('destination-group-input');
const screenShareStartButton = document.getElementById('shareScreenStart-button');
const screenShareStopButton = document.getElementById('shareScreenStop-button');
let call;
let callAgent;
let callClient;
async function init() {
callClient = new CallClient();
//get an access token to use
const response = await fetch('YOUR ACS TOKEN ISSUING WEB FUNCTION URL HERE (WITH THE CODE). SEE DAY 3');
const responseJson = await response.json();
const token = responseJson.value.item2.token;
const tokenCredential = new AzureCommunicationTokenCredential(token);
callAgent = await callClient.createCallAgent(tokenCredential);
connectButton.disabled = false;
}
init();
connectButton.addEventListener("click", () => {
const destinationToCall = { meetingLink: destinationGroupElement.value};
call = callAgent.join(destinationToCall);
call.on('stateChanged', () => {
callStateElement.innerText = call.state;
})
// toggle button states
disconnectButton.disabled = false;
connectButton.disabled = true;
screenShareStartButton.disabled = false;
screenShareStopButton.disabled = false;
});
disconnectButton.addEventListener("click", async () => {
await call.hangUp();
// toggle button states
disconnectButton.disabled = true;
connectButton.disabled = false;
callStateElement.innerText = '-';
});
screenShareStartButton.addEventListener("click", async () => {
await call.startScreenSharing();
});
screenShareStopButton.addEventListener("click", async () => {
await call.stopScreenSharing();
});

Testing it out

Similar to previous days, this one is relatively straightforward to test out. As before, use a command-line to run this command then browse to the sample application in your browser (usually http://localhost:8080):

npx webpack-dev-server --entry ./client.js --output bundle.js --debug --devtool inline-source-map

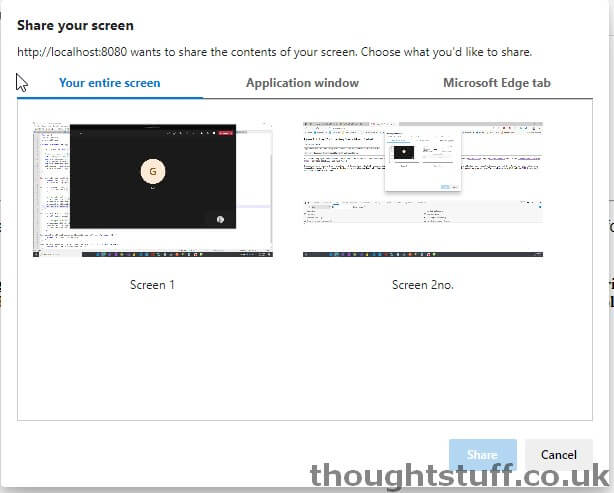
Join a Teams meeting with the Teams client, then take the meeting join URL and join via the sample code. Once there, click the start screensharing button. You will see that the browser will pop up an in-built sharing selection that lets the user choose what to share. You don’t have any control over what this looks like – it’s part of the browser:
That’s it. From the Teams client, you should now be able to see that the ACS user is sharing screen content.

What’s the code doing?

There’s almost no need for this section today. The important lines to be aware of are lines 54 and 58 – this where the two methods on the Call object are to start and stop screen sharing.


Today, we took our existing ACS code and really easily added the ability to add screen sharing. Tomorrow we’re going to look at managing the participant list. Links for all blog posts can be found at learnACS.dev. You can also subscribe to my YouTube channel for videos about ACS (and much more!).

Written by Tom Morgan

Tom is a Microsoft Teams Platform developer and Microsoft MVP who has been blogging for over a decade. Find out more.
Buy the book: Building and Developing Apps & Bots for Microsoft Teams. Now available to purchase online with free updates.

3 Comments

  1. Thanks for the post! If a user is sharing screen From the Teams client, how can it be seen by ACS user?

  2. First of all, thank you for your example, it’s very useful.
    Is share feature supported for mobile?

    Best
    Antonio

  3. First of all, thank you for your useful example.
    Is share feature supported for mobile?

    Best,
    Antonio

Post a Reply

Your email address will not be published. Required fields are marked *

This site uses Akismet to reduce spam. Learn how your comment data is processed.