


Learn Azure Communication Services Day 15 – Doing Chat in ACS
This blog post is part of a series called “Learn ACS“, all about Microsoft Azure Communication Services. The series covers a high-level overview of capabilities and considerations, then dives into the development detail of using ACS in your application. Find the rest of the posts in the series at learnACS.dev.
I’ve been posting daily for the last 15 days and so this will be the last daily post for a little while. I am definitely going to be adding to this series because there are so many areas of Azure Communication Services that I haven’t had a chance to write about yet, but… just not daily!
Today, we’re going to look at something different. We’ve spent a lot of time looking at the VoIP calling platform in ACS, but today I want to explore the chat platform a bit. Inside Azure Communication Services is a full platform for hosting text-based chat, either alongside calling or completely separatly. It also supports Teams Interop to meeting chat, but that’s a subject for another blog post.
The way chat works in ACS is slightly different from how calling works. With calling you could either call someone directly, or use an ID to start or join a group call. With chat, you first need to create a chat thread before you can join it. Further, only people you explicitly name as participants can join the chat, although once they’ve been added they can themselves add more people. This makes our sample code a little more involved because we need to cover creating a new chat thread, joining a thread and adding new people, if we want to have a demo that shows chat working.
Chat services are delivered via a different package so it’s necessary to install that before we do anything else. I’m going to assume you’ve copied one of the earlier samples – anything from Day 5 onwards will be fine.
The chat service code needs to know the URL of your Azure Communication Services endpoint. You can find this by going to the resource in Azure and copying the Endpoint value from the Overview page.
In addition to the other instructions for getting Day 5 up and running, add in this one to install the communication-chat module:
npm install @azure/communication-chat
Here’s the code: don’t forget, on Line 16 replace the placeholder text with your endpoint URL, and on Line 19, replace the placeholder text with the full URL of your Azure Function created in Day 3, including the code parameter:
index.html
| <!DOCTYPE html> | |
| <html> | |
| <head> | |
| <title>Learn ASC Day 15 - Doing Chat in ACS</title> | |
| </head> | |
| <body> | |
| <h2>Learn ASC Day 15 - Doing Chat in ACS</h2> | |
| <p>Your User ID <span style="font-weight: bold" id="userId">-</span></p> | |
| <input id="destination-group-input" type="text" placeholder="Chat Thread ID" | |
| style="margin-bottom:1em; width: 600px;" /> | |
| <div> | |
| <button id="connect-button" type="button" disabled="false"> | |
| Connect | |
| </button> | |
| <button id="disconnect-button" type="button" disabled="true"> | |
| Disconnect | |
| </button> | |
| <button id="createChatThread" type="button" disabled="true"> | |
| Create a Chat Thread | |
| </button> | |
| </div> | |
| <ul id="chat-container"> | |
| </ul> | |
| <br/> | |
| <input id="chat-input" type="text" placeholder="Type your message" /> | |
| <button id="chat-send" type="button" disabled="true">Send</button> | |
| <hr/> | |
| <input id="user-input" type="text" placeholder="User ID" /> | |
| <button id="user-add" type="button" disabled="true">Add User</button> | |
| <hr/> | |
| <p style="font-family: sans-serif">Hi, I'm Tom! I hope you found this code sample useful. This sample code comes from a series of blog posts about Azure Communication Services. Links for all blog posts can be found at <a href="https://learnacs.dev" target="_blank" rel="noopener">learnACS.dev</a>. I blog at <a href="https://blog.thoughtstuff.co.uk">thoughtstuff.co.uk</a>. You can also <a href="https://www.youtube.com/c/TomMorganTS?sub_confirmation=1" target="_blank" rel="noopener">subscribe to my YouTube channel</a> for videos about ACS (and much more!). </p> | |
| <h4>Disclaimer: This is a sample. It’s not meant for you to take and use without fully understanding what it’s doing. It’s definitely not meant for production use. You should understand the risks of hosting your own ACS instance and associated web-based entry point on the public internet before proceeding. If you end up sharing your access tokens, or there’s a bug in the code and you end up with a huge hosting bill, or find yourself unwittingly hosting other people’s rooms, you’re on your own. This sample code is provided under the <a href="https://opensource.org/licenses/MIT">MIT license</a>, which you should read in full (it’s 21 LOC).</h4> | |
| <script src="./bundle.js"></script> | |
| </body> | |
| </html> |
client.js
| import { ChatClient, ChatThreadClient, ChatParticipant, CreateChatThreadResult } from "@azure/communication-chat"; | |
| import { AzureCommunicationTokenCredential } from '@azure/communication-common'; | |
| const connectButton = document.getElementById('connect-button'); | |
| const disconnectButton = document.getElementById('disconnect-button'); | |
| const userIdElement = document.getElementById('userId'); | |
| const createChatThreadButton = document.getElementById('createChatThread'); | |
| const destinationGroupElement = document.getElementById('destination-group-input'); | |
| const chatContainer = document.getElementById('chat-container'); | |
| const chatInputElement = document.getElementById('chat-input'); | |
| const chatSendButton = document.getElementById('chat-send'); | |
| const userInputElement = document.getElementById('user-input'); | |
| const userAddButton = document.getElementById('user-add'); | |
| const acsEndpoint = "YOUR ACS ENDPOINT URL, FROM THE OVERVIEW PAGE IN AZURE"; | |
| let chatClient; | |
| let threadClient; | |
| let userIdentity; | |
| async function init() { | |
| //get an access token to use | |
| const response = await fetch('YOUR ACS TOKEN ISSUING WEB FUNCTION URL HERE (WITH THE CODE). SEE DAY 3'); | |
| const responseJson = await response.json(); | |
| const token = responseJson.value.item2.token; | |
| userIdentity = responseJson.value.item1.id; | |
| const tokenCredential = new AzureCommunicationTokenCredential(token); | |
| chatClient = new ChatClient(acsEndpoint, tokenCredential); | |
| connectButton.disabled = false; | |
| createChatThreadButton.disabled = false; | |
| userIdElement.innerText = userIdentity; | |
| } | |
| init(); | |
| connectButton.addEventListener("click", async () => { | |
| const chatThreadId = destinationGroupElement.value; | |
| threadClient = await chatClient.getChatThreadClient(chatThreadId); | |
| await chatClient.startRealtimeNotifications(); | |
| chatClient.on('chatMessageReceived', (message) => { | |
| var li = document.createElement("li"); | |
| li.appendChild(document.createTextNode(message.content)); | |
| chatContainer.appendChild(li); | |
| }) | |
| // toggle button states | |
| disconnectButton.disabled = false; | |
| connectButton.disabled = true; | |
| chatSendButton.disabled = false; | |
| userAddButton.disabled = false; | |
| }); | |
| disconnectButton.addEventListener("click", async () => { | |
| await call.hangUp(); | |
| // toggle button states | |
| disconnectButton.disabled = true; | |
| connectButton.disabled = false; | |
| }); | |
| chatSendButton.addEventListener("click", async () => { | |
| await threadClient.sendMessage({ content: chatInputElement.value }); | |
| chatInputElement.value = ""; | |
| }); | |
| createChatThreadButton.addEventListener("click", async () => { | |
| let createChatThreadResult = await chatClient.createChatThread({topic: "Day 15 Chat", participants: []}); | |
| let threadId = createChatThreadResult.chatThread.id; | |
| alert("New thread created. ID is: " + threadId); | |
| destinationGroupElement.value = threadId; | |
| }); | |
| userAddButton.addEventListener("click", async () => { | |
| threadClient.addParticipants({participants: [{id: {communicationUserId:userInputElement.value}}]}); | |
| alert("User added"); | |
| }); |
Testing it out
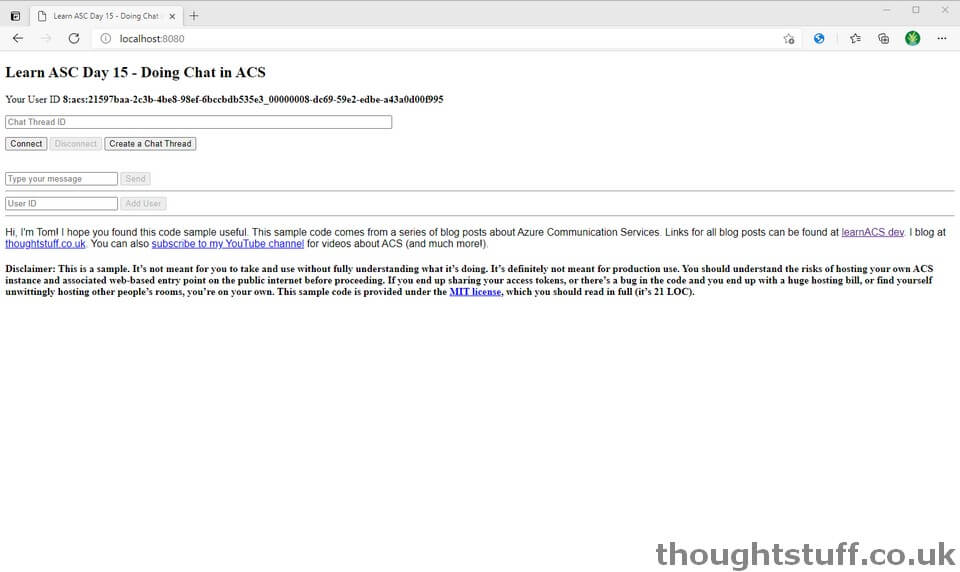
We need two browsers running to test this out, so once you’ve used a command-line to run this command, browse to the sample application in your browser (usually http://localhost:8080), and then open a second private browsing session to the same address:
npx webpack-dev-server --entry ./client.js --output bundle.js --debug --devtool inline-source-map
There’s a few things going on here, so here’s a walkthrough you can follow to try everything out, and then you can play around with it after that.
- Browser 1 – before we can do anything we need to create a new chat thread to chat in, so click the “Create a Chat Thread” button. You should get an alert with the new ID, which is also placed into the Thread ID box.
- Browser 1 – the new chat thread is created, but we haven’t connected to it yet. Click “Connect” to do this. Now we’re connected, but a chat of 1 is a lonely place.
- Browser 2 – we need to connect to the chat instance that was created in Browser 1, but before we’re allowed to do that we have to be added as a participant. So, copy the User ID from Browser 2 to your clipboard
- Browser 1 – Once you’ve connected to the chat thread, paste the User ID into the User ID box at the bottom and click “Add User”. This adds the user from Browser 2 to the chat thread.
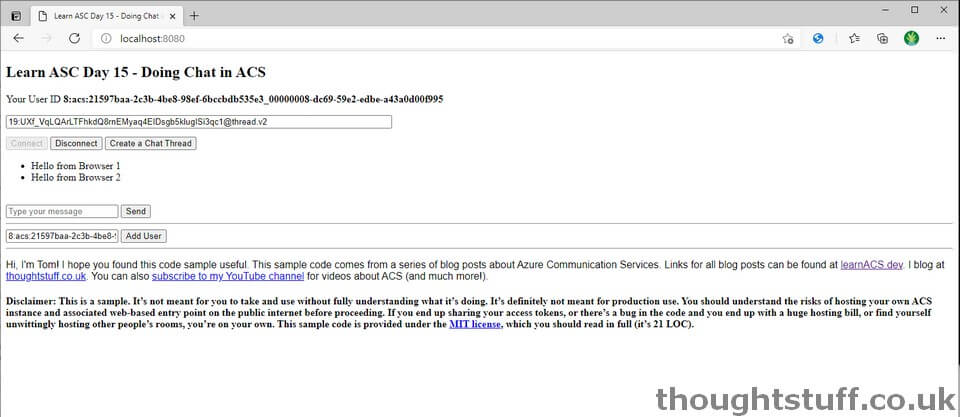
- Browser 2 – Copy the Chat Thread ID from out of the input box in Browser 1 and paste it into the “Chat Thread ID” box. Click Connect to join the chat thread created by Browser 1.
- Browsers 1 & 2 – now, both browsers should now be able to send messages using the “Type your message” and “Send” elements, and see the conversation show up in the browser.
- Party!
What’s the code doing?
- The chat client is created in the init() function on line 32. Unlike the calling client, it needs the ACS Endpoint.
- If you want to receive notifications about new messages in a chat thread you have to opt-in to them with the startRealtimeNotifications method. You have to do this before you subscribe to the chatMessageReceived event (even though that feels wrong to me!) (lines 44-52)
- A chat client can tell you about notifications to more than one chat thread. Setting up chat threads, adding participants and sending messages all happens on a ChatThreadClient (not the ChatClient).
- We set up a chat thread with no additional participants (line 79) but you could do so if you knew their IDs ahead of time. It’s not necessary to add yourself.
- There are a whole bunch of interesting methods we didn’t explore because this sample was already large enough. You can list all messages in a chat, delete messages, send and receive read receipts, send typing notifications and more. If you’re interested, have a look at the ChatThreadClient Class Definition.
Today, we explored using the chat platform to send and receive chat messages in two different browsers. Links for all blog posts can be found at learnACS.dev. You can also subscribe to my YouTube channel for videos about ACS (and much more!).
Written by Tom Morgan
 Tom is a Microsoft Teams Platform developer and Microsoft MVP who has been blogging for over a decade. Find out more.
Related posts:
 Learn Azure Communication Services Day 12 – Showing Screen Share Content
Learn Azure Communication Services Day 11 – Changing Audio & Video Devices
Learn Azure Communication Services Day 1 – What is Azure Communication Services (ACS), an Introduction
Learn Azure Communication Services Day 3 – Letâs Code! Creating a back-end Token Issuing Function in Azure Functions
Learn Azure Communication Services Day 9 – Muting and Unmuting
Learn Azure Communication Services Day 12 – Showing Screen Share Content
Learn Azure Communication Services Day 11 – Changing Audio & Video Devices
Learn Azure Communication Services Day 1 – What is Azure Communication Services (ACS), an Introduction
Learn Azure Communication Services Day 3 – Letâs Code! Creating a back-end Token Issuing Function in Azure Functions
Learn Azure Communication Services Day 9 – Muting and Unmuting
In real life example two users won’t be sending each other their threadID how that will be worked out? because I am not going to send my partner my thread ID to chat with him. This portion is not clear to me. Could you please help me out on this? How this will work in real life scenario?