


How to: build a COVID-19 Employee Reporting Solution using Microsoft’s Power Platform
Recently, as part of a presentation for my employer Modality, I demoed creating a COVID-19 reporting experience using Microsoft’s Power Platform. You can watch the full presentation for free, which includes an introduction to the Power Platform as well.
I’ve taken the demo part of that presentation and put it into its own video, which you can watch here:
Here are the steps to follow if you want to build something similar.
Use Power Automate to upload images from mobile to SharePoint
We’re going to use a standard SharePoint Document Library to store uploaded images. This will form the file store for the whole solution.
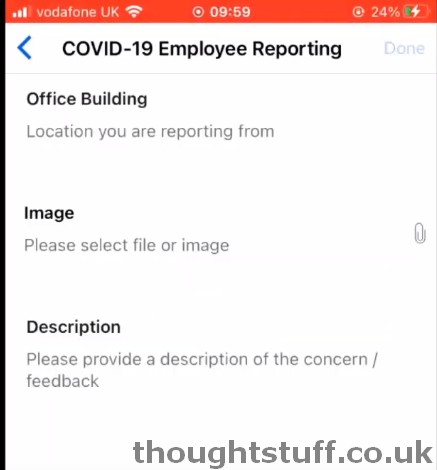
Add some custom columns to represent things you want users to report: such as Location, Description etc.
Navigate to the Power Automate dashboard, select “Create” and then choose “Instant Cloud Flow”:

Choose “Manually trigger a flow”:

Click open the “Manually trigger a flow” block, then add inputs: as many as you need for the additional columns you’ve created in the Document Library. Finally, add a “File” input for the image:

Add a new Step. Find the SharePoint connector and add the “Create file” action. Provide the correct Site Address and Folder Path, choose a unique value for the File Name (such as timestamp) (and don’t forget to add .jpg to the end), and then choose “Image” as the File Content value:

Add another step, this time find the action “Get file properties” and provide the ItemID from the “Create File” step. This will get the properties of the file that has just been added to SharePoint, including all the custom columns (which will currently be empty, but we’re about to update them):

Add a third step, this time find the action “Update file properties”. Use the same ID as before, but this time fill in the additional columns using the information in the first box:

Save the flow, and then test it using the Power Automate mobile application:
Power Apps
From the Power Apps dashboard, select New App, and choose Canvas:

Choose “SharePoint”, then provide the site name and Document Library name. Click Connect. A template application will be built for you:

In the video I change the data value of some fields, and delete some un-needed fields.
To add a new item, go to “DetailScreen1”, which is the detail view. Add a new label. In the properties for the label, set the Advanced>Text value to “BrowseGallary1.Selected.[field_name]”. Use the built-in Intellisense to give you a list of available fields.

Use the Play button (top right) to test out the app.
Add a new button to the Detail screen. With the button selected, choose Action > Power Automate from the top-menu. Choose an existing Power Automate flow, or create a new one.
When creating a Power Automate flow to use with Power Apps, choosing to create one from Power Apps will pre-load it with the important “PowerApps” action as the first step:

You need this if you want to pass information from your Power App to Power Automate. In your flow, every time you need information from Power Apps, choose the “Ask in Power Apps” action:

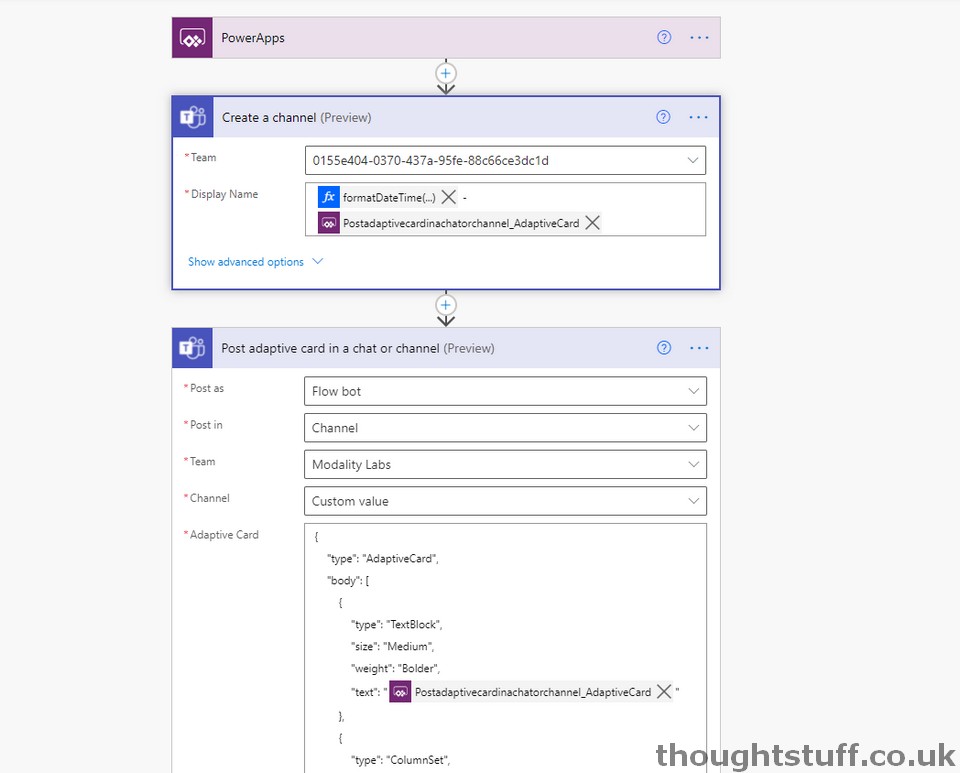
What you do in the Flow is entirely up to you. I decided to create a new channel and then post a message to that channel, using the actions from the Microsoft Teams connector:
Then, once you’ve saved your flow, back in Power Automate you then pass those values as parameters. You’ll notice in Power Apps that when you choose a Flow, it adds the action to the function bar at the top, but with an empty set of parameters, and lots of red underlining:
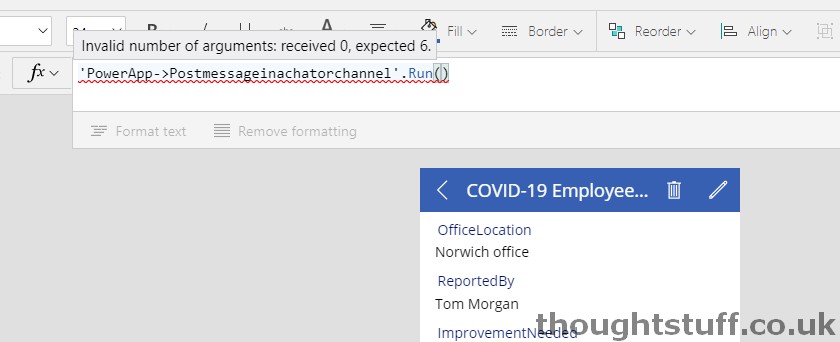
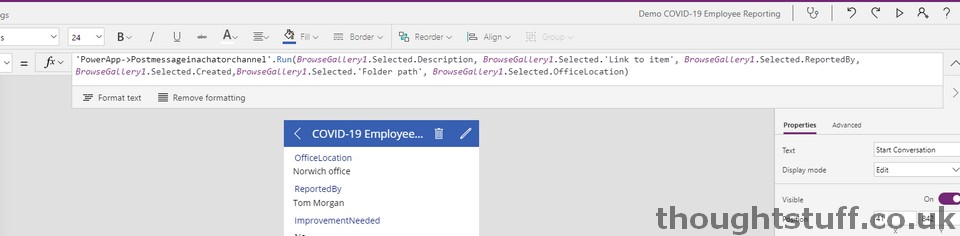
Your job then is to fill in those values, in the same order that you requested them in Flow, so your function will end up looking something like this:
At this point, you can then use the Play button again to test your application. Clicking the button should execute the Flow, which you can check and troubleshoot in Power Automate using their History and reply functions.
At this point you could publish the Power App, or even add it to Microsoft Teams as a tab.
Related posts:
 I’m Speaking about Power Apps and the Microsoft Power Platform on 27 April online
 Walkthrough: how to create an application built on Project Oakdale
 Reporting Services: Achieving Text Flow with Columns
 SharePoint 2010 Workflows are going away this year – here’s what you need to know
 Join me for: Microsoft Teams Webinar – Microsoft Power Platform and Microsoft Teams