Developing with Microsoft Teams: Creating Static Tabs
[contemplate-3]
In this post, we’ll look at creating static tabs, which are the more simple types of tabs you can create in Microsoft Teams
What are Static Tabs
If you’ve used Teams for more than a few hours, you’ll have noticed that Tabs are an important part of the Teams experience. With Tabs, users can access information from many different places. By default a new channel has a Conversations tab, a Files tab and a Wifi tab but new tabs can be added to show additional information. These can be for specific information (such as a OneNote notebook, an Excel file) or to a third-party system, of which there are many (Asana, Hootsuite, Trello etc.)
At their heart though, tabs are a surface for developers to expose content within Teams. Fundamentally, tabs are web pages which are framed nicely within the Teams client. Anyone who has previously done Skype for Business development and used Conversation Window Extensions (CWEs) will be familiar with this process. Except that, this time there’s no Silverlight!
There are two types of Tabs – Static Tabs and Configurable Tabs. Static Tabs are the easier of the two to setup and it’s these tabs we’re going to cover in this blog post.
Creating a Static Tab
To create a static tab, you need to have some web content that you want to expose within Teams. This content should be the same for all users. (if you need content that changes based on different users or changing circumstances, then you need a Configurable Tab. Â In this example I’m going to use my website thoughtstuff.co.uk, which is just a regular webpage which I haven’t altered in any way for this demo to work.
You need to create a manfiest.json file to represent your Static Tab. Start with the basic template described here, and then add the specific section for creating a static tab:
"staticTabs": [
{
"entityId": "pageid",
"name": "ThoughtStuff Blog",
"contentUrl": "https://blog.thoughtstuff.co.uk",
"websiteUrl": "https://blog.thoughtstuff.co.uk",
"scopes": [ "personal" ]
}
],
"validDomains": [
"*.thoughtstuff.co.uk"
]
(these two sections are added as top level sections in the manifest.json, for instance immediately after the accentColor section. Just add a comma and then paste these sections in before the final curly brace.)
Some of the attributes in this section are obvious, but some require some explanation:
- entityId – this is a unique identifier for your tab. For static tabs, it doesn’t serve any specific role.
- name – the name of your page as you want it to appear in Teams.
- contentUrl – this is the URL which is actually rendered and shown as the content of your tab.
- websiteUrl – this is the ‘breakout’ URL. In Teams, when your contentUrl is rendered, an icon is shown at the top of the page with a ‘go to website’ link. You can specify a different URL for this link, if you want to direct the user to an alternative experience or if you want to format information differently in Teams than on your normal pages.
- scopes – defines where in the Teams client your tab is shown. Right now the only support scope for Static Tabs is ‘personal’. You can add other scopes here but they won’t do anything.
You’ll notice from the sample above that there is another section alongside the staticTab section, which is the validDomains section. This is used by several different development implementations, but here it is used to white-list the domains you want to reference in either the contentUrl or websiteUrl. Make sure that every domain you are referencing are in this list. Separate domains using a comma. You can use wildcards for subdomains, as in the example above.
Be aware that all URLs must be HTTPS – if you use any URLs which start with http:// then they will be rejected when you load your application.
Once you’ve set these values, save your manifest.json file, zip it up with the two required image files, and sideload it into Teams.
Accessing a Static Tab
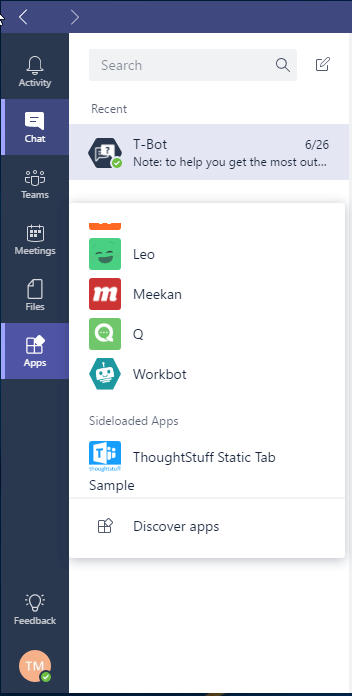
Once your application is in Teams, because it’s a tab with only personal scope, to view it you need to choose the Apps section from the left-hand menu. If you don’t see this, try enabling Developer Preview. Click the Apps icon and you’ll see your tab at the bottom, in a section titled “Sideloaded Apps”:
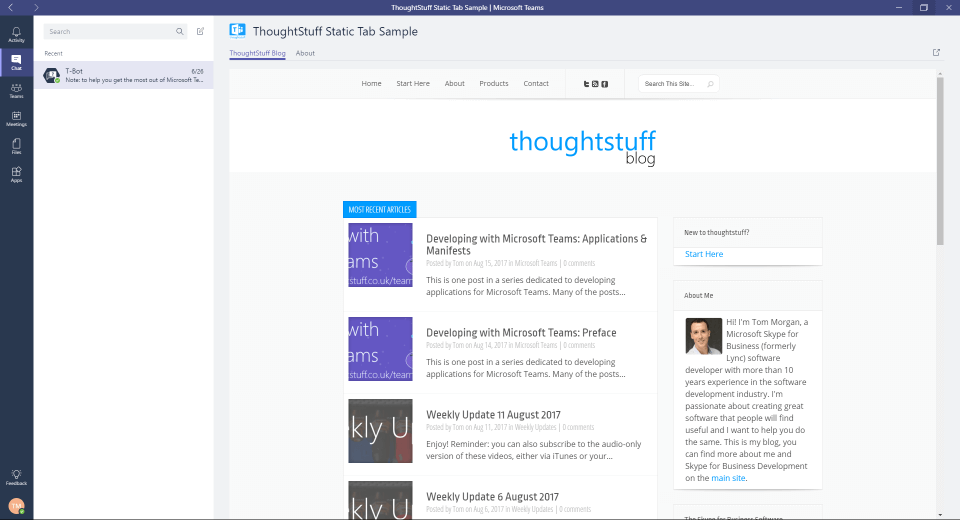
When you click the app you should see the rendered contentURL within Teams:
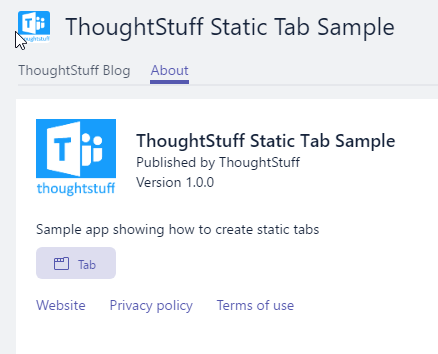
If you click the About tab then you’ll see some of the values from your manifest.json file, including the version number, links to your additional URLs and description:





Hi,
Nice post. I’ve followed the instructions and I see the tab appear but when I click on it, the website doesn’t load in the Teams frame.
If I click the globe icon (top right), the website loads fine in Chrome.
Is there something I’m doing wrong for this to work? I appreciate your post is 4 years old so things may have changed a lot since then!!
Thanks